I have been, or can be if you click on a link and make a purchase, compensated via a cash payment, gift, or something else of value for writing this post. As an Amazon Associate, I earn from qualifying purchases. Please read my full Affiliate Disclosure for more information.
Ever wondered how to give your room a fresh, personalized look without breaking the bank? Easy DIY room decor has become a huge trend because it combines creativity, affordability, and the thrill of making something with your own hands. Not only does it allow you to showcase your unique style, but it also transforms your space into a cozy, inviting haven that truly feels like your own.
Plus, DIY projects are perfect for adding that special touch of personality and flair that store-bought decor just can’t match. In this article, you’ll find a treasure trove of inspiration and practical ideas to elevate your living space effortlessly. From stylish wall hangings to clever upcycled pieces, each idea is designed to be simple, fun, and achievable—no expert skills needed! Whether you’re looking for quick updates or more creative projects, you’ll discover a variety of ways to refresh your room that will spark your imagination and turn your decor dreams into reality.
1. Stylish Macrame Wall Hangings for a Boho Vibe
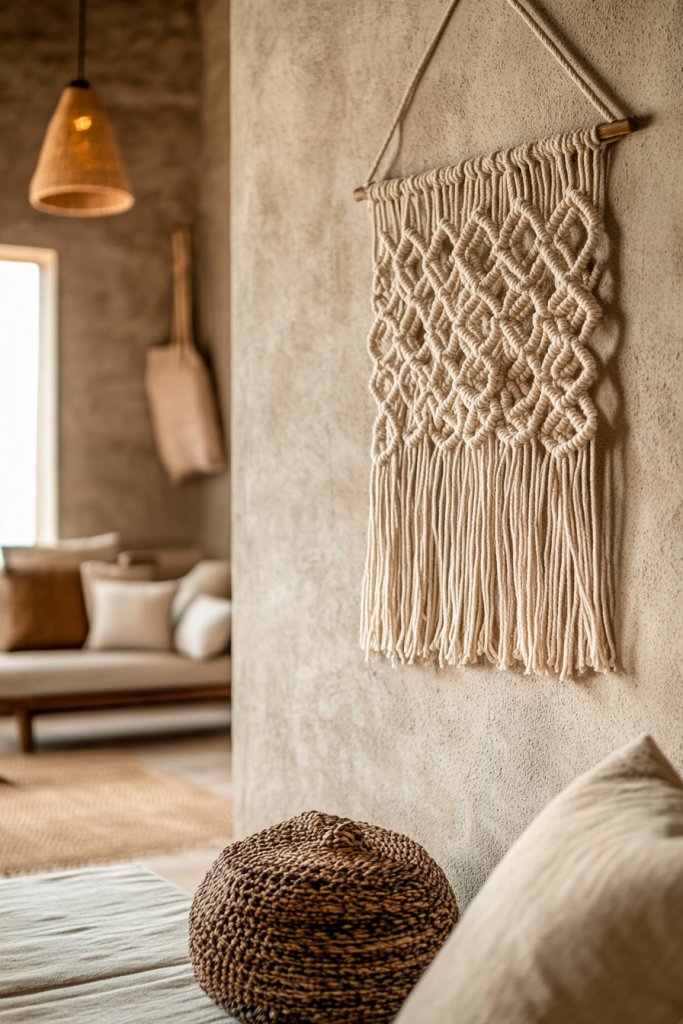
Transform your space instantly with the timeless charm of macrame wall hangings, adding a relaxed boho aesthetic that feels both cozy and artistic. These handcrafted textiles are perfect for creating a focal point on any blank wall, infusing warmth and texture into your room decor.
Imagine a large, intricate piece crafted from soft, natural cotton cords in warm beige or earthy terracotta tones. The design features delicate knots, tassels, and geometric patterns that drape gracefully from a wooden dowel or metal rod.
As light hits the textured surface, it casts subtle shadows, adding depth and visual interest. The tactile feel of the knotted fabric invites touch, while the gentle sway of the tassels creates a calming movement in the breeze or when you walk past.
The overall effect is a harmonious blend of rustic charm and modern simplicity, making your wall feel inviting and curated. Getting started is simple and budget-friendly.
You’ll need some cotton rope or cord (about 3-6mm thickness), a wooden dowel or metal rod, and scissors. Choose a pattern or design that fits your style—there are plenty of free tutorials online for beginner-friendly options.
Cut your cords to desired lengths, fold them in half, and knot them onto the dowel using basic macrame techniques like the square knot or lark’s head. Finish with tassels or decorative beads for a personalized touch. Hang your masterpiece on a nail or hook, and enjoy your handmade boho wall art!
2. Upcycled Mason Jar Candle Holders for Cozy Ambiance
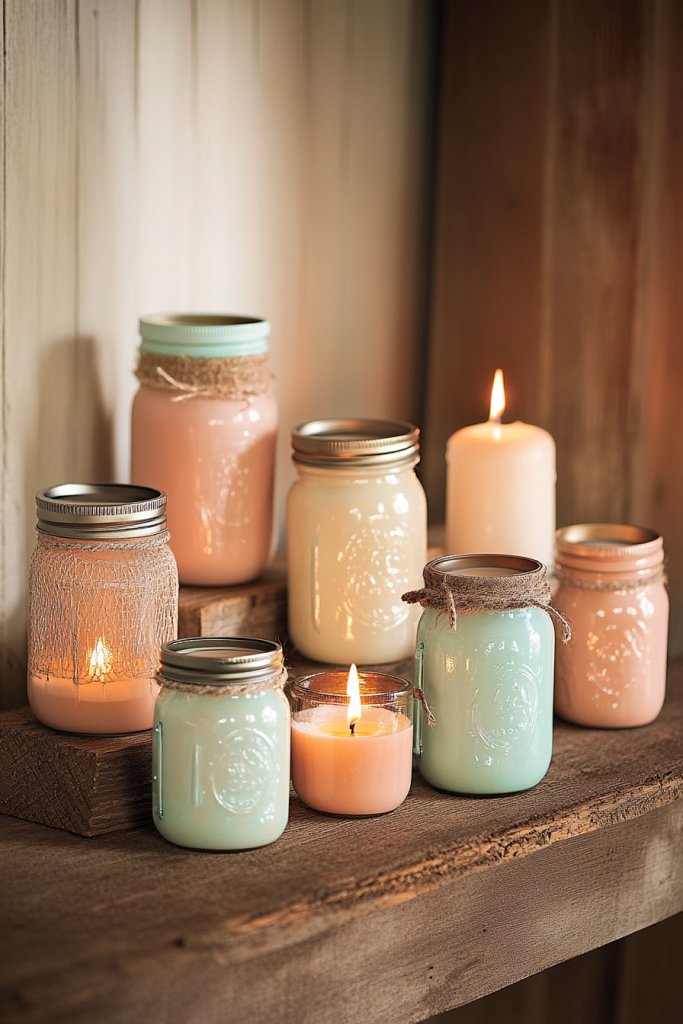
Create a warm, inviting glow in your room using charming upcycled Mason jar candle holders—an easy DIY project that combines sustainability with style. These versatile holders bring soft, flickering light perfect for relaxing evenings or intimate gatherings.
Visualize clear glass Mason jars, their surfaces cleaned and free of labels, now transformed into rustic candle holders. Inside, place tealight or small pillar candles—preferably unscented to keep the cozy atmosphere.
You can enhance the look by adding decorative elements like dried herbs, pebbles, or colored sand at the bottom for texture and color. Surrounding the jar with a twine or jute rope wrapped around its neck adds a rustic touch, while a small sprig of greenery or a dried flower tucked into the twine makes it even more charming.
When lit, the candle’s warm glow reflects softly through the glass, casting gentle patterns across your walls and surfaces, creating a tranquil ambiance reminiscent of a cozy cabin. To make your own, gather empty Mason jars, candles, and optional decorative items like twine, beads, or small stones.
Clean the jars thoroughly and dry them well. If desired, wrap the necks with jute twine or ribbon and secure with a knot or glue.
Add your chosen embellishments inside or outside for extra style. Place your finished candle holders on shelves, coffee tables, or window sills—arranged in clusters for a more dramatic effect—and light your candles to enjoy a soothing, homemade glow.
3. Faux Wallpaper Accent Walls Using Removable Decals
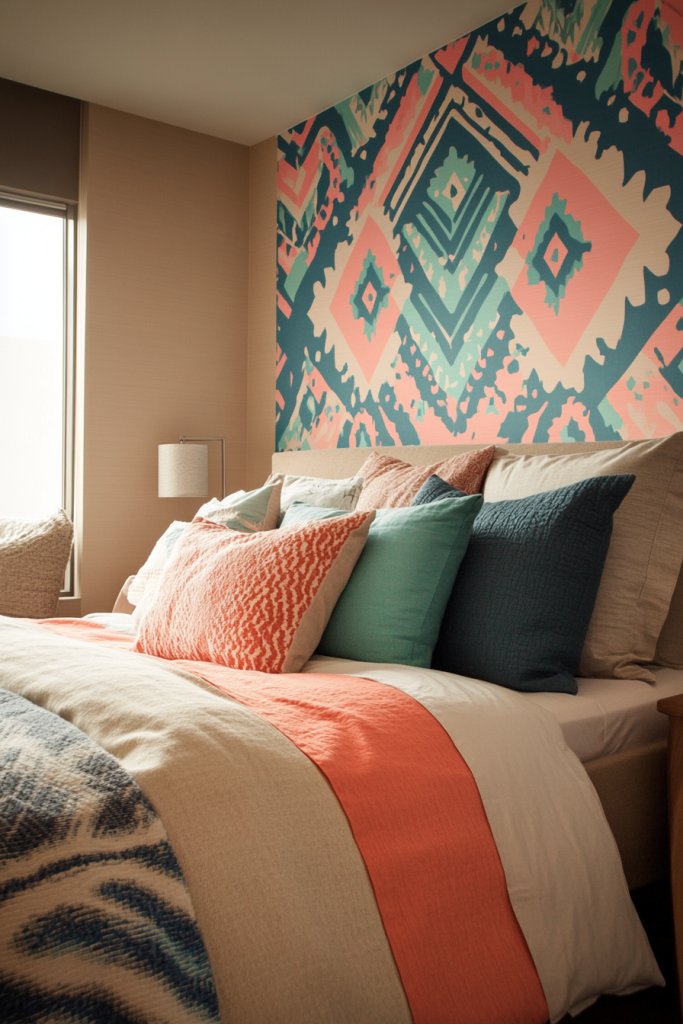
Easily add eye-catching style to your room with faux wallpaper created from removable decals, offering a quick and damage-free way to refresh your space. This idea is perfect for renters or anyone wanting a bold statement without the commitment.
Visualize a feature wall decorated with large, patterned decals in trendy geometric, botanical, or abstract designs. These decals are made from high-quality, adhesive-backed vinyl that sticks smoothly to walls and peels away cleanly when needed.
The patterns come in a variety of colors—think soft pastels, monochrome, or vibrant hues—allowing you to match your decor theme. The decals can be arranged to create a repeating pattern or a single large motif, transforming a plain wall into a focal point that adds depth and personality.
When lit by natural light or accent lamps, the textured decals cast subtle shadows, enhancing the visual interest and creating a dynamic backdrop. To achieve this look, purchase removable wall decals or stickers from a home decor store or online.
Clean your wall surface thoroughly to ensure adhesion, then carefully peel and stick the decals according to the pattern you want. Use a squeegee or credit card to smooth out air bubbles for a flawless finish.
Choose a color scheme that complements your room’s palette and consider layering with other decor elements like framed prints or shelves. This approach allows for a stylish, customizable accent wall that can be changed seasonally or whenever you craving a fresh look.
4. Creative Fabric Wall Art with Framed Textiles
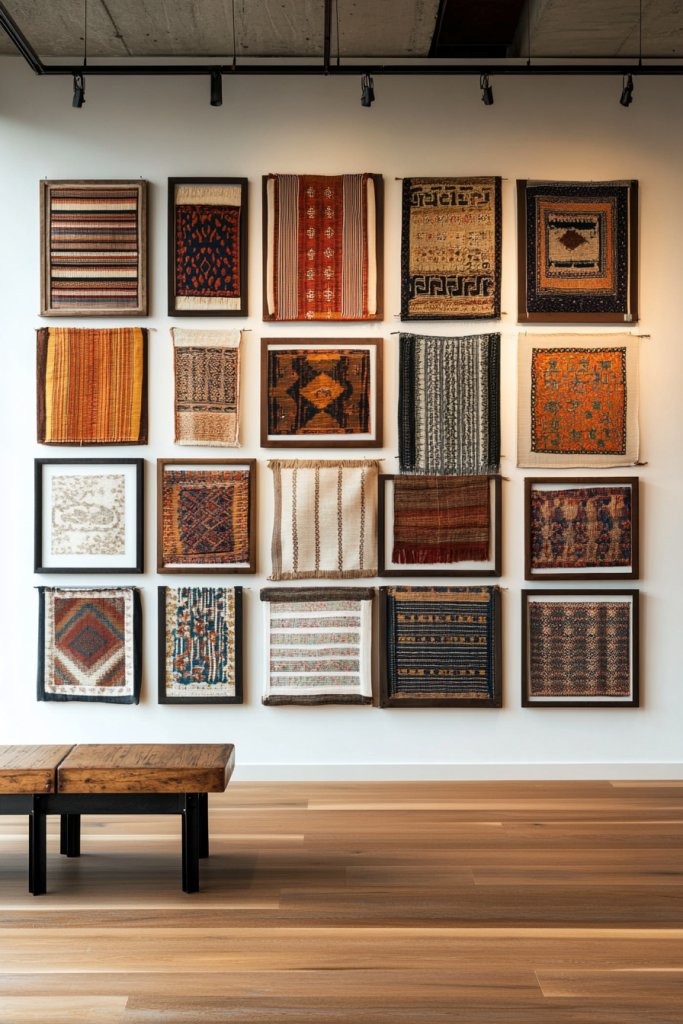
Add warmth and texture to your room with fabric wall art, turning everyday textiles into striking decorative pieces that express your personal style. This DIY project offers a unique way to incorporate color, pattern, and softness into your decor.
Envision a framed textile piece—perhaps a piece of embroidered fabric, a colorful woven scarf, or a piece of patterned quilt—carefully mounted inside a sleek or rustic frame. The fabric’s colors might range from vibrant jewel tones to muted neutrals, depending on your aesthetic, with textures like fringed edges, intricate embroidery, or woven patterns adding visual interest.
Hang these framed textiles in a gallery arrangement or as standalone focal points, filling your wall with tactile richness that invites both visual and sensory engagement. The soft material contrasts beautifully with harder surfaces, creating a cozy, inviting atmosphere that elevates your space.
To create your own, select a fabric or textile piece that resonates with your style—upcycled scarves, vintage tablecloths, or handwoven textiles work beautifully. Secure the fabric inside a frame using double-sided tape or a fabric mount, ensuring it is taut and smooth.
Opt for wooden, metal, or shadow-box frames depending on your decor vibe. Hang your fabric art with nails or hooks, arranging multiple pieces for a gallery effect or placing a singular statement piece. This simple project transforms textiles into art, adding personality and warmth to your room with minimal effort.
5. DIY Painted Terracotta Pots as Decorative Stands
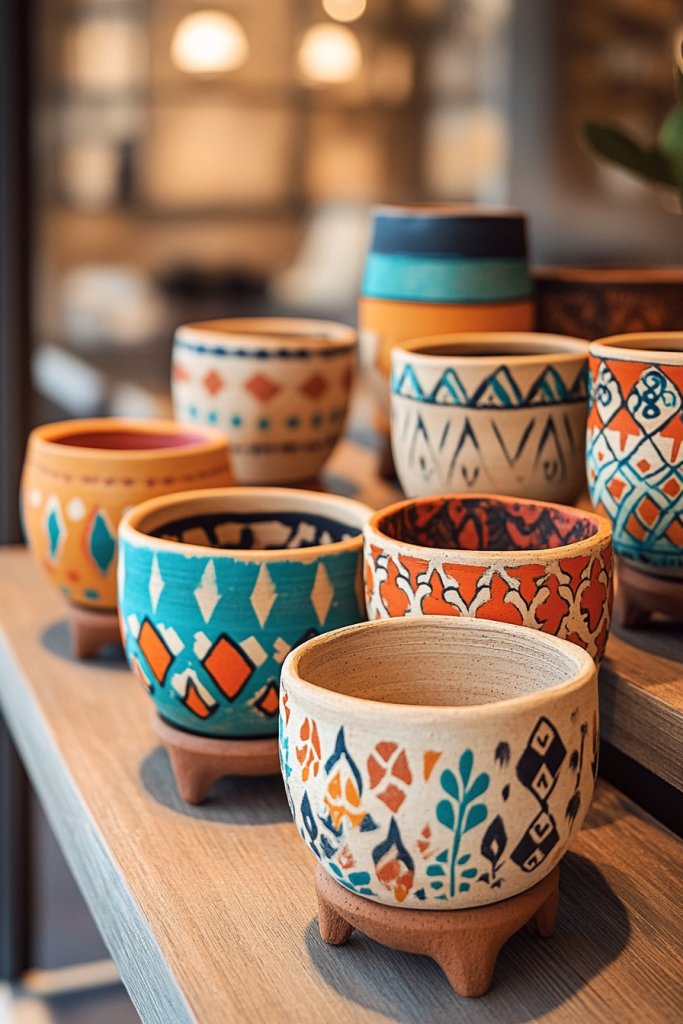
Transforming plain terracotta pots into colorful decorative stands is a fantastic way to add personality and charm to any room. This idea not only repurposes everyday items but also introduces vibrant pops of color and texture that elevate your space effortlessly.
Imagine a set of small, round terracotta pots painted in cheerful shades like mint green, coral, and soft blush. The rough matte surface of the clay contrasts beautifully with smooth, glossy paint, while intricate patterns such as geometric lines, polka dots, or even delicate floral designs bring visual interest.
These painted pots sit atop shelves or side tables, acting as charming stands for small plants, candles, or decorative objects. Their rustic texture combined with bright colors creates a cozy, artsy vibe that complements both modern and boho interiors.
Getting started is simple and budget-friendly. First, clean your terracotta pots thoroughly and let them dry.
Then, apply a primer if desired for better paint adhesion. Use acrylic paint and small brushes to add your chosen designs, letting each layer dry completely before adding details.
For extra durability, seal the finished pots with a clear, matte spray sealant. You can also explore using stencils for clean, professional-looking patterns. These painted pots can be customized to match your color scheme and style, making your decor uniquely yours in just a few easy steps.
6. Handmade Rope Shelves for Functional Style
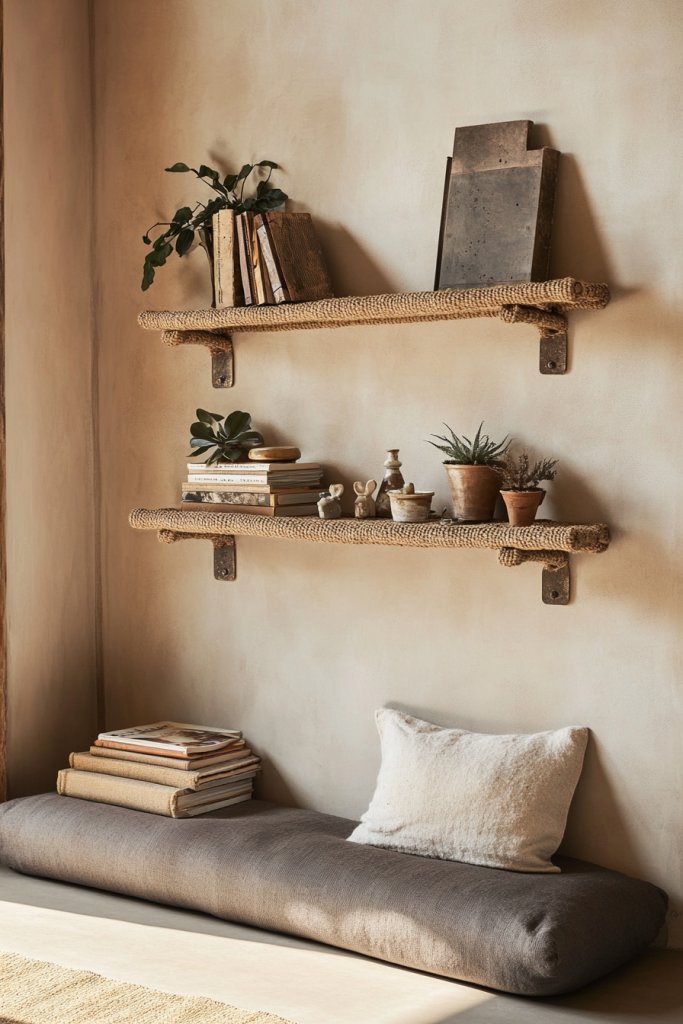
Rope shelves combine rustic charm with practical storage, providing a stylish solution for displaying your favorite decor items while adding texture to your room. They’re perfect for creating a cozy, boho-inspired vibe that feels inviting and personalized.
Picture a sturdy wooden plank suspended by thick, knotted ropes—these ropes hang from wall hooks or anchors, giving the shelf a floating appearance. The natural fibers of the rope add a tactile element, contrasting beautifully against smooth surfaces or modern decor.
You can paint or stain the wood to match your room’s palette—think warm walnut, matte black, or even pastel shades. These shelves are ideal for holding small plants, candles, framed photos, or decorative bowls.
Their simple yet eye-catching design makes them a versatile addition that feels both handcrafted and functional. To make your own, start by selecting a wooden plank—about 24 inches long and 4 inches wide works well.
Drill small holes at each end of the plank, then thread thick, natural jute or hemp ropes through the holes, tying secure knots underneath. Attach the ropes to wall hooks or anchors using sturdy knots or metal hooks.
Adjust the length to achieve your desired shelf height, making sure it’s level before hanging. This project requires minimal tools and materials, making it accessible even for beginners seeking a charming, handcrafted touch in their home decor.
7. Customized Throw Pillows with Fabric Paint Designs
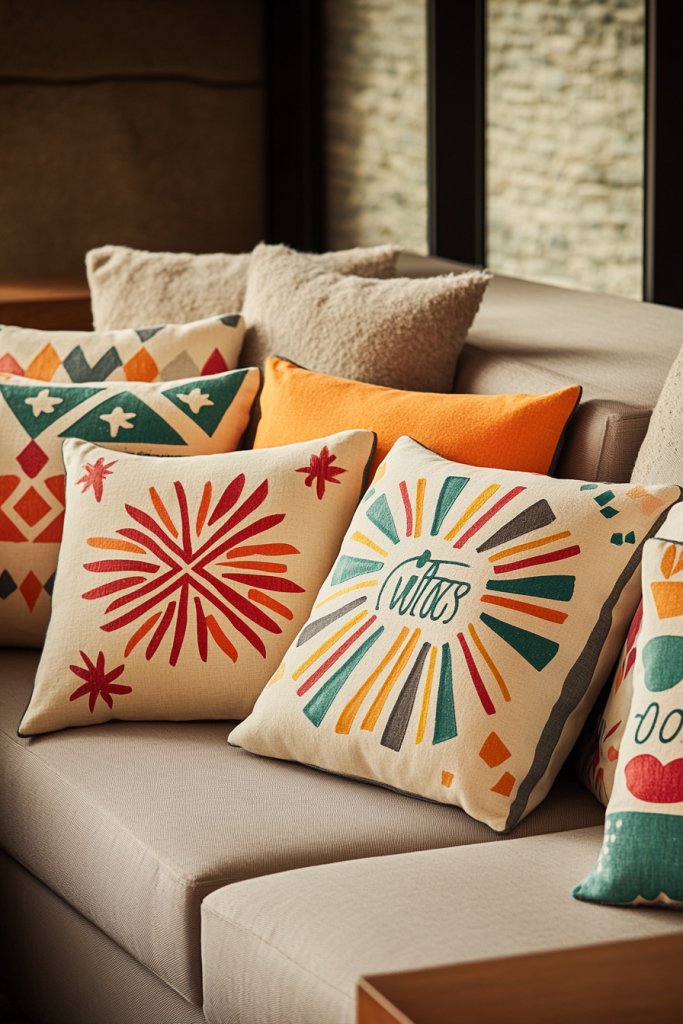
Adding personalized throw pillows decorated with fabric paint is an easy, affordable way to refresh your space and showcase your creativity. These DIY pillows can reflect your style, mood, or seasonal themes, making your decor feel fresh and uniquely yours.
Visualize a plush, soft pillow in a neutral tone like cream or gray, with bold, colorful designs painted on the surface. You might choose geometric patterns, hand-lettered quotes, or playful motifs like stars or hearts.
The fabric paint creates a slightly textured, matte finish that enhances the tactile appeal. These pillows sit on your sofa or bed, instantly adding a pop of color and personality.
The combination of cozy texture and vibrant artwork makes the space feel more inviting and curated. To create your own, select a plain pillow cover made of cotton or linen.
Using fabric paint and fine brushes or stencils, sketch your design—start with simple shapes or words if you’re a beginner. Allow the paint to dry completely, following the manufacturer’s instructions, and heat-set if recommended for durability.
You can also layer colors or add small details for more impact. This project makes it easy to tailor your decor to current trends or personal themes, turning a basic pillow into a statement piece in just a short time.
8. Decorate with Unique Sculptural Objects from Repurposed Materials
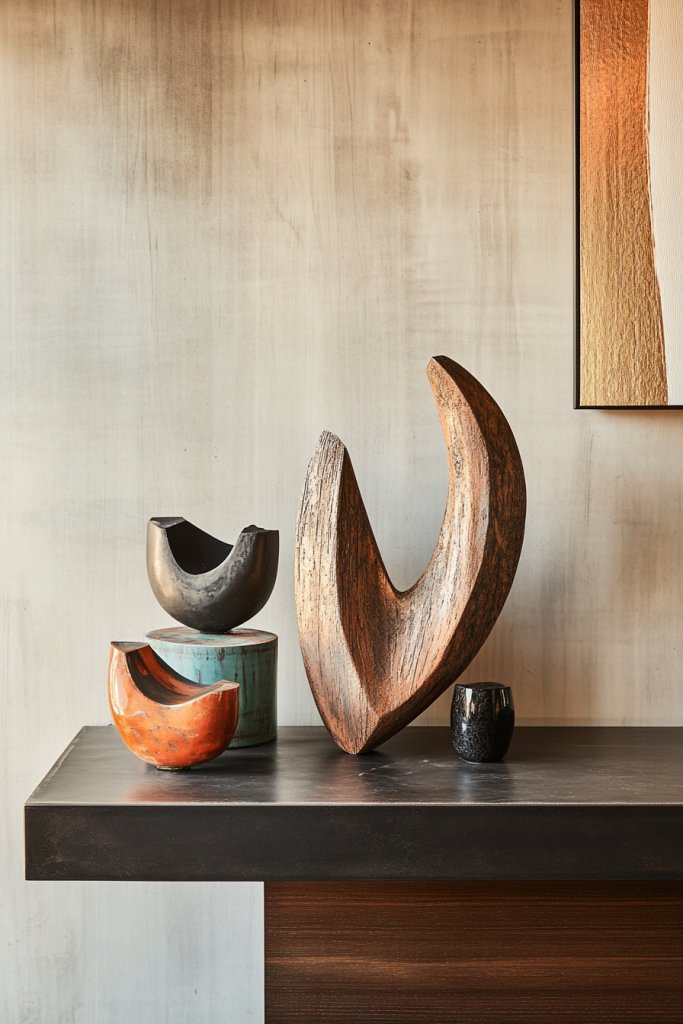
Incorporating sculptural objects crafted from repurposed materials adds artistic flair and eco-friendly style to your room. These one-of-a-kind pieces serve as conversation starters and reflect your creativity and commitment to sustainability.
Picture a sculpture made from reclaimed metal scraps, old jewelry, or broken ceramics, shaped into abstract forms or natural motifs like leaves or waves. These objects can be displayed on shelves, coffee tables, or hung as wall art.
Their textured surfaces and mixed materials create visual depth and tactile richness. Combining these sculptures with minimalist backgrounds emphasizes their uniqueness, making your decor feel curated and thoughtfully crafted.
Creating your own involves gathering materials like scrap metal, wire, or broken ceramics. Use basic tools such as pliers, glue, or wire to shape and assemble your sculptures—no advanced skills needed.
For safety, wear gloves and work in a well-ventilated space. Focus on simple forms and abstract designs to keep the process accessible. Once finished, showcase your sculptures on a dedicated shelf or in a shadow box for a distinctive, eco-conscious decor element that adds character and artistic depth to your room.
9. Elegant Tiered Tray Displays for Small Decor Items
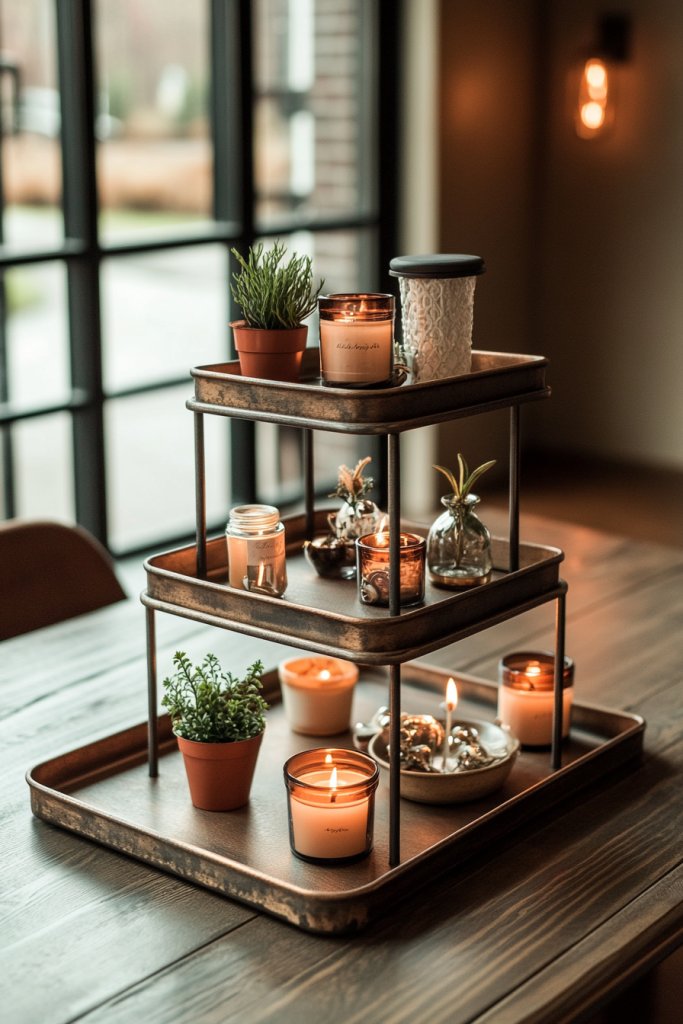
Tiered trays are a chic and versatile way to organize and display small decor pieces, creating a visually appealing focal point that adds charm and sophistication to any room. They’re perfect for showcasing candles, trinkets, jewelry, or miniature plants in an organized, layered arrangement.
Imagine a vintage-inspired metal or wooden tray with multiple levels, decorated with tiny succulents, decorative candles, small framed photos, and seasonal accents like pinecones or ornaments. The varying heights and textures create an engaging visual hierarchy that invites the eye to explore different levels.
The tray’s elegant design enhances the aesthetic appeal, making even simple objects look curated and stylish. Whether placed on a coffee table, countertop, or dresser, tiered trays add a polished touch to your decor.
To make your own, purchase or repurpose a tiered tray—these can be found at thrift stores or online, or you can assemble one from stacking small plates or bowls with a central stand. Decorate with small, decorative items like mini vases, candles, or figurines.
For added customization, paint the tray in a color that complements your room’s palette or add decorative accents with stencils. This easy-to-assemble display brings a sense of order and style to your space, perfect for showcasing your favorite small decor pieces with elegance and ease.
10. Colorful Washi Tape Borders for Framed Photos and Mirrors
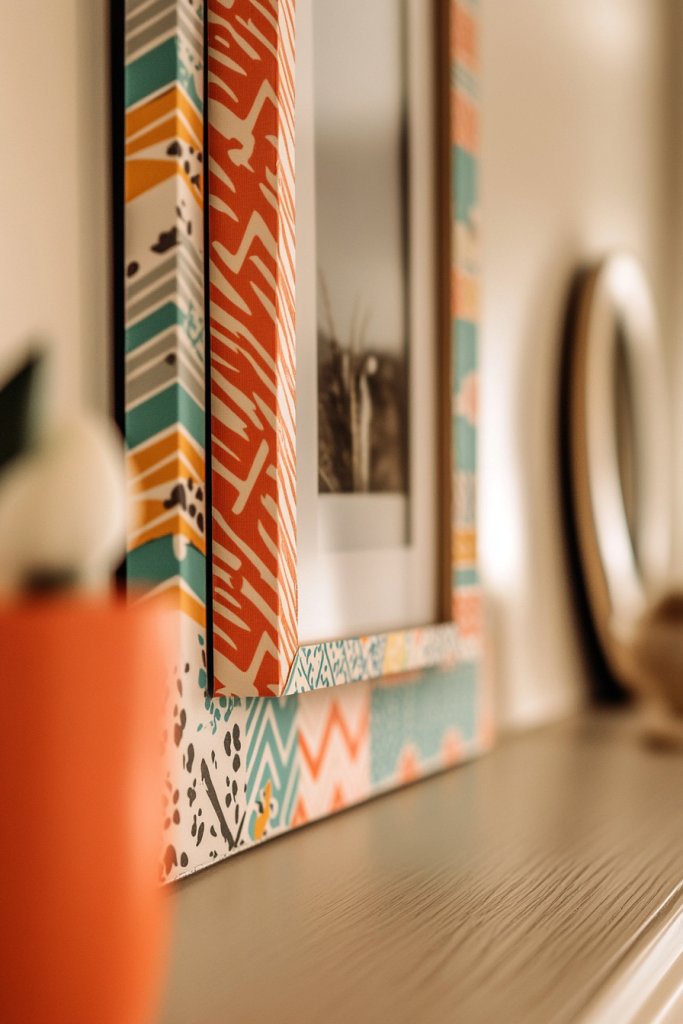
Adding colorful washi tape borders is a simple way to instantly elevate your framed photos and mirrors, injecting personality and color into your space. This technique is perfect for giving a plain frame or mirror a fresh, playful look without the need for expensive replacements or intricate DIY skills.
It’s a popular trend on Pinterest for its affordability and versatility, making it accessible for all skill levels. Imagine a crisp white picture frame transformed with bold, geometric patterns in bright pink, teal, or sunny yellow washi tape.
The tape’s matte finish adds a subtle texture, contrasting beautifully with the smooth glass or sleek frame. When applied around the edges of a mirror or photo, it creates a fun, layered effect that draws the eye while adding a pop of color.
The overall aesthetic feels lively yet cohesive, especially when coordinated with other decorative accents like throw pillows or wall art. The borders can be customized in width and pattern, allowing you to tailor the look to your unique style and space.
Getting started is straightforward. Gather your favorite washi tapes in various colors and patterns—think stripes, florals, or abstract designs.
Clean the surface of your frame or mirror with a gentle cloth, then carefully apply the tape along the edges, smoothing out air bubbles as you go. For clean lines, use a ruler or painter’s tape as a guide.
You can mix and match different tapes or create a repeating pattern for a chic, coordinated look. This DIY takes less than an hour, costs just a few dollars, and results in a personalized decor piece that’s sure to catch compliments.
11. DIY Fabric Banners and Garlands for Festive Touches
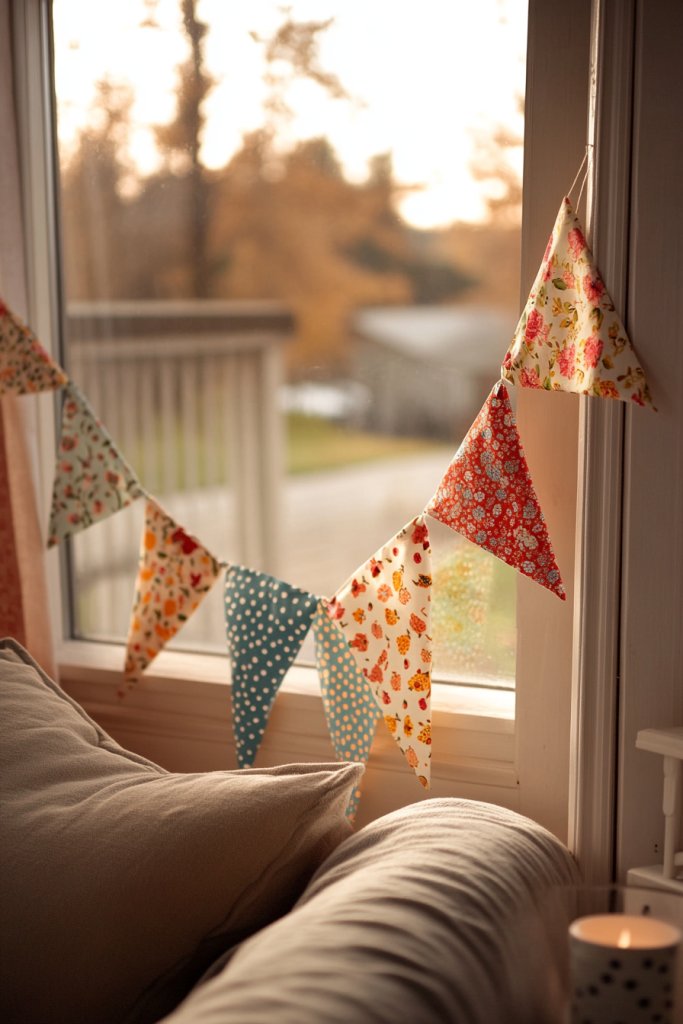
Fabric banners and garlands are an easy, charming way to add a touch of celebration or coziness to any room. They can be customized to match your color scheme, seasonal themes, or personal style, making your space feel more lively and inviting.
This project is especially popular for creating a cozy, boho vibe or for special occasions like birthdays or holidays. Picture a string of soft, lightweight fabrics in pastel pinks, earthy terracotta, or vibrant jewel tones, cut into triangles, rectangles, or circles.
Each piece is sewn or glued onto a length of twine or thin rope, with small gaps in between for a breezy, relaxed look. The fabric edges might be frayed for texture or neatly hemmed for a cleaner appearance.
The garland hangs across a wall, window frame, or above a bed, adding movement and visual interest. When lit by natural light or fairy lights, it creates a warm, cheerful glow that instantly brightens the room.
Creating your own fabric banners is simple. Choose your favorite fabrics—cotton, linen, or even reclaimed textiles—and cut them into your preferred shapes.
Use a sewing machine or fabric glue to attach each piece to a length of jute or cotton twine. For a more polished look, hem the edges beforehand; for a boho charm, leave them raw and frayed.
Hang the finished banner with clothespins or hooks, adjusting the length to suit your space. With just a few materials and about 30 minutes, you’ll have a custom decor piece that adds a festive, handcrafted touch to your room.
12. Rustic Wooden Pallet Coffee Table Makeover
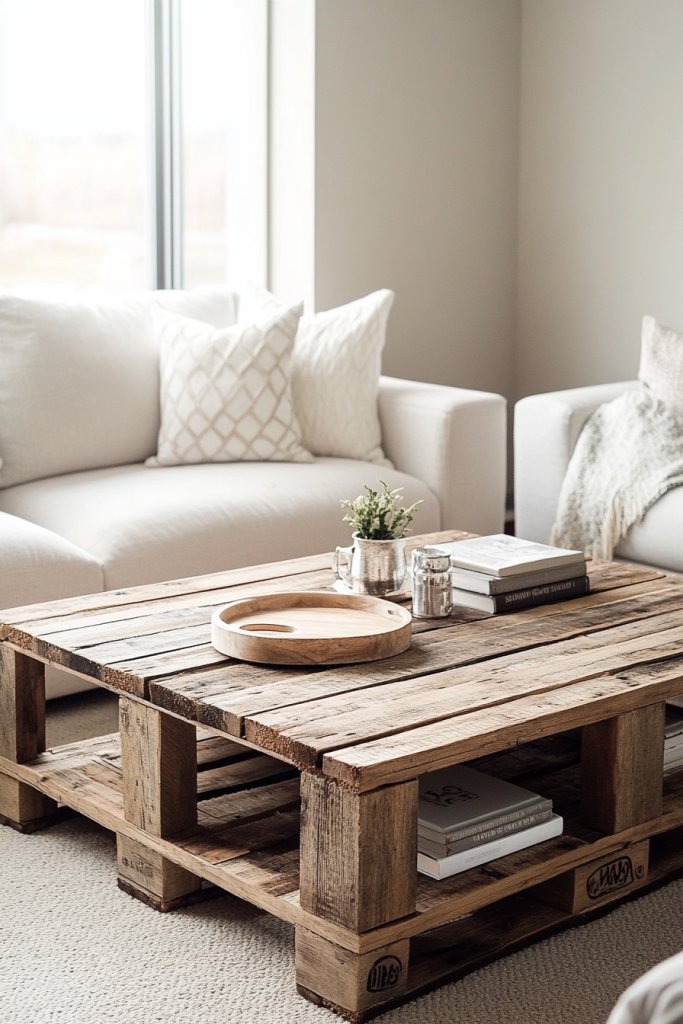
A rustic wooden pallet coffee table is a fantastic DIY project that combines practicality with a cozy, farmhouse aesthetic. Reusing old pallets not only saves money but also adds a sense of history and charm to your living space.
This transformation is a favorite among Pinterest enthusiasts looking to infuse warmth and texture into their decor. Visualize a sturdy rectangular table made from reclaimed wooden pallets with a weathered, natural finish.
The rough-hewn planks display knots, grain patterns, and imperfections that evoke a rustic charm. The surface is smooth enough for drinks and decor, yet retains a raw, authentic feel.
The base might feature simple legs or be left as-is for a more industrial look. You can add a coat of clear sealant to preserve the wood or paint it in a color that complements your room’s palette, such as soft white, charcoal gray, or pastel blue.
This piece becomes the centerpiece of your seating area, offering both style and function. To make your own, source wooden pallets from local stores or online marketplaces—look for ones with minimal damage.
Disassemble the pallets carefully, then sand down rough edges and surfaces. Reassemble the planks into a rectangular shape, securing them with screws or nails.
Finish with a wood stain, paint, or sealant, and attach optional caster wheels for mobility. This project can be completed in a few hours and requires basic tools like a drill, screwdriver, and sandpaper. The result is a uniquely personalized coffee table that adds rustic charm and practicality to your living room.
13. Minimalist Floating Shelves for Displaying Decor Pieces
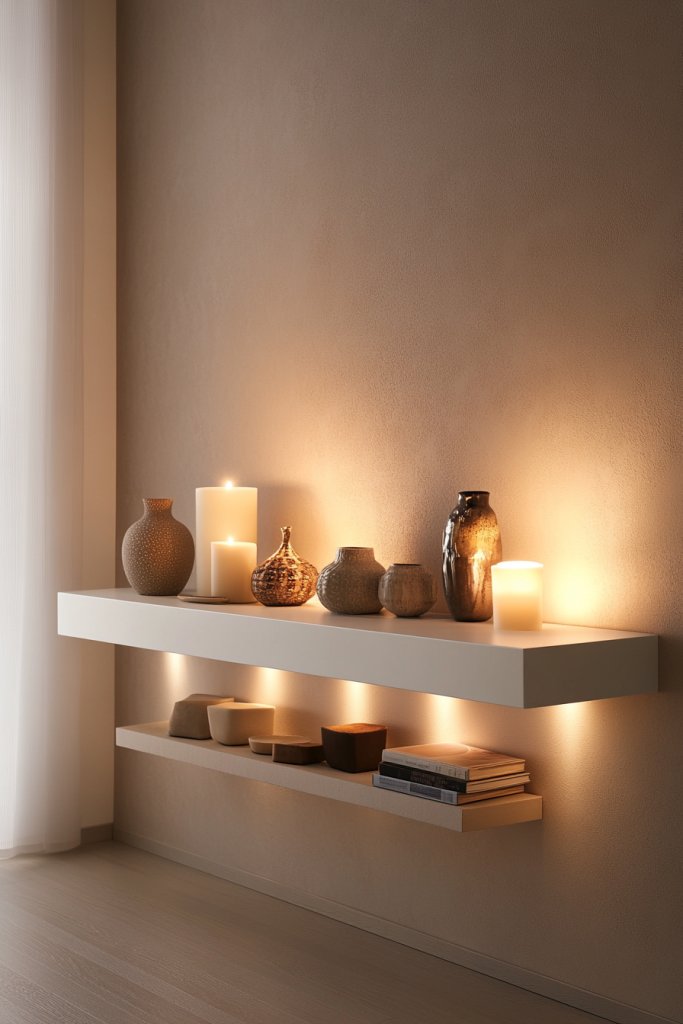
Floating shelves are a sleek, functional addition to any room, providing the perfect platform to showcase your favorite decor items without cluttering the space. Their minimalist design makes them versatile, blending seamlessly into modern, Scandinavian, or industrial interiors.
These shelves are especially popular on Pinterest for their clean look and ease of customization. Imagine a set of narrow, matte black or natural wood shelves mounted against a neutral wall.
Each shelf holds small decorative objects—ceramic vases, tiny sculptures, framed photos, or candles—arranged thoughtfully to create a balanced display. The open space underneath adds a sense of openness, making the room feel larger and more airy.
The overall aesthetic is simple yet stylish, emphasizing the beauty of each object and the wall behind. When paired with layered lighting or contrasting wall colors, these shelves become eye-catching focal points that elevate your decor effortlessly.
Installing floating shelves is straightforward. Measure and mark the desired placement on your wall, then drill into studs or use appropriate wall anchors for drywall.
Use brackets or hidden mounting hardware designed specifically for floating shelves. Choose your materials—wood, MDF, or metal—based on your style and budget.
For a quick DIY, opt for pre-cut shelves and simple brackets, then finish with paint or stain if desired. With basic tools and a few minutes of effort, you can create a cohesive display that showcases your personality and enhances your space’s visual appeal.
14. Personalize Plain Lampshades with Decorative Tape or Fabric
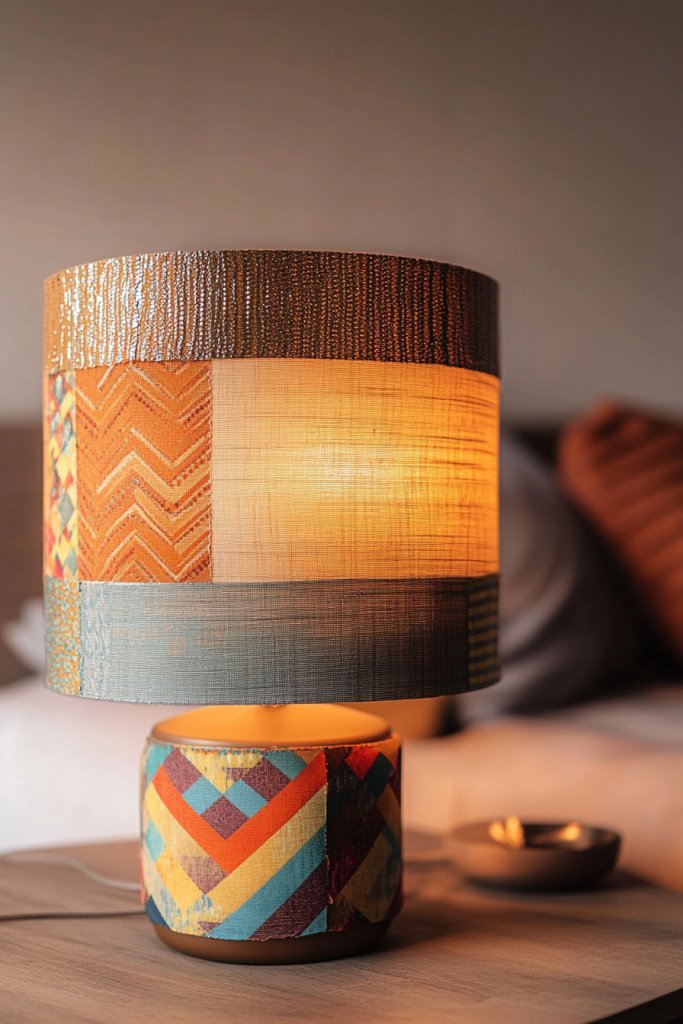
Transforming a plain lampshade into a decorative statement piece is a quick, budget-friendly way to add personality to your lighting. Whether it’s a simple drum shade or a more elaborate design, customizing with decorative tape or fabric allows you to match your room’s color scheme or introduce new textures and patterns.
This DIY is especially popular for those who want a subtle yet impactful decor upgrade. Visualize a neutral-colored lampshade adorned with bold black and white geometric tape, or a soft pastel fabric wrapped around the shade for a cozy, cottage feel.
The tape or fabric adds visual interest, creating a layered, textured look that complements other textiles in your room like cushions or throws. When lit, the pattern subtly filters the light, creating a warm, inviting glow.
The customized shade instantly feels more intentional and coordinated with your decor, giving your space a fresh, personalized vibe without purchasing an entirely new lamp. To do this, gather decorative washi tape or fabric—cotton, linen, or even vintage scarves work well.
Clean the lampshade surface, then carefully apply the tape along the edges or wrap the fabric around, securing with double-sided tape or hot glue. For fabric, use a staple gun or glue for a neat finish, ensuring the fabric is taut but not stretched.
Trim any excess and finish the edges for a polished look. This simple project takes less than 30 minutes, costs very little, and allows you to create a custom lampshade that truly reflects your style.
15. Create a Chic Jewelry or Accessories Organizer with Hooks and Frames
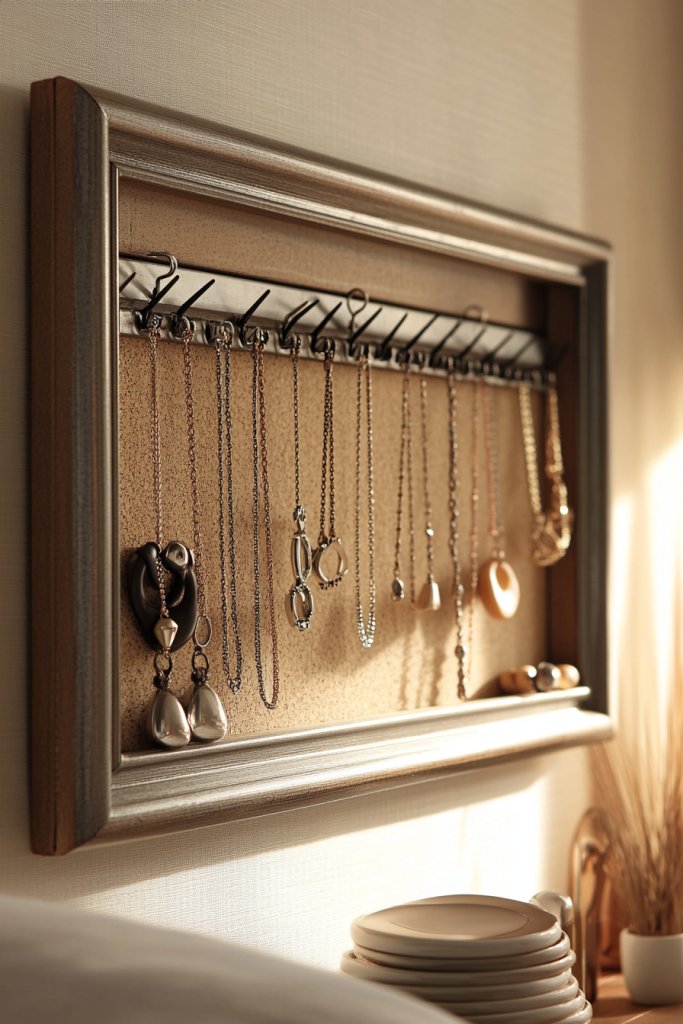
Transforming clutter into chic organization is a game-changer for any room. This idea makes your jewelry and accessories not only easy to find but also adds a stylish decor element, elevating your space’s aesthetic.
It’s a practical solution that combines functionality with visual appeal, perfect for a quick bedroom refresh. Imagine a sleek, lightweight frame—perhaps a vintage window frame or a modern metallic grid—mounted on your wall.
Adorn it with small hooks or pegs to hang necklaces, bracelets, and earrings, creating a dynamic display. You can even add decorative elements like tiny shelves or fabric backing to enhance the visual interest.
Brightly colored or metallic hooks add a touch of glamour, while the entire setup feels organized yet effortlessly stylish. This combo creates a personalized gallery of your favorite accessories, making your space feel curated and inviting.
Getting started is simple: choose a frame—an old window, a decorative wire grid, or a large picture frame—and secure it to the wall with appropriate hardware. Attach small hooks or pegs in a pattern that suits your collection, ensuring easy access.
For added flair, line the back of the frame with colorful fabric or decorative paper. Hang your jewelry, then step back to enjoy your newly stylish, functional display. This project takes minimal tools and can be customized to match your decor style, making it an achievable and satisfying upgrade.
16. Hang Decorative Mirrors in Unique Shapes to Enhance Space
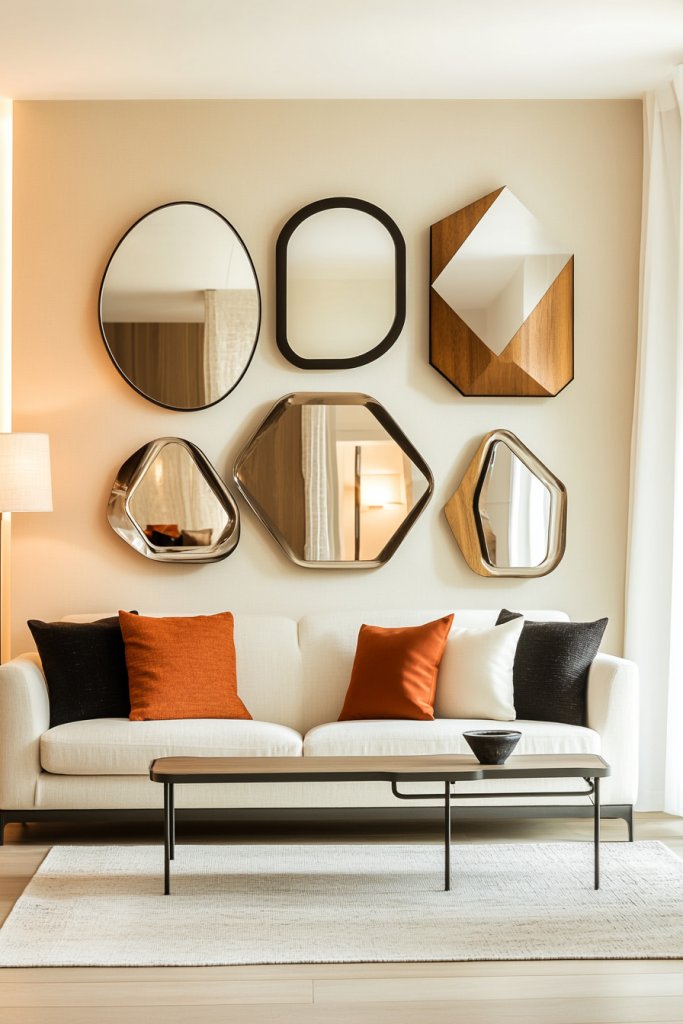
Decorative mirrors in distinctive shapes instantly add personality and a sense of spaciousness to any room. Beyond their functional role, they serve as eye-catching focal points that amplify light and create an open, airy atmosphere—perfect for small spaces or areas needing a touch of flair.
Picture a set of mirrors in geometric shapes—hexagons, circles, or asymmetrical freeform designs—mounted on a feature wall. The frames could be metallic in gold or black for a modern look, or wooden for a warm, rustic vibe.
Strategically placing these mirrors reflects light from windows or lamps, making your room feel larger and more vibrant. Their varied shapes and sizes add visual interest, while the reflective surfaces contribute a fresh, contemporary aesthetic that energizes the space.
To implement, select or craft mirrors in your preferred shapes—many stores offer affordable geometric mirror sets, or you can repurpose small vintage mirrors. Use strong wall hooks or adhesive strips suitable for your wall type to hang them securely.
Arrange them in a pattern that balances the space, such as a cluster or a linear arrangement. Ensure the mirrors are at eye level for maximum impact. With minimal tools and a bit of creativity, you can turn ordinary walls into a stunning visual centerpiece that instantly elevates your room’s style.
17. DIY Rope or Twine Art Wall with Geometric Patterns
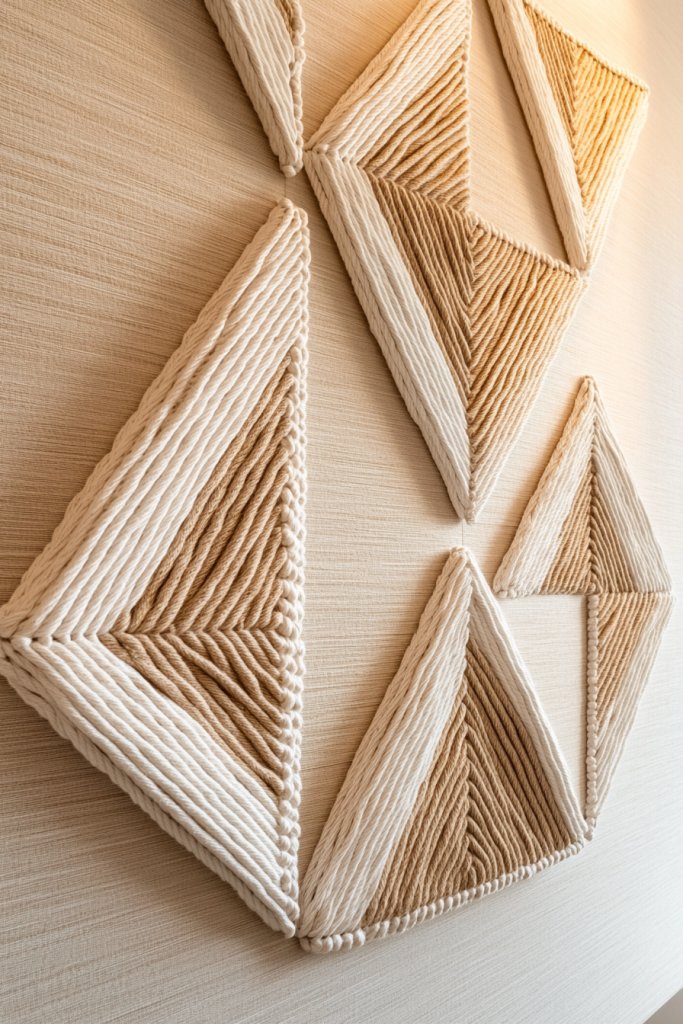
A rope or twine art wall introduces texture and a modern, handcrafted vibe to your decor. It’s a budget-friendly way to add visual depth, with the potential for endless customization through geometric patterns, shapes, or abstract designs.
This idea transforms simple materials into an eye-catching statement piece. Visualize a large wall with intersecting ropes or twine arranged in precise geometric shapes—triangles, diamonds, or chevrons—secured with small hooks or nails.
The natural fibers of the rope contrast beautifully with painted walls, especially in neutral tones like beige, white, or soft pastels. For added interest, incorporate metallic or painted accents, or even small decorative objects like beads or charms along the twine.
The tactile quality invites a subtle sense of calm and craftsmanship, making the wall a focal point that combines modern minimalism with artisanal charm. Start by gathering sturdy jute or cotton twine, small hooks, and nails.
Sketch your pattern on paper first to plan the design. Secure the anchors at the corners or intersecting points, then stretch and attach the rope, adjusting tension for a clean, crisp look.
Tie off the ends securely and add decorative elements if desired. This project is accessible for beginners, requiring only basic tools and a little patience. The result is a versatile, textured art piece that adds personality without overwhelming your space.
18. Repurpose Vintage Suitcases as Stylish Storage and Decor

Vintage suitcases are a charming way to combine storage and decor, giving your room a nostalgic yet trendy vibe. Their unique designs and aged patinas lend character and warmth, making them perfect for creating cozy corners or functional accent pieces.
Imagine stacked suitcases in various sizes—perhaps a smaller one on top of a larger, with a plush throw draped over the edge. They can serve as side tables, plant stands, or hidden storage for blankets, books, or accessories.
The distressed leather or fabric exteriors, along with brass hardware, add a vintage touch that complements rustic, bohemian, or eclectic decor styles. When placed strategically, they become a visual centerpiece that sparks conversation and adds layers of personality to your space.
To implement, browse thrift stores or online marketplaces for vintage suitcases in good condition. Clean and, if desired, lightly sand or polish the surfaces for a refreshed look.
Use the suitcases as-is or add a soft cushion inside to make them more comfortable for sitting or stacking. Secure them in place if used as tables, or leave them open for easy access to stored items. Combining practicality with style, vintage suitcases are an affordable, customizable way to infuse your room with charm and functionality.
19. Make Your Own Decorative Tray Using Paint and Stencils
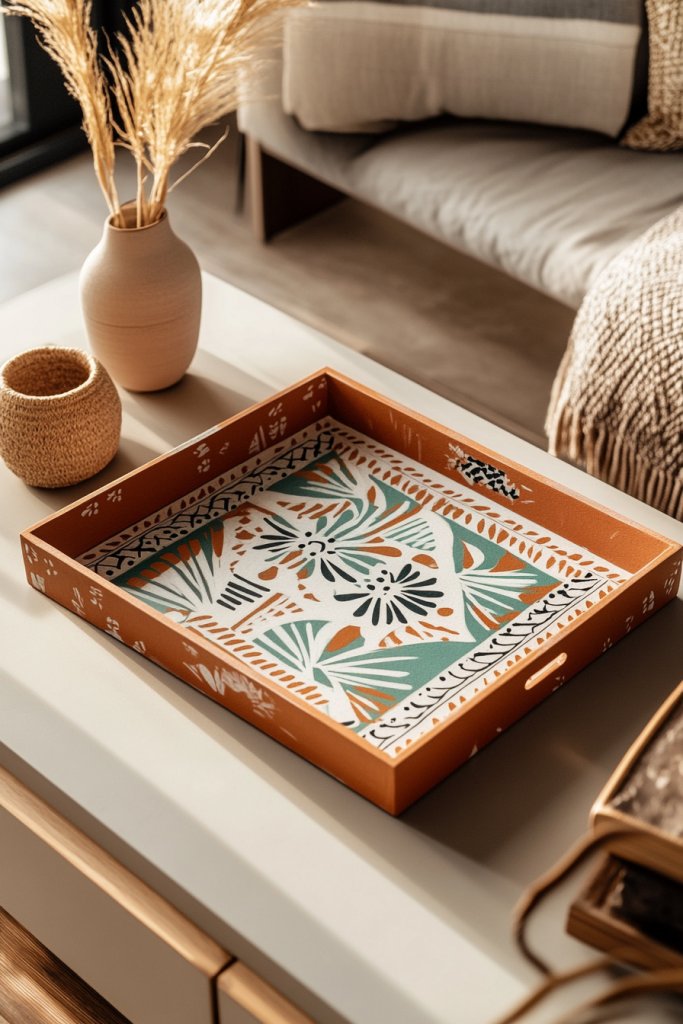
A personalized decorative tray is both a stylish and practical addition to your room, perfect for organizing essentials or serving as a display piece. Customizing one with paint and stencils allows you to match your decor theme and showcase your creativity.
Envision a simple wooden or MDF tray—rectangular or round—with a smooth surface. Use painter’s tape to define areas for painting, and choose a color palette that complements your room—soft pastels, metallics, or bold hues.
Apply your chosen paint with a brush, then, once dry, use stencils to add patterns or words for added visual interest. Finish with a clear sealant to protect your design and ensure durability.
The result is a bespoke piece that elevates your space, whether used for holding jewelry, candles, or displaying decorative objects. To make it, gather a wooden or MDF tray, paint, stencils, and sealant. Lightly sand the tray for a smooth finish, then paint it in your base color.
After drying, position your stencils and carefully paint over them, removing the stencils gently once done. Seal the surface with a clear coat to prevent chipping. This project is straightforward, budget-friendly, and highly customizable—perfect for adding a personal touch to your room decor.
20. Add Texture with DIY Tapestry or Textile Wall Coverings
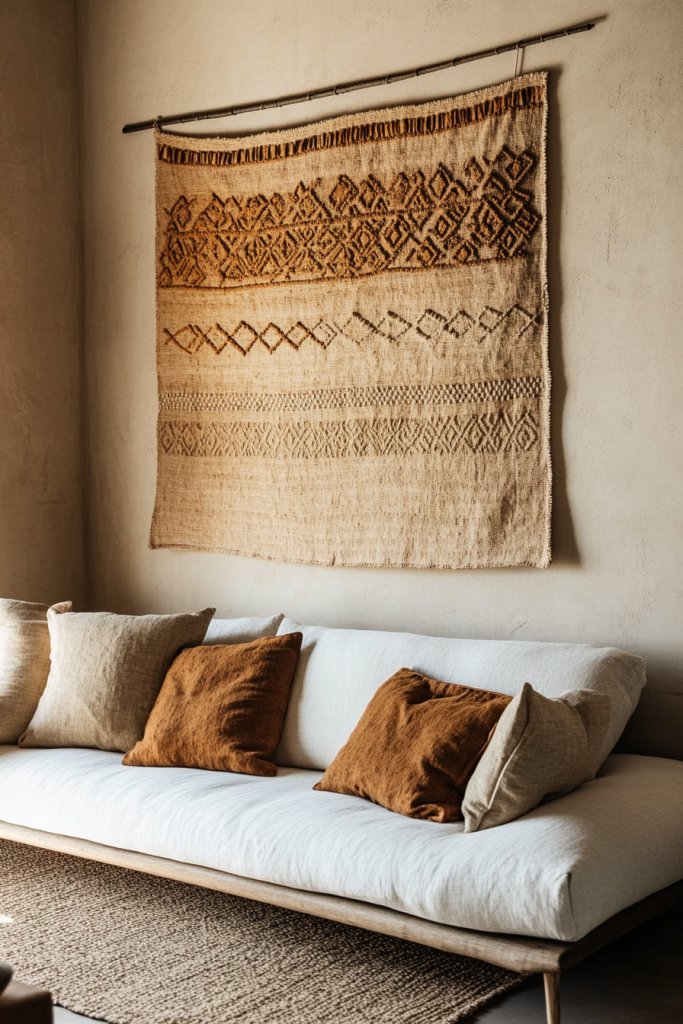
Creating a textured wall feature with DIY tapestries or textile coverings instantly adds warmth and visual interest to any room. This idea is perfect for transforming plain walls into cozy, inviting focal points that echo current interior trends toward tactile, layered decor.
Whether you choose a bold, bohemian look or a subtle, minimalist vibe, incorporating fabric textures can make your space feel more personalized and dynamic. Imagine a large, handwoven tapestry hung centrally on your wall—perhaps in earthy tones like terracotta, cream, and olive green.
The fabric might feature intricate patterns, fringed edges, or even embroidery to create depth and movement. Alternatively, layered textile panels in different textures, such as chunky knits, velvet, or linen, can give a rich, tactile surface.
These textiles absorb sound, add softness underfoot, and fill your space with a cozy, inviting atmosphere. The combination of colors, patterns, and textures creates a tactile feast that makes your room feel layered and thoughtfully curated.
To implement this look, start by selecting textiles that match your style and color palette. For a quick update, hang a large piece of fabric using decorative hooks or a tension rod, or secure multiple panels with washi tape or command hooks for easy removal.
You can also sew or glue different textiles onto a fabric backing to create a custom, layered wall hanging. Using materials like woven cotton, plush velvet, or chunky knit throws can add variety without much effort. Keep in mind that heavier fabrics may require more secure hanging methods, but overall, this is a beginner-friendly project that adds instant texture and personality.
21. Transform Old Crates into Trendy Side Tables or Storage Units
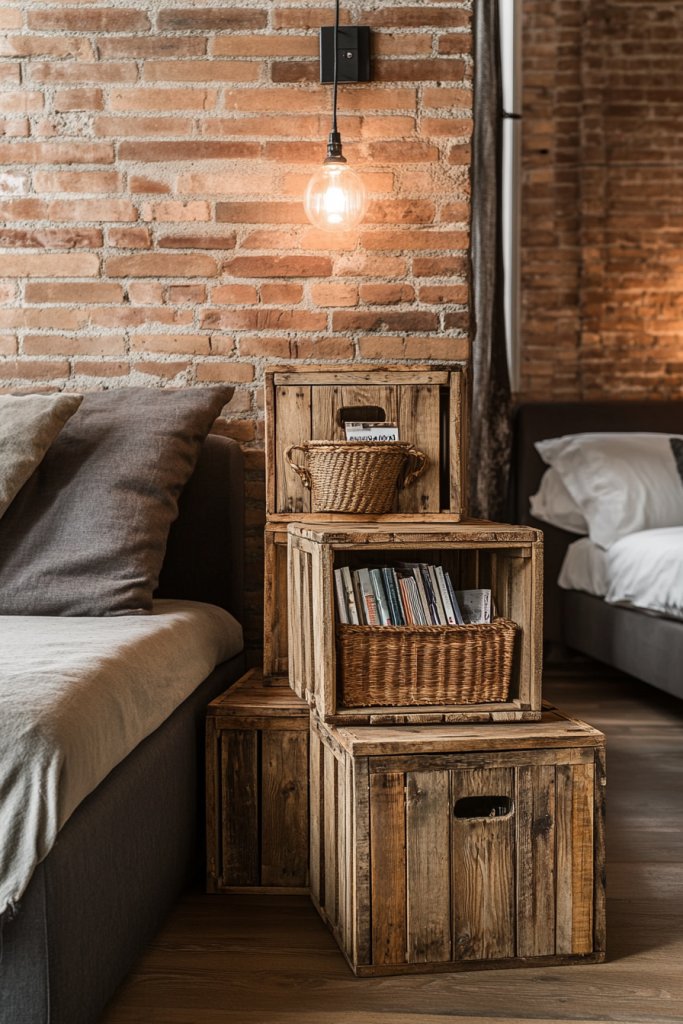
Repurposing vintage wooden crates into functional side tables or storage units is a charming and budget-friendly way to add rustic appeal to your room. This idea taps into the popular industrial aesthetic while offering practical storage—perfect for books, plants, or decorative accessories.
It’s an easy project that can be customized with paint, stain, or decorative touches to suit your decor style. Visualize a set of weathered crates stacked horizontally or vertically beside a sofa or bed, with some painted in soft pastels or bold shades like navy or mustard yellow for a modern twist.
The open sides make it easy to access stored items, while the natural wood grain adds texture and warmth. You might also line the inside with fabric or paper for a pop of color.
The crates can be left raw for a vintage feel or sealed with a matte finish for durability. When arranged creatively, they can serve as coffee tables, bedside tables, or even open shelving, giving your space a layered, eclectic look.
Getting started is simple: locate sturdy crates at thrift stores or craft stores, then sand rough edges. Paint or stain them in your chosen colors—whitewash for a shabby-chic look or bright hues for a playful vibe.
Stack or arrange the crates in your preferred configuration and secure them with nails or brackets if needed for stability. To finish, add a glass or wooden top for a smooth surface if using as a table. This project is accessible for most skill levels and results in versatile, stylish storage that adds character and function to your room.
22. Craft Custom Coasters and Trivets with Resin or Cork
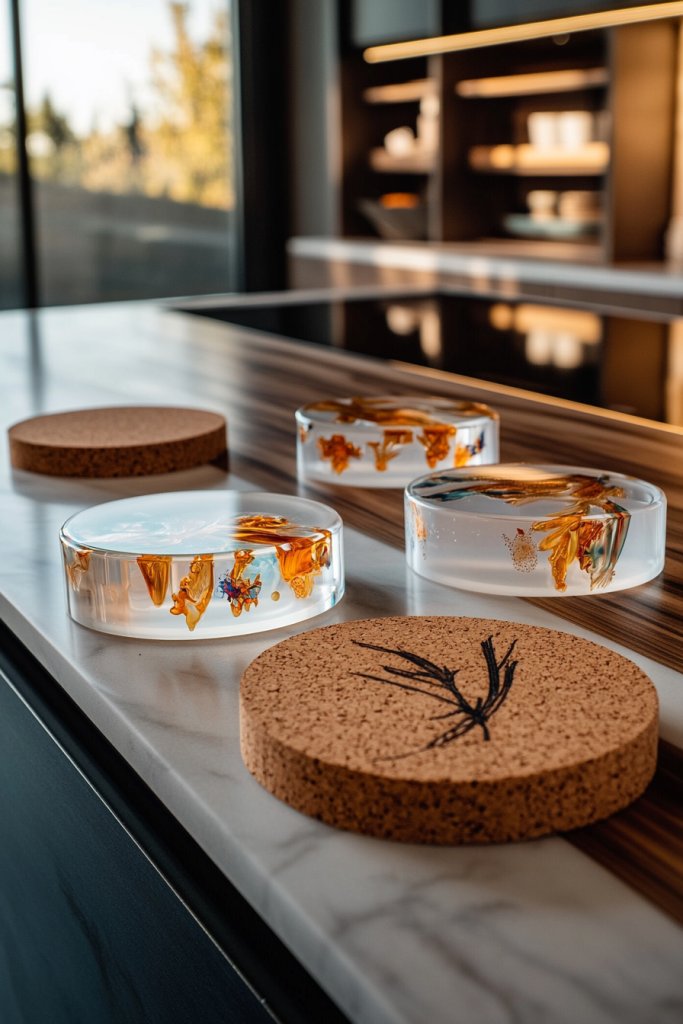
Personalized coasters and trivets are both practical and decorative, protecting surfaces while adding a unique touch to your room decor. Using resin or cork, you can create customized pieces that reflect your style—be it minimalist, bohemian, or modern.
These DIY projects are fun, inexpensive, and result in a sophisticated look that elevates your everyday table settings. Picture a set of round or square coasters made from cork, stamped with your favorite patterns or painted with metallic accents.
Resin coasters, on the other hand, can feature embedded objects like dried flowers, gold flakes, or small charms encased in glossy finishes. The textures and visual interest of resin add depth, while cork offers a natural, earthy vibe.
Both materials are heat-resistant and durable, making them practical for everyday use. Arrange them on your coffee table or countertop, and they instantly add a crafted, curated feel to your space.
To make these, gather materials like cork sheets or pre-cut cork coasters, resin kits, mixing cups, and decorative inclusions such as dried flowers or glitter. For cork, cut to your desired shapes and seal with a clear protective finish.
For resin, follow the manufacturer’s instructions to mix and pour into molds, embedding your chosen items, and let cure for the specified time. These projects require some patience but are beginner-friendly, and the result is a set of bespoke coasters or trivets that combine functionality with artistic flair.
23. Decorate with Handmade Clay or Ceramic Figurines
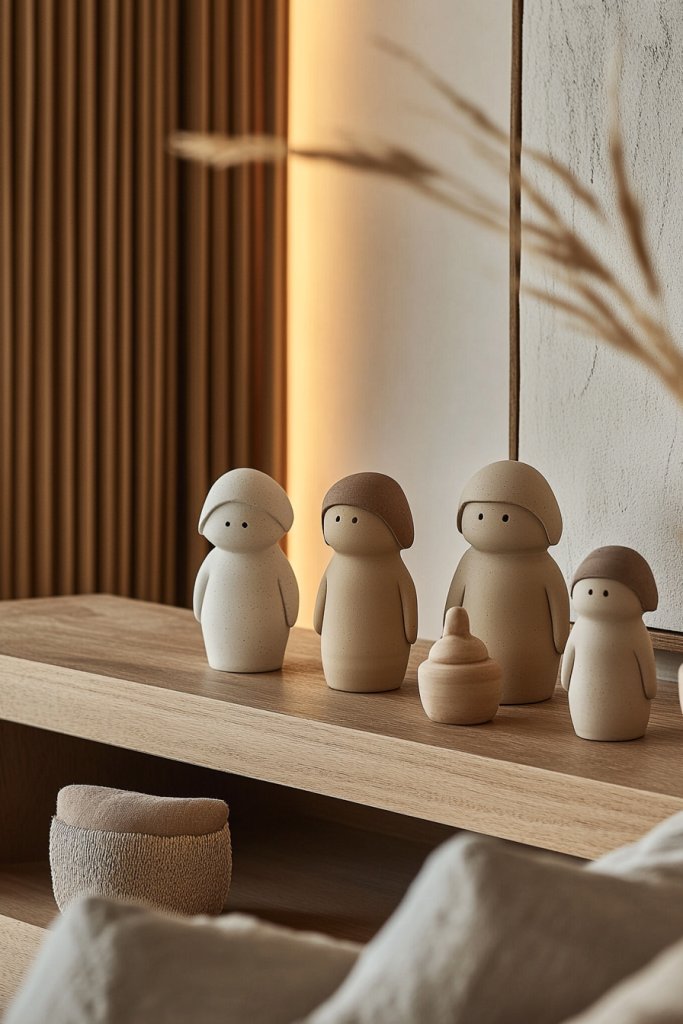
Adding handmade clay or ceramic figurines to your decor introduces personality and artisanal charm to your space. These small sculptures can serve as table accents, shelf decor, or even paperweights, enriching your room with tactile, handcrafted details.
Their variety allows for endless customization, from minimalist abstract shapes to detailed characters or abstract forms. Visualize a shelf lined with tiny ceramic animals, abstract geometric sculptures, or playful figurines in matte pastel glazes.
The textures of clay and ceramic surfaces—smooth, matte, or glazed—bring a warm, tactile element that invites touch and admiration. You might choose earthy tones like terracotta, soft blush pinks, or monochrome black and white for a sophisticated look.
These figurines can also evoke themes or personal interests, making your decor more meaningful. Their presence adds depth and a handcrafted touch that elevates a simple shelf or side table.
Start by sourcing air-dry clay or ceramic supplies from craft stores. Sculpt your desired shapes, then allow them to dry or fire in a kiln if you have access.
Once hardened, paint or glaze your figurines in your preferred colors. For beginner-friendly projects, use silicone molds or pre-made forms and simply decorate with paint or glaze.
Once finished, arrange your figurines thoughtfully on shelves or tables, mixing sizes and shapes to create visual interest. These charming handmade pieces instantly infuse warmth and personality into your room.
24. Create a Gallery Wall Using Mix-and-Match Frames and Prints
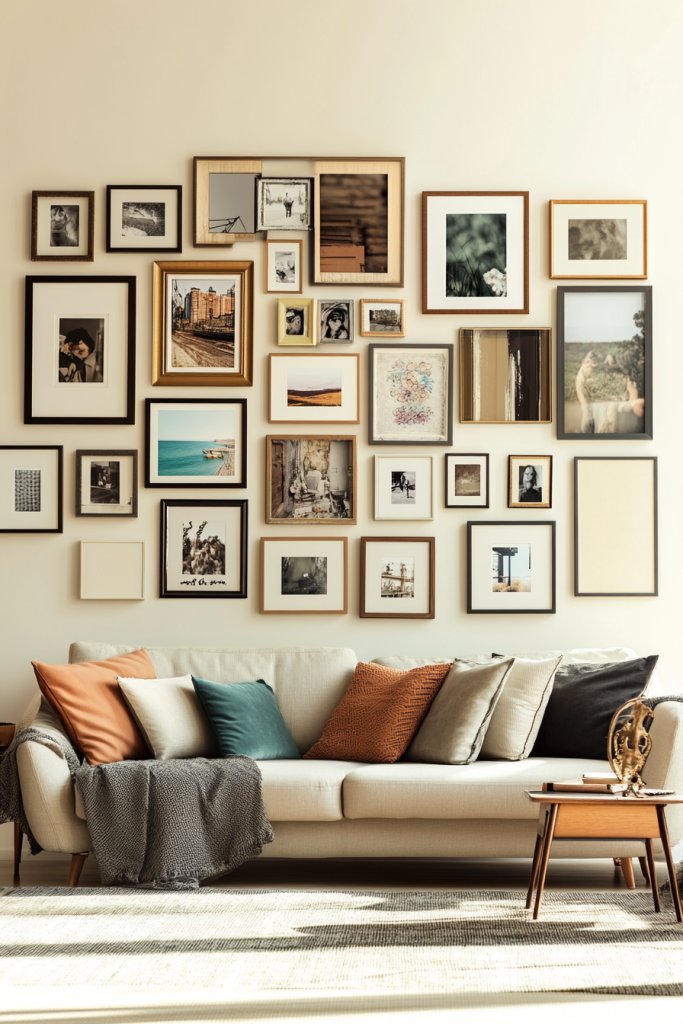
A gallery wall is a dynamic, personalized art display that transforms blank wall space into a focal point filled with your favorite prints, photos, and decorative elements. The mix-and-match approach offers flexibility, allowing you to incorporate different frame styles, sizes, and artwork to reflect your personality and style.
It’s an easy way to add visual interest and a curated, gallery-like feel to your room. Picture a wall adorned with an eclectic arrangement of framed prints—some in ornate gold frames, others in sleek black or white, with a mix of photographs, quotes, and abstract art.
The varied sizes and orientations create a lively rhythm, while the overall layout feels balanced yet spontaneous. Incorporate personal photos, vintage prints, or even fabric swatches for added texture.
Use painter’s tape or washi tape to plan your layout before hanging, ensuring a cohesive look. The combination of colors, frames, and artwork invites the eye to explore and adds a layer of personality to your decor.
Begin by gathering a selection of frames and prints that match your style and color scheme. Lay them out on the floor to experiment with arrangements before hanging.
Use basic tools like a hammer and nails or adhesive hooks for easy setup. For a polished look, keep a consistent mat or border around prints, or go for a more eclectic feel with diverse frame styles. This project is highly customizable and rewarding, giving you a unique art display that reflects your taste and instantly elevates your room’s aesthetic.
Conclusion
With these 25 easy DIY room decor ideas, transforming your space has never been more fun and accessible. From stylish wall hangings and personalized gallery walls to clever upcycling projects and textured accents, there’s something to suit every style and skill level. Dive into these creative projects and infuse your home with personality and charm—your perfect space is just a DIY away! Start now and watch your room become a beautiful reflection of your unique taste.
Leave a Reply