Ever wondered how to transform a blank wall into a stunning showcase of your personality and creativity? DIY wall decor has become a favorite for many because it offers a unique way to personalize your space without breaking the bank. Not only is it fun and satisfying to craft something yourself, but it also allows you to add those special touches that truly reflect your style and interests.
From rustic charm to modern minimalism, DIY wall projects empower you to turn ordinary walls into extraordinary focal points. In this article, you’ll find a treasure trove of innovative ideas and practical tips that will inspire your next decorating adventure.
Whether you’re a beginner or an experienced DIY enthusiast, there’s something here for everyone—from cozy string light installations to bold geometric sculptures. Get ready to explore a diverse range of creative projects that will help you craft personalized, eye-catching walls that make your space truly your own!
1. Macramé Wall Hangings with Custom Patterns
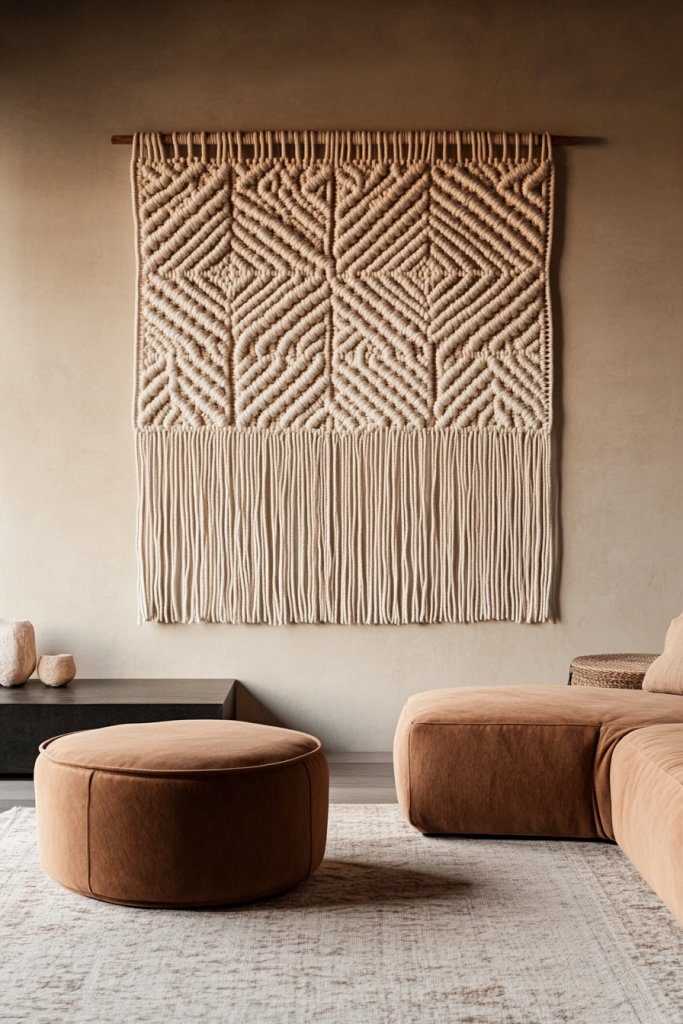
Macramé wall hangings are a timeless way to add texture and personality to any space. Custom patterns elevate this craft, turning a simple textile into a striking focal point that reflects your style.
Imagine a large, intricately knotted piece featuring symmetrical loops and fringed edges in soft neutral tones like cream, taupe, or blush. The thick cotton cords create a tactile, boho-inspired texture that invites touch, while the pattern—perhaps a diamond motif or chevron stripes—adds visual interest.
Hanging against a light-colored wall, this piece offers a cozy, artisanal vibe that instantly warms the room. The gentle sway of the fringes in the breeze enhances the relaxed, inviting atmosphere.
Getting started is easier than you might think. Gather cotton cords or jute ropes, a wooden dowel or metal rod, and your preferred pattern template.
Cut the cords to your desired length, attach them to the dowel with lark’s head knots, and then follow your chosen pattern to knot and weave. Finish with fringes or tassels for extra flair. No advanced skills are needed—just patience, some basic knotting techniques, and a creative eye to customize your design.
2. Framed Fabric Art Using Recycled Textiles
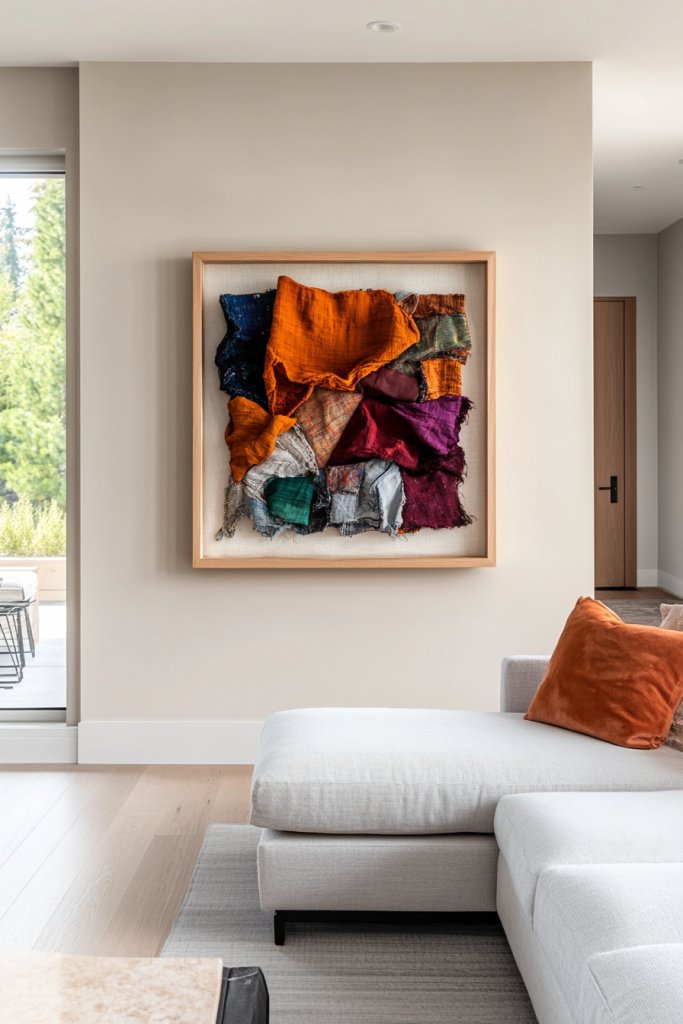
Transforming recycled textiles into framed fabric art is a sustainable way to add a colorful, textured element to your walls. It combines eco-consciousness with creative flair, giving new life to old fabrics.
Picture a series of vibrant, patchwork-inspired textile panels mounted in sleek, simple frames. The fabrics might include vintage floral prints, linen, burlap, or even worn-out T-shirts dyed in bold hues.
Each piece is stretched tightly within the frame, showcasing layered textures and patterns that evoke a cozy, eclectic charm. When hung together, they create a gallery wall of meaningful, upcycled art that adds warmth and personality to any room.
To create your own, start by collecting recycled textiles—think scrap fabrics, old clothing, or leftover upholstery. Cut them into manageable sizes, then layer or stitch pieces together for a patchwork effect if desired.
Stretch your fabric over a sturdy frame or canvas board and secure with glue or staples. Finish by framing each piece with simple wood or metal frames. This project is beginner-friendly and offers endless customization options based on your fabric stash.
3. Geometric Wood Wall Sculptures for Modern Flair
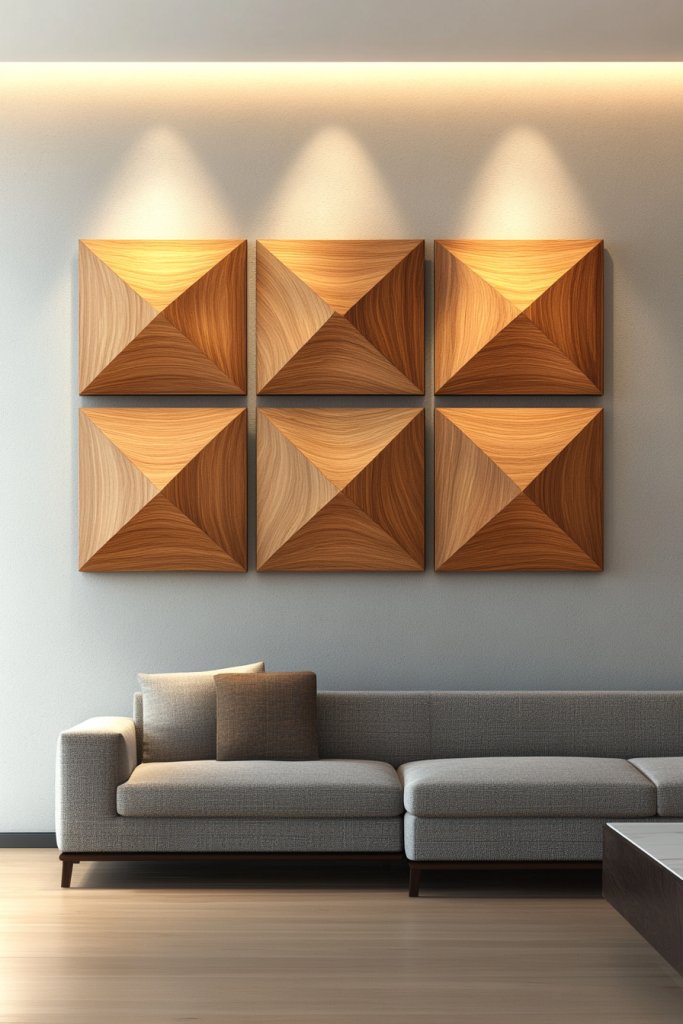
Adding geometric wood sculptures to your wall introduces a sleek, contemporary aesthetic that emphasizes clean lines and natural materials. These sculptures serve as statement pieces that elevate your decor with minimal effort.
Visualize a set of interlocking wooden shapes—triangles, hexagons, or rectangles—mounted in a symmetrical or asymmetrical arrangement. The wood might be left in natural tones, stained in deep espresso, or painted in bold colors like navy, mustard, or blush.
The three-dimensional design creates shadows and depth, making the sculpture pop off the wall. Its modern look pairs beautifully with minimalist furniture, offering a chic, artful accent that transforms a blank space into a focal point.
To make your own, select wood pieces or craft plywood, cut into your chosen geometric shapes using a jigsaw or purchase pre-cut shapes from a craft store. Sand the surfaces for smoothness, then stain, paint, or seal as desired.
Attach the pieces together with strong adhesive or small nails to form your sculpture. Use mounting hardware to hang securely on the wall. This project is perfect for DIY enthusiasts ready to add a bold, modern touch.
4. DIY Wall-Mounted Shelves with Decorative Items
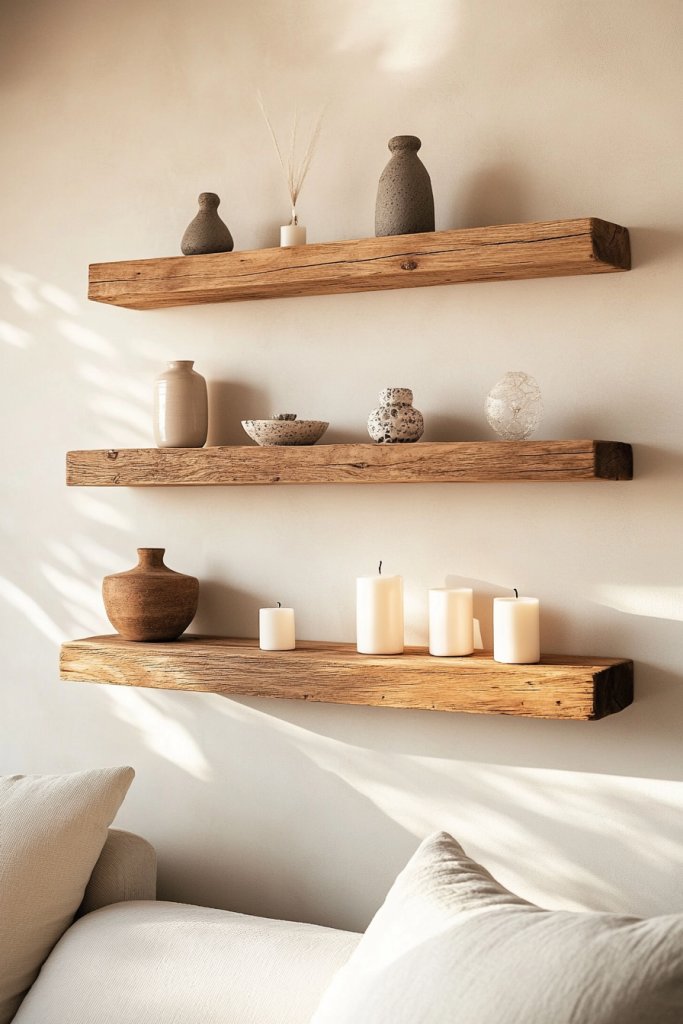
Transforming an empty wall into a stylish display zone is easier than you think with DIY wall-mounted shelves. This idea is perfect for showcasing your favorite decorative pieces while adding functional storage to any room.
It’s a simple, cost-effective way to bring personality and organization together seamlessly. Imagine sleek wooden shelves painted in soft pastels or bold black, mounted at varying heights on a blank wall.
They hold a curated collection of decorative items like vintage vases, small potted succulents, framed photos, or quirky figurines. The shelves create a layered visual effect, with textured ceramics, glossy glass, or rustic reclaimed wood adding depth.
The overall look is both modern and cozy, making your space feel curated yet inviting. The arrangement invites you to run your fingers along the edges, and the visual contrast between the shelves and their contents adds a lively, personalized touch.
Getting started is straightforward. First, measure and mark where you want your shelves, then select wooden planks or floating shelf kits available at hardware stores—alternatives include reclaimed wood or sturdy MDF for budget-friendly options.
Use a level and a drill to securely mount the brackets or floating supports. Decorate with your chosen items, mixing heights and textures for visual interest. Keep safety in mind by anchoring shelves into studs or wall anchors if needed, and enjoy a customized display that elevates your decor effortlessly.
5. String Light Art Installations for Cozy Ambiance
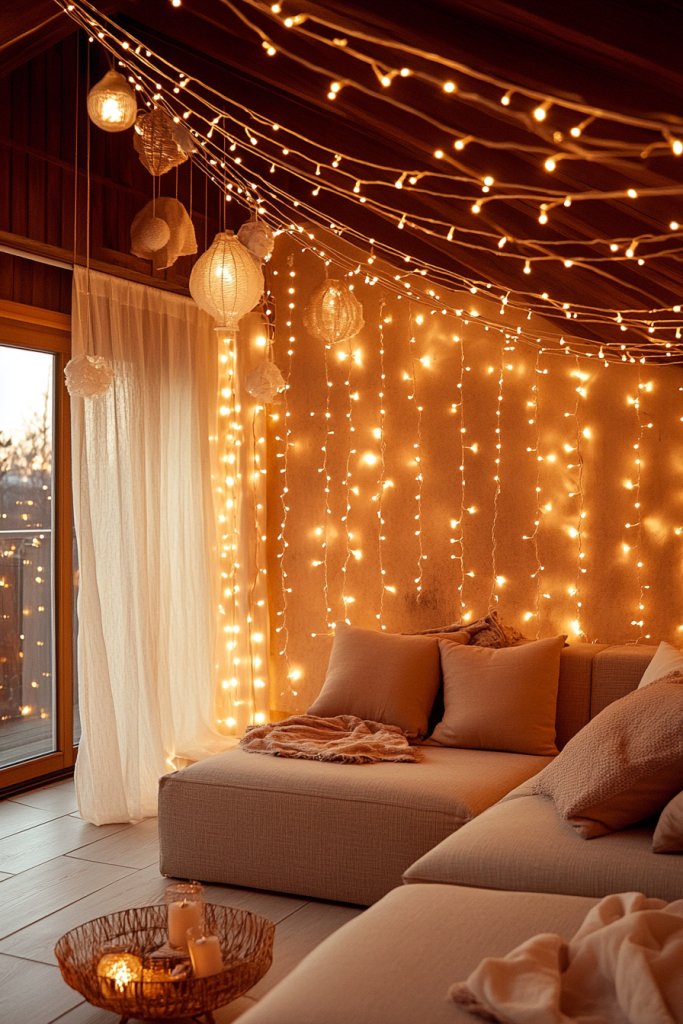
String light art installations are a magical way to create a warm, inviting atmosphere in any space, perfect for cozy nights or lively gatherings. This idea combines soft illumination with visual intrigue, transforming bare walls into enchanting backdrops.
Picture a wall softly lit by a network of delicate string lights arranged in geometric shapes, flowing patterns, or even whimsical designs like stars or hearts. The gentle glow casts flickering shadows and a calming ambiance, perfect for bedrooms, living rooms, or patios.
The lights glisten against textured wall surfaces, enhancing the room’s warmth. Embedded among the lights could be small decorative elements like paper lanterns, photo clips, or fabric banners, adding layers of visual interest.
The result is an intimate, dreamy space that feels both handcrafted and effortlessly stylish. To create your own string light installation, gather battery-operated fairy lights or plug-in string lights, depending on your space and preference.
Use command hooks, adhesive clips, or cup hooks to secure the lights in your chosen pattern—simple geometric shapes or freeform designs work well. For added flair, incorporate small decorative accents like paper cutouts or fabric strips woven into the lights.
Take your time arranging the pattern, ensuring the lights are evenly spaced and securely fastened. Plug in your creation, and enjoy a cozy, personalized glow that instantly elevates your space.
6. Faux Tile Murals Using Peel-and-Stick Stickers
Faux tile murals are a fantastic way to achieve the chic, polished look of tiled walls without the mess or expense of real tiles. Using peel-and-stick stickers, you can create a stunning, low-maintenance feature wall that adds texture and style to your room.
Imagine a vibrant, geometric, or classic subway tile pattern covering a designated wall—bright whites, blues, or even metallic hues like gold or silver. The stickers are designed with realistic grout lines and detailed tile patterns, giving the illusion of a full tile installation.
This textured surface catches the light differently throughout the day, adding depth and visual interest. The overall effect is fresh, modern, and easily customizable—perfect for kitchens, bathrooms, or accent walls in living areas.
To DIY this look, purchase peel-and-stick tile decals from home improvement or craft stores—alternatives include removable wallpaper or stencil paint designs for different effects. Clean and dry your wall thoroughly before application.
Carefully peel and align each tile sticker, smoothing out air bubbles with a squeegee or cloth. For larger areas, work in sections to keep lines straight. Once complete, you’ll have a sleek, stylish wall that’s simple to remove or update whenever you desire a fresh look, all without the hassle of traditional tile installation.
7. Decorative Wall Tapestries Made from Woven Materials
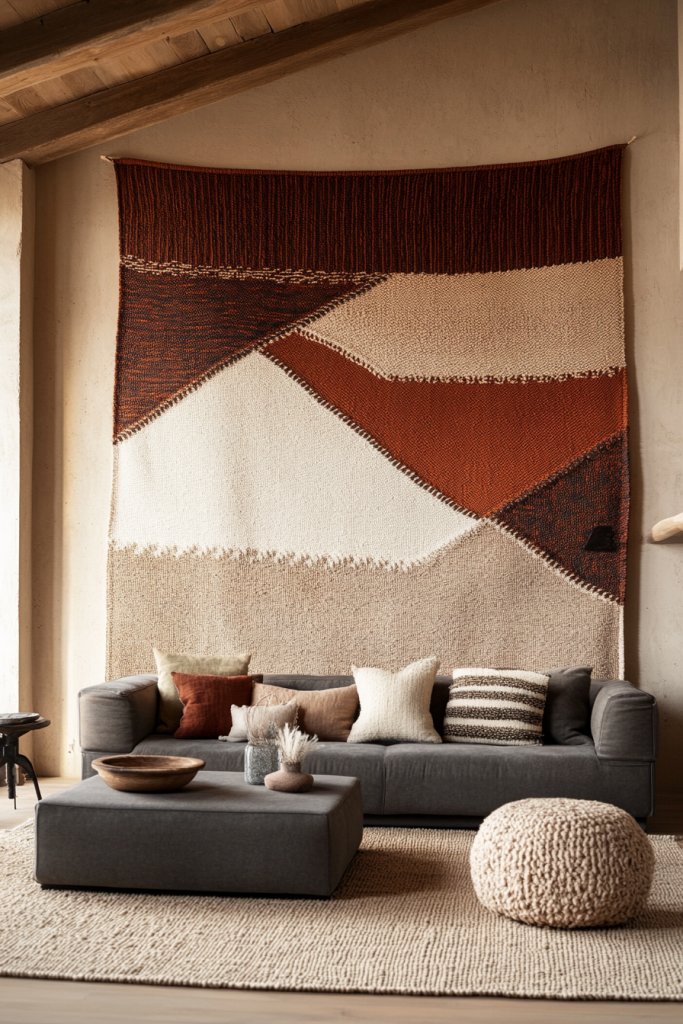
Decorative woven tapestries bring warmth, texture, and a touch of boho charm to any wall, instantly transforming a blank space into a cozy focal point. They’re perfect for adding visual richness and a tactile element to your decor.
Picture a large, intricately woven textile featuring natural fibers like jute, cotton, or wool, with patterns in earthy tones—beige, rust, deep blues, or vibrant reds. The tapestry hangs loosely or is stretched taut over a wooden dowel, creating soft folds and a layered look.
Its textured surface invites touch and adds depth to the wall, while the patterns evoke a sense of craftsmanship and cultural richness. Whether placed behind a bed or sofa or in an entryway, this decorative piece radiates warmth and personality, making your space feel inviting and curated.
To make your own, start with woven fabric or macramé kits, or create your own design using knots, weaving, or embroidery on a sturdy base. Attach the textile to a wooden dowel or rod using simple stitches or clips.
Hang it with rope or leather straps, securing it to nails or hooks on the wall. If you prefer ready-made options, many craft stores sell beautiful woven wall hangings—customize yours with additional tassels or beads for extra flair. This project is easy, inexpensive, and adds a handcrafted, textured touch to your home decor.
8. Artistic Wall Decals Created with Stencils and Paint
Decorative wall decals made with stencils and paint offer a customizable, budget-friendly way to add pattern and personality to your space without the permanence or expense of wallpaper. This technique allows you to create eye-catching designs that reflect your style and transform blank walls into works of art.
Picture a clean, neutral wall as your canvas—perhaps a soft blush pink, muted gray, or crisp white. Using a stencil with an intricate leaf pattern, geometric shapes, or inspiring words, you can add a bold or subtle visual element.
When painted with a contrasting or metallic color—like gold or navy—the design pops with depth and sophistication. The texture of the paint adds a tactile quality that enhances the overall aesthetic, making your wall feel layered and lively.
The result is a chic, personalized backdrop that can complement various decor styles, from boho to modern minimalist. Getting started is simple: gather your preferred stencil, painter’s tape, and quality acrylic or latex paint in your chosen shades.
Secure the stencil flat against the wall with tape, then use a foam roller or stencil brush to dab on the paint gently—avoid excess paint to prevent bleeding. Carefully lift the stencil when finished, and repeat as needed to cover larger areas or create repeating patterns.
For a more refined finish, consider using a stencil brush for detailed edges or layering different colors for a more complex look. This DIY project is accessible for beginners and offers endless possibilities for creative expression.
9. Custom Monogram or Name Sign in 3D Letters
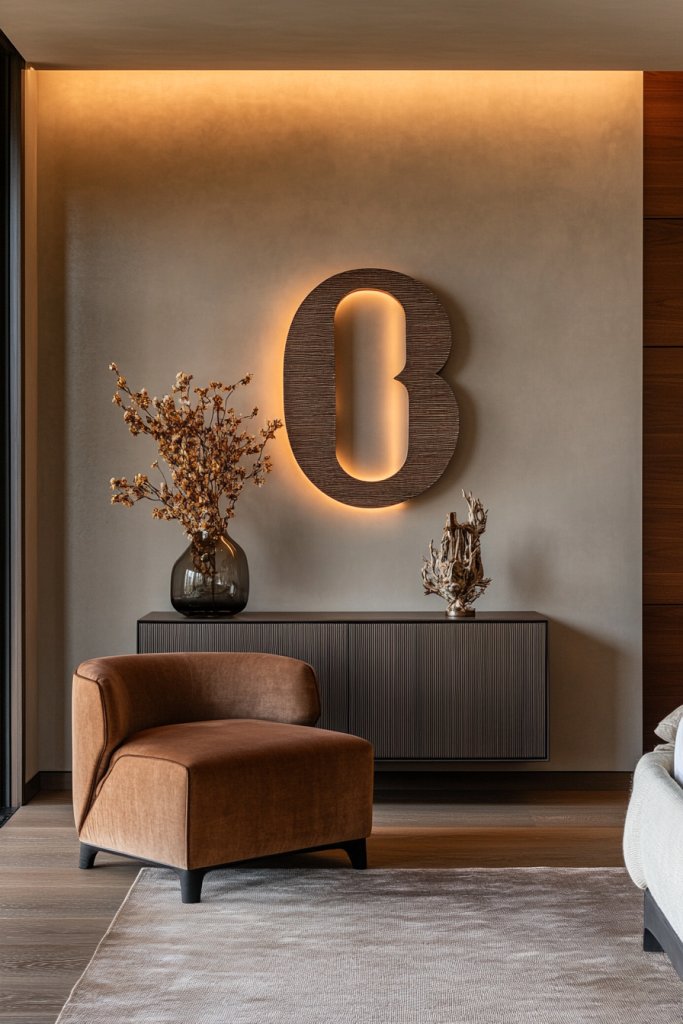
A personalized monogram or name sign in 3D letters adds a striking focal point to your wall, blending modern design with heartfelt individuality. It’s a simple yet impactful way to make your space feel uniquely yours, whether in a bedroom, entryway, or living room.
Imagine sleek, three-dimensional letters crafted from materials like reclaimed wood, foam board, or acrylic, painted in your favorite colors—perhaps matte black for sophistication, metallic gold for glam, or soft pastels for a gentle touch. The letters are arranged horizontally or vertically, with spacing tailored to your wall’s size, creating a balanced and eye-catching display.
The 3D aspect adds shadows and depth, making the sign stand out against a plain wall or behind a cozy gallery of family photos and decorative accents. This personalized touch instantly elevates your decor and makes your space truly welcoming.
To create your own monogram or name sign, start by selecting your preferred font and sizing the letters to fit your wall. Cut out the letters from your chosen material—using a cutting machine like a Cricut for precision or manual methods for a handcrafted feel.
Paint or decorate the letters as desired, then attach hanging hardware or command strips to the back. Mount the sign at eye level, ensuring it’s centered and straight. This project is straightforward and highly customizable, making it perfect for adding a meaningful, modern statement to your home.
10. DIY Metallic Wall Art Using Aluminum Foil or Gold Leaf
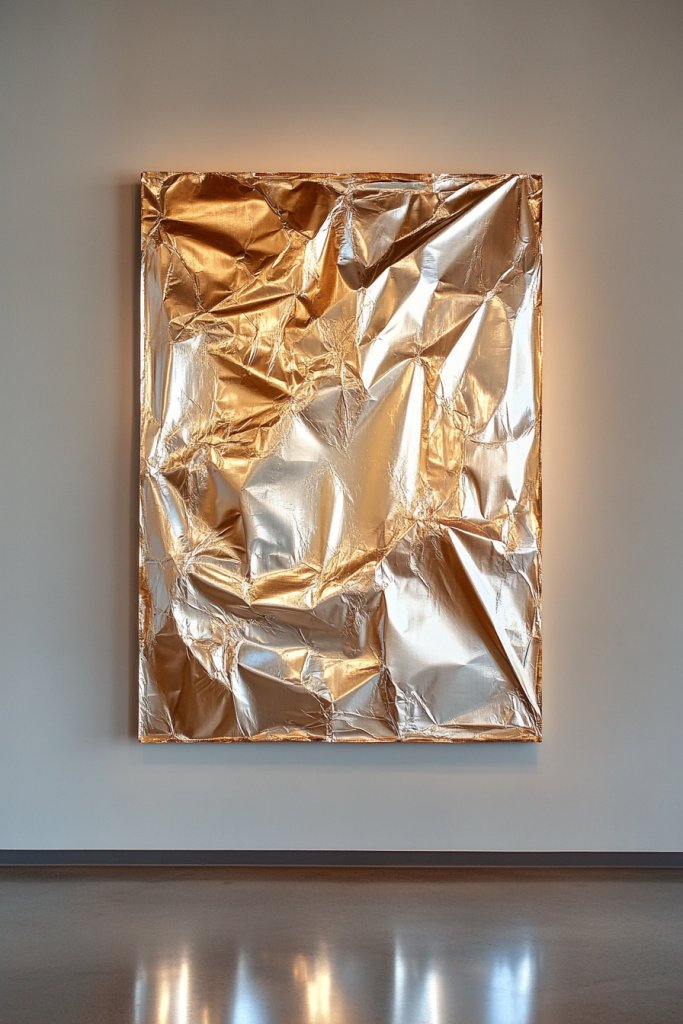
Adding metallic accents to your wall decor creates a luxe, radiant atmosphere that catches the eye and reflects light beautifully. Using materials like aluminum foil or gold leaf, you can craft stunning, budget-friendly metallic wall art with a high-end look.
Visualize a large canvas or wooden panel as your base, painted in a neutral tone—think soft gray, beige, or matte black—to serve as a backdrop for your metallic masterpiece. Using aluminum foil or gold leaf, you can create abstract shapes, geometric patterns, or textured surfaces by carefully applying the metal with adhesive or decoupage glue.
The result is a shimmering, textured focal point that exudes elegance and modernity. The reflective quality of the metallics adds depth and dimension, making your wall come alive with light and movement.
Start by preparing your base with a coat of primer or base paint, then outline your design lightly with a pencil. Carefully apply adhesive or decoupage glue where you want the metallic elements, then gently press the foil or gold leaf into place, smoothing out wrinkles with a soft brush or fingertip.
Trim excess material for clean edges. Seal the finished piece with a clear protective coat if desired. This project is accessible for DIYers of all skill levels and instantly transforms ordinary walls into striking art installations.
11. 3D Paper Art or Origami Wall Installations
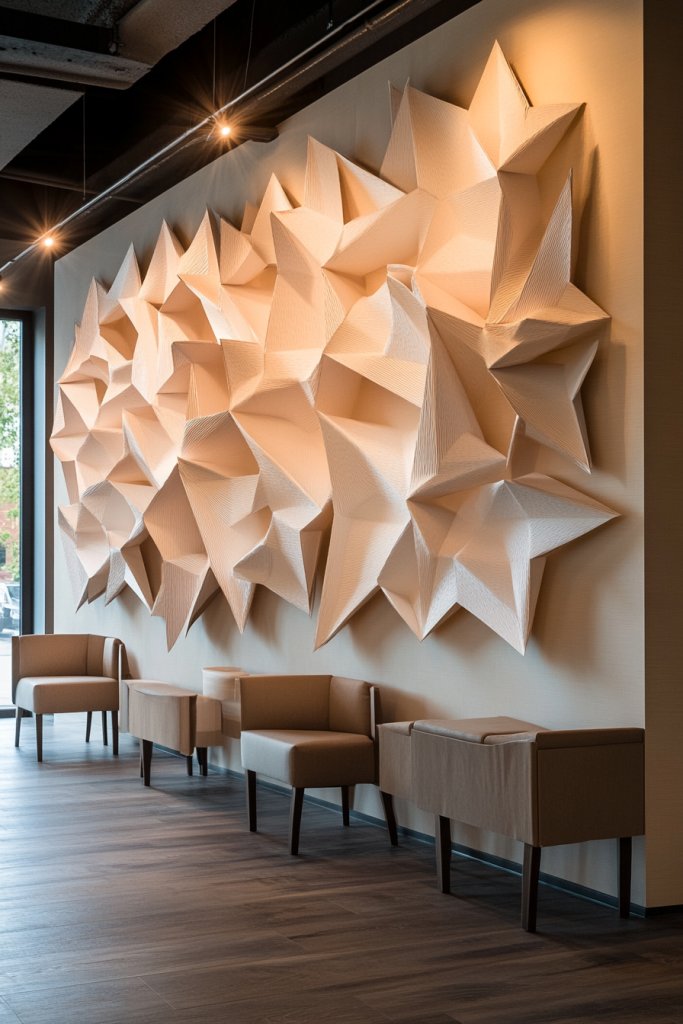
Transform your wall into a gallery of intricate, eye-catching shapes with 3D paper art and origami installations that bring depth, texture, and a touch of craftsmanship to your decor. These lightweight, customizable pieces can be tailored to any style or color scheme, making your space uniquely vibrant.
Picture a wall adorned with a series of folded paper sculptures—geometric triangles, delicate blossoms, or abstract forms—crafted from sturdy cardstock or decorative paper. In soft pastel shades, metallics, or bold primary colors, these shapes create a dynamic visual rhythm, especially when arranged in a repeating pattern or clustered in a specific area.
The tactile quality of the folds and angles invites viewers to appreciate the craftsmanship, adding a sense of movement and sophistication. These pieces can be hung individually or grouped for a statement installation, lending an artistic, handcrafted vibe to your room.
To create your own origami wall art, gather durable paper or cardstock in your chosen colors. Use tutorials or diagrams to fold shapes like cranes, hexagons, or modular units.
Attach each piece to the wall with removable adhesive strips or double-sided tape, starting from a central point and expanding outward for symmetry. Experiment with different sizes and arrangements to suit your space, and consider sealing the paper with a matte spray for added durability. This project is perfect for beginners and offers a creative way to add dimension and personality to your walls.
12. Colorful Patterned Washi Tape Wall Designs
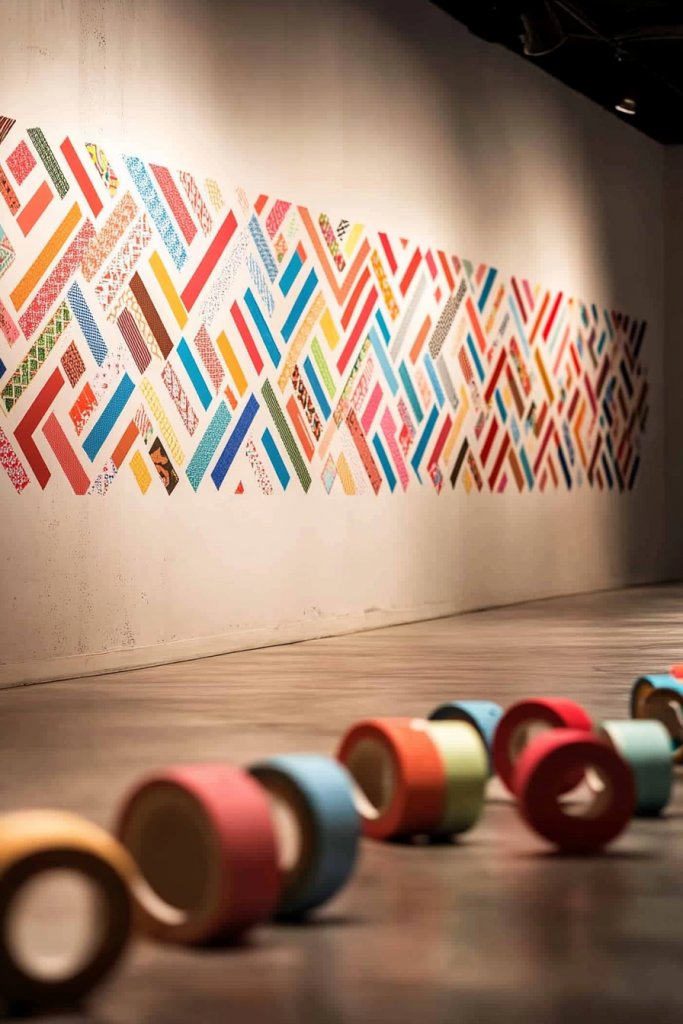
Transforming a blank wall into a vibrant visual focal point can be as simple as using colorful washi tape to create eye-catching patterns. This method offers a playful, customizable, and budget-friendly way to personalize your space with minimal effort.
It’s perfect for renters or anyone wanting a non-permanent decor solution that can be easily changed. Imagine a wall decorated with bold geometric shapes, stripes, or abstract designs, all crafted with strips of washi tape in shades like coral, teal, gold, and mint.
The tape’s matte finish contrasts beautifully against a neutral wall, adding depth and texture. Tactile and colorful, these patterns can be as simple as parallel lines or intricate mosaic-like arrangements, transforming your space into a lively, modern gallery.
The visual impact is both cheerful and sophisticated, fitting seamlessly into contemporary, boho, or eclectic interiors. Getting started is straightforward: gather washi tape in your chosen colors and patterns, a measuring tape or ruler, and some painter’s tape or masking tape for straight lines.
Plan your design with light pencil marks if needed, then carefully apply the washi tape along your guides, pressing firmly to avoid bubbles. For more complex patterns, use a stencil or template to ensure precision. The whole process is quick, fun, and highly adaptable to different wall sizes and styles.
13. Handcrafted Clay or Ceramic Wall Hanging Pieces
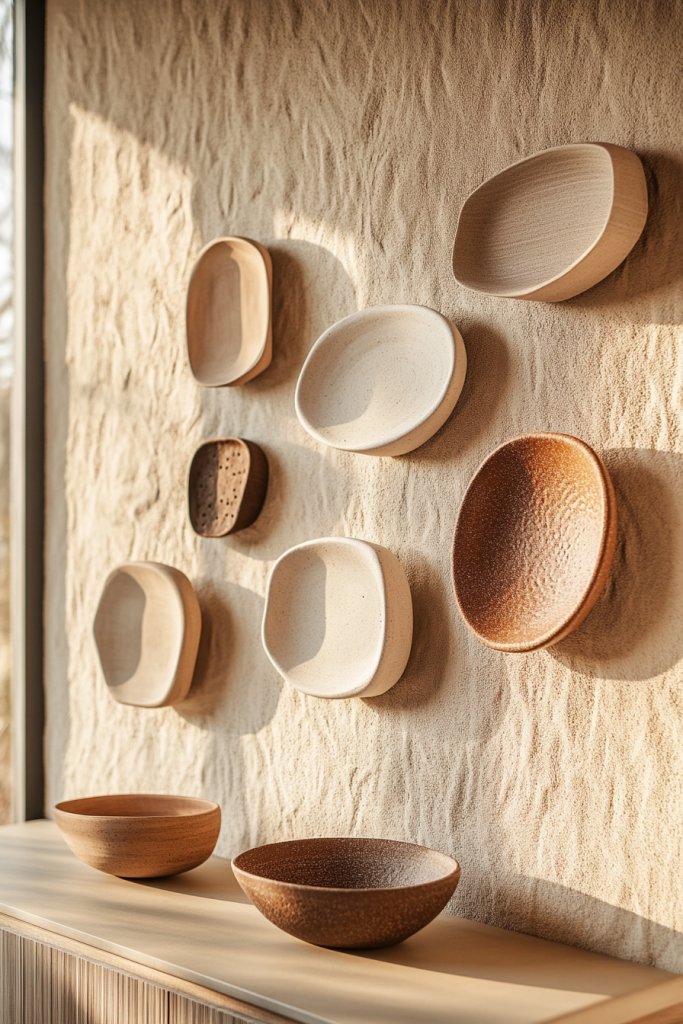
Adding handcrafted clay or ceramic wall hangings introduces organic texture and artisanal charm to your space. These pieces serve as one-of-a-kind decorative accents that celebrate craftsmanship, bringing a warm, tactile element to your wall decor.
Whether glazed or matte, they evoke a cozy, earthy vibe that’s perfect for boho, rustic, or minimalist aesthetics. Picture a series of small, irregularly shaped clay discs or abstract ceramic sculptures mounted on a wall.
Their natural tones—creamy whites, warm terracotta, or speckled browns—complement textured fabrics and wooden elements nearby. The surface textures vary from smooth and glossy to rough and matte, inviting touch and adding visual interest.
Arranged in a linear or clustered formation, these pieces create a dynamic, layered look that feels both relaxed and refined, with subtle hints of handmade imperfection that make each piece special. Creating your own clay wall hangings is accessible: start with air-dry clay or kiln-fired ceramics available at craft stores or online.
Shape small discs, spheres, or abstract forms using simple tools, then let them dry or fire according to the manufacturer’s instructions. You can add color with non-toxic paints, glazes, or metallic accents.
Attach your finished pieces to the wall with strong adhesive or hooks, arranging them in a pattern that suits your space. With patience and creativity, you’ll craft a unique gallery that showcases your personal style.
14. Floating Shelves with Decorative Books and Objects
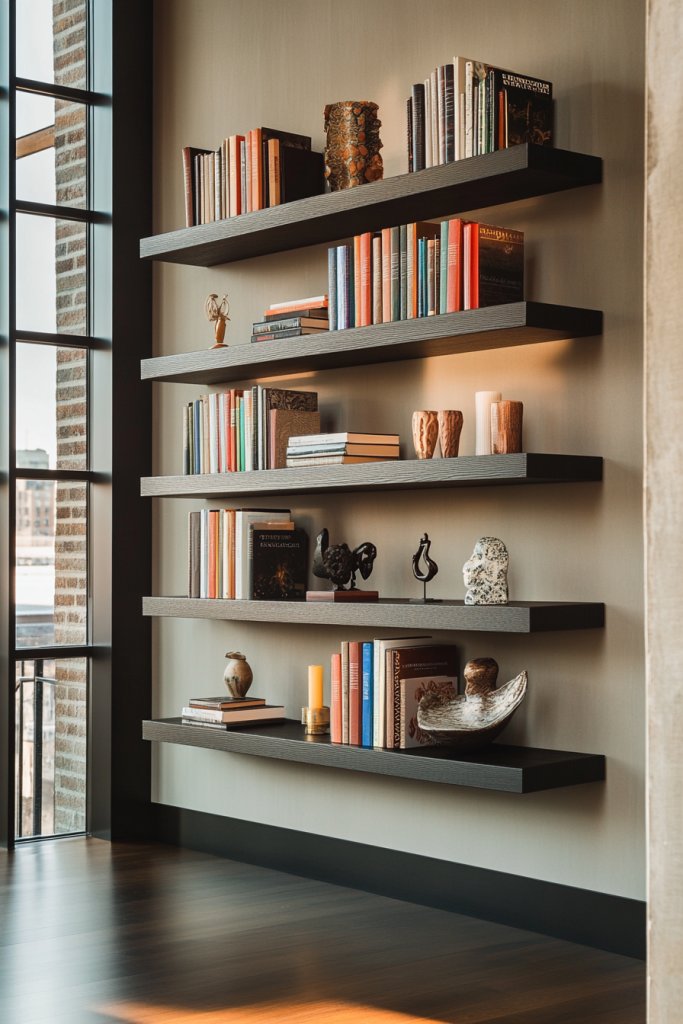
Floating shelves are a sleek, functional way to add visual interest and storage to your walls, especially when styled with decorative books and objects. They create a layered, curated look that balances practicality with aesthetics, making your space appear more intentional and personalized.
Whether in a living room, bedroom, or hallway, floating shelves can showcase your favorite items while enhancing the overall design. Picture a set of minimalist white or natural wood shelves installed at varying heights, holding a mix of hardcover books, small sculptures, candle holders, and framed photos.
The books can be stacked horizontally or arranged vertically, with decorative objects placed to break the monotony and add color or texture. Incorporating items like ceramic vases, vintage cameras, or small indoor plants (if desired) adds visual depth and personality.
The arrangement should feel balanced but not overly symmetrical, inviting the eye to explore different layers and focal points. To implement this, measure and mark where you want your shelves, ensuring they are level.
Use pre-made floating shelf brackets or DIY options like sturdy wooden planks with hidden supports. Secure the shelves into wall studs or use appropriate wall anchors for safety.
Style your collection by alternating heights, colors, and textures, creating a dynamic display that evolves over time. This simple project instantly elevates your decor while providing space for your cherished items.
15. Textile Wall Art Using Quilts or Embroidered Fabrics

Textile wall art made from quilts or embroidered fabrics adds cozy warmth and tactile richness to your space. These pieces serve as functional art, blending craftsmanship with visual appeal.
Their soft textures and intricate details make them perfect for creating a welcoming, personalized atmosphere, especially in bedrooms, living rooms, or cozy corners. Visualize a large, vintage-inspired quilt draped or framed on your wall, its patchwork of colorful fabrics—reds, blues, and creams—creating a patchwork mosaic.
Alternatively, consider a hand-embroidered piece with delicate floral motifs or geometric patterns, mounted in a simple wooden frame or stretched over a canvas. The textures vary from plush quilting stitches to fine embroidery threads, inviting tactile exploration.
The overall effect is warm, inviting, and layered with history and personality, transforming your wall into a tactile tapestry of stories and craftsmanship. To craft your textile wall art, choose a pre-made quilt or sew your own patchwork using fabric scraps.
For embroidery, pick a design or pattern, gather embroidery hoops or stretcher bars, and use embroidery floss and needles to create your artwork. Mount your textile piece onto a frame or secure it with staples on a wooden backing.
For easier options, purchase vintage or handmade textiles online or at thrift stores and display them as-is. This project combines creativity and tradition, resulting in a heartfelt decor element that feels both personal and timeless.
16. Reclaimed Wood Pallet Art with Inspirational Messages
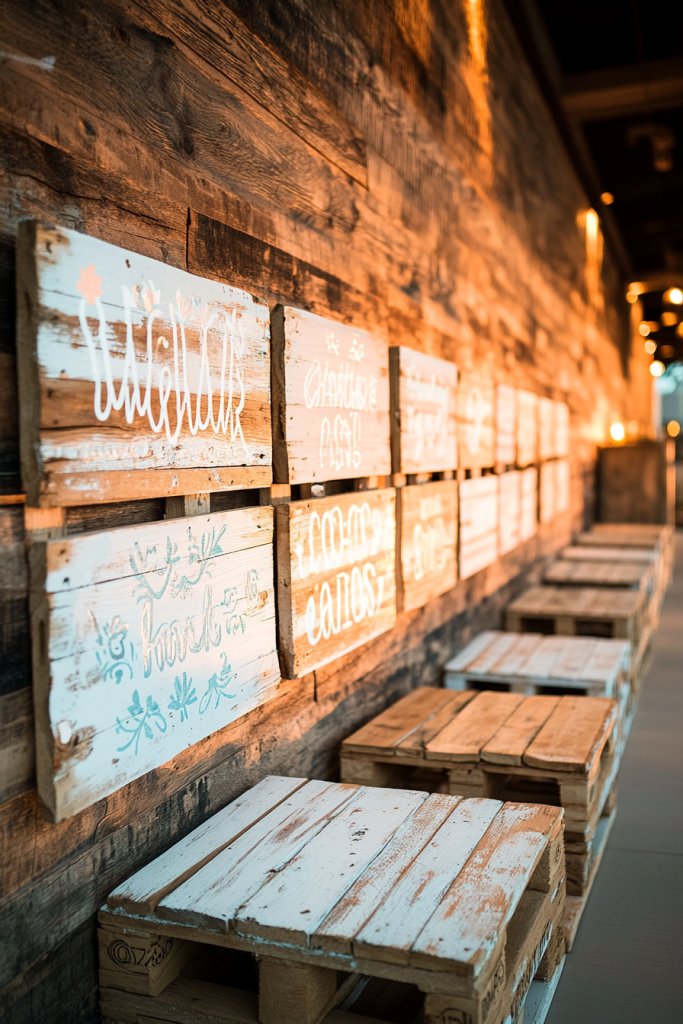
Transforming old pallets into inspiring wall art is a fantastic way to add rustic charm and motivation to your space. This idea not only recycles weathered wood but also creates a warm, inviting atmosphere that echoes sustainability and creativity.
Imagine a large wooden panel crafted from reclaimed pallets, featuring carefully painted or stenciled inspirational words like “Dream Big” or “Stay Positive.” The wood’s natural grain and imperfections add texture and character, while bold, contrasting colors such as white or black paint make the messages stand out vividly. You might also incorporate decorative elements like metal accents or weathered hooks for added visual interest.
The overall effect is a piece that feels both personal and handcrafted, blending raw natural textures with uplifting quotes. To create your own reclaimed pallet art, start by sourcing weathered pallets from local stores or online marketplaces.
Break down the pallets into planks and sand them lightly to smooth rough edges. Arrange the pieces into a rectangular or square shape, securing them with nails or a wood adhesive.
Use stencils or freehand paint your chosen motivational phrases with a brush or spray paint in your preferred colors. Finish by sealing the surface with a clear matte spray to protect your design. Hang your finished piece on a prominent wall to inspire every day.
17. Woven Wall Baskets for Texture and Visual Interest
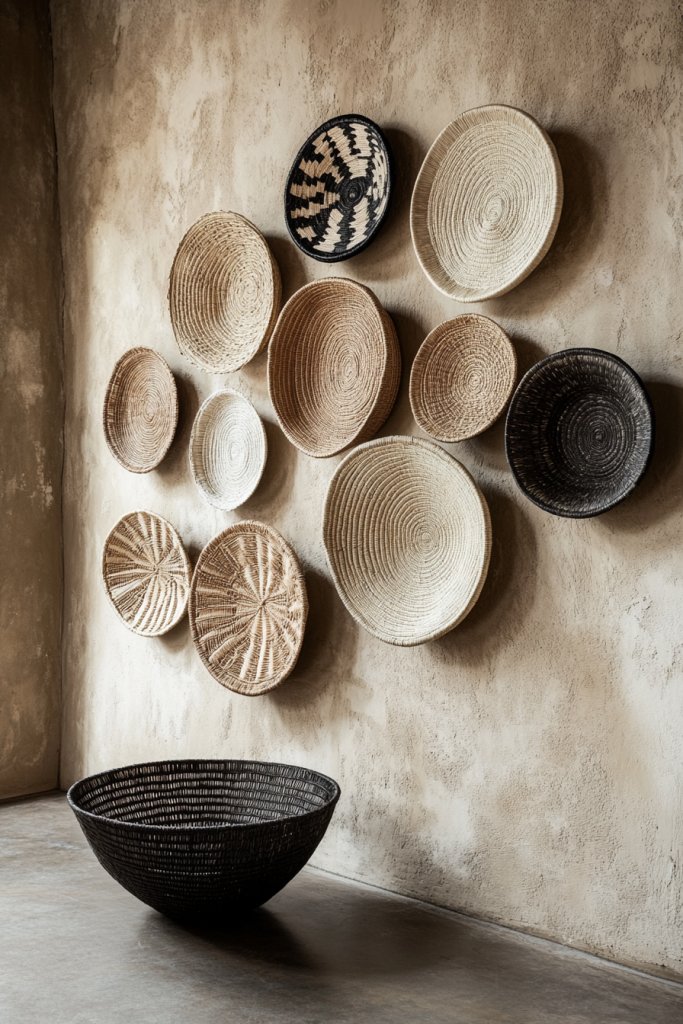
Adding woven wall baskets introduces rich texture and a cozy, bohemian vibe to any room. Their intricate patterns and natural fibers create a tactile focal point that elevates simple wall decor into a statement piece.
Visualize a series of round or oval baskets in neutral tones like beige, taupe, or soft gray, arranged in a staggered or symmetrical pattern. The baskets’ woven textures—made from rattan, seagrass, or jute—offer visual depth and a subtle sheen when catching the light.
Some baskets feature decorative details such as tassels, fringes, or colorful accents, adding personality and warmth. These baskets serve both as art and functional storage, subtly blending practicality with aesthetic appeal.
Their organic shapes and textures evoke a calming, earthy atmosphere, making your space feel inviting and layered. To hang woven baskets, choose a sturdy wall hook or a small nail for each basket’s loop or handle.
Start with larger baskets as anchors and fill gaps with smaller ones for visual balance. Select materials like rattan, seagrass, or jute based on your budget and style preference; many affordable options are available at craft stores or online.
To install, simply secure each basket by its handle or loop, ensuring they hang evenly. Mix and match different sizes and shapes for a curated, eclectic look that adds warmth and texture to living rooms, bedrooms, or entryways.
18. DIY Wall-Mounted Planters for Faux or Artificial Plants
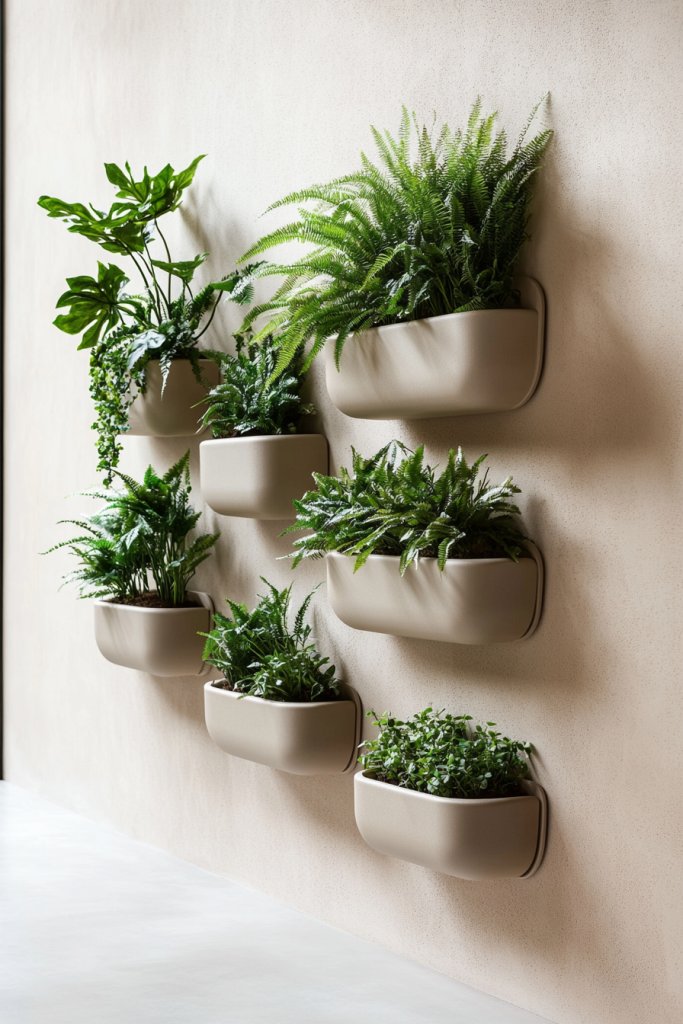
Wall-mounted planters offer a sleek and modern way to display faux or artificial plants, bringing a touch of greenery without the maintenance of real plants. They create a fresh, vibrant atmosphere that’s perfect for brightening up any wall.
Picture a set of minimalist rectangular or circular planters made from metal, ceramic, or wood mounted at different heights on your wall. These containers can be filled with faux succulents, trailing vines, or lush foliage made from high-quality synthetic materials.
The planters’ colors—like matte black, white, or metallic finishes—contrast beautifully with the greenery, creating a clean, contemporary look. When arranged thoughtfully, they give the illusion of a lush green garden, adding both depth and visual interest to your space.
The combination of textures—smooth planters with leafy faux plants—creates a dynamic, lively effect that’s both stylish and low-maintenance. To make your own wall planters, select your preferred containers and attach them securely to the wall using appropriate anchors or mounting brackets.
Fill each with faux plants that mimic real foliage closely, such as silk succulents or artificial trailing ivy. If using wood or ceramic, ensure they are sealed or treated for durability.
Arrange your planters in a grid, staggered pattern, or asymmetrical layout based on your aesthetic taste. This simple DIY allows you to enjoy the look of a lush green wall without the hassle of watering or sunlight.
19. String Art with Custom Shapes and Messages
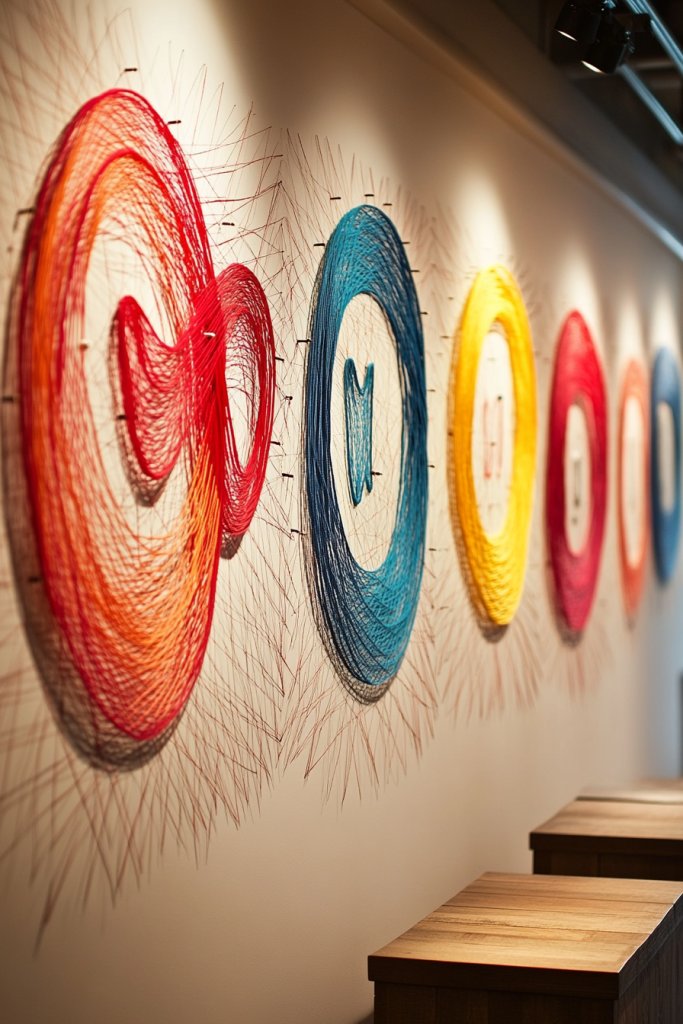
String art transforms simple nails and colorful thread into captivating wall decor that expresses personality and creativity. It’s a highly customizable project perfect for adding a personal touch to your space.
Visualize a large wooden board or canvas with a design outlined by nails or pins, forming a heart, star, or meaningful word like “Love” or “Hope.” Brightly colored threads crisscross between the nails, creating intricate patterns and textures. The interplay of vibrant strings against the natural or painted background creates a lively, eye-catching piece.
The overall effect is both modern and nostalgic, with a sense of handcrafted artistry that makes your wall feel uniquely yours. To create your own string art, start by sketching your design lightly with pencil on a wooden board or sturdy backing.
Hammer nails along the outline at regular intervals, ensuring they are evenly spaced. Choose colorful embroidery floss or craft thread, and begin wrapping the thread around the nails to fill in the design.
Use multiple colors for added vibrancy or stick to a monochrome palette for sophistication. Once finished, secure the ends of the thread, and mount your artwork on the wall using picture hooks or a frame. This creative project is straightforward, fun, and delivers a striking, personalized decor piece.
20. Abstract Painted Wall Panels with Bold Colors
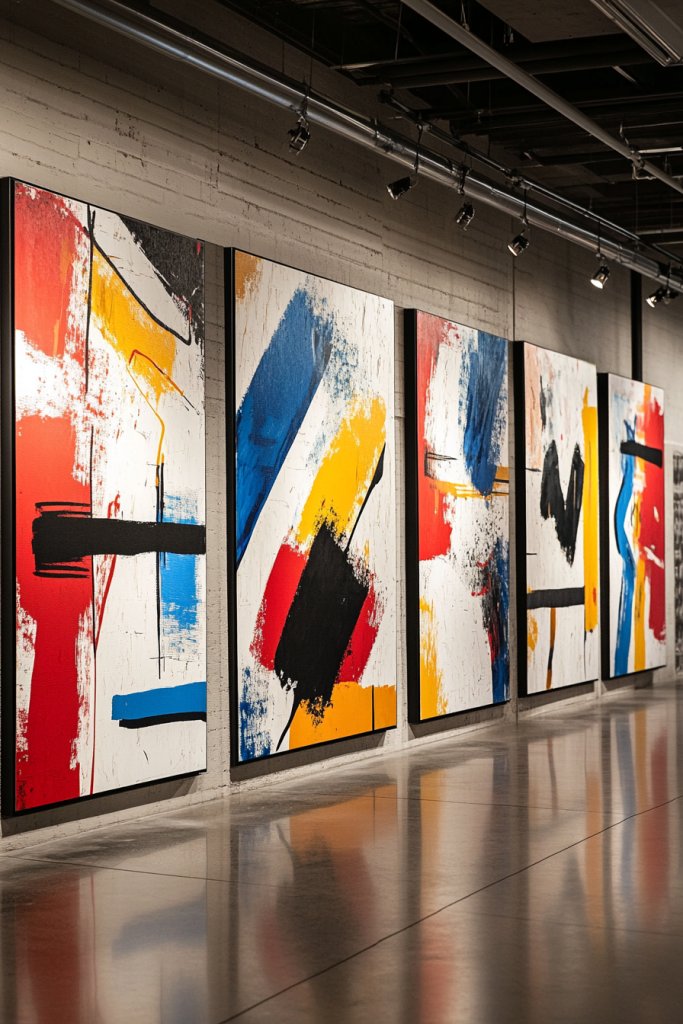
Create a statement wall with abstract painted panels that evoke energy and modern artistry. Bold colors and dynamic shapes transform a plain wall into a captivating focal point.
Picture large rectangular or square panels painted with sweeping brushstrokes, geometric shapes, or freeform splashes in vibrant hues like fiery red, electric blue, or sunny yellow. Layering different shades and textures adds depth and movement, making the wall pulse with visual energy.
The abstract design can be tailored to your color scheme, space size, and personal style, offering a versatile way to express creativity. The combination of bright colors and bold forms energizes the room and makes it feel contemporary and lively.
To make your own abstract panels, start with blank canvases or sturdy MDF boards. Sketch your design lightly with pencil, then use acrylic paints or latex wall paint for bold coverage.
Mix colors directly on the surface or use masking tape to create sharp edges and geometric shapes. Apply multiple layers for texture and depth, and finish with a clear matte or gloss sealant.
Mount the finished panels on your wall with picture hooks or adhesive strips, arranging them as a gallery or in a grid for maximum impact. This project is perfect for those looking to add a splash of color and artistic flair to their home effortlessly.
Conclusion
With so many creative DIY wall decor ideas—from macramé hangings and painted canvases to reclaimed wood art and personalized photo collages—there’s endless potential to transform your space into a reflection of your unique style. Whether you prefer modern geometric designs, cozy string light installations, or vibrant painted panels, these projects invite you to get hands-on and make your home truly yours.
Don’t hesitate to experiment and let your personality shine through every detail. Start crafting today and turn your walls into inspiring works of art that tell your story.
Leave a Reply