I have been, or can be if you click on a link and make a purchase, compensated via a cash payment, gift, or something else of value for writing this post. As an Amazon Associate, I earn from qualifying purchases. Please read my full Affiliate Disclosure for more information.
Transforming your bedroom ceiling can instantly elevate the entire space, making it feel more luxurious, cozy, or stylish. Ceiling design ideas have surged in popularity because they offer an unexpected way to add personality and character without altering the walls or furniture. From bold colors to intricate patterns, a well-designed ceiling can become the focal point that ties the entire room together.
In this article, you’ll discover a wide array of creative ceiling ideas tailored to suit different styles and preferences. Whether you love subtle elegance or daring designs, there’s something here to inspire your next makeover. Get ready to explore innovative ways to transform your bedroom ceiling and create a stunning, personalized sanctuary!
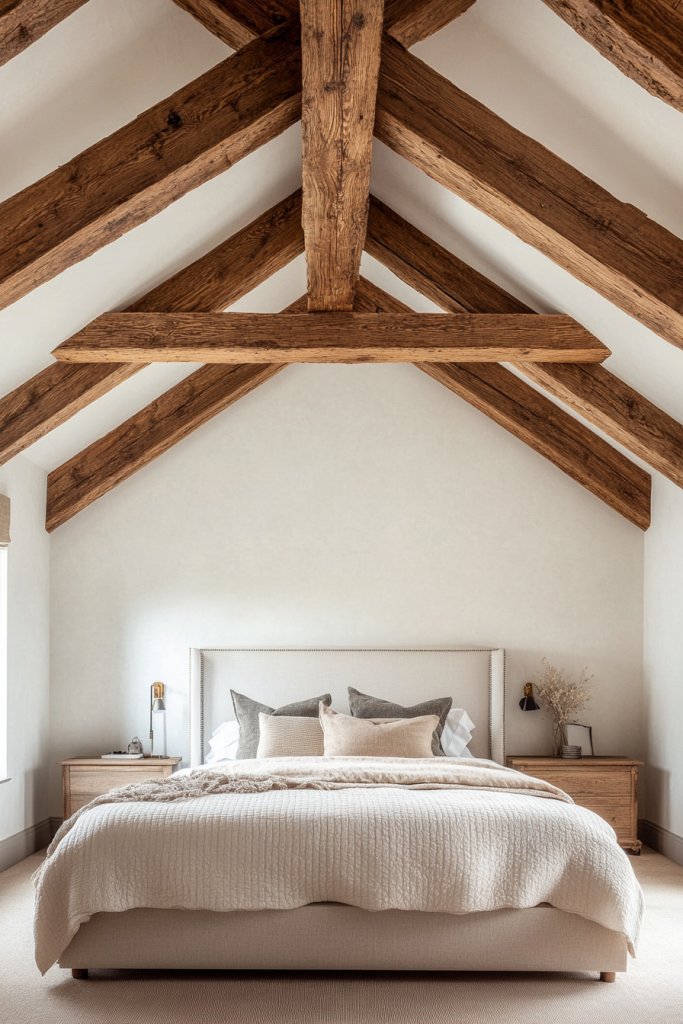
1. Wooden Beam Accents for Rustic Charm
Longing for that cozy, cabin-like vibe that makes your bedroom feel warm and inviting? Standard ceilings can sometimes leave a space feeling a bit sterile or generic. You want to add character, texture, and a dash of rustic charm. Wooden beams are the perfect fix, instantly transforming an ordinary ceiling into a statement piece.

- AUTOGRAPHED / SIGNED -- Wooden : A Lifetime of Observations and Reflections on and off the Court by Coach John Wooden and Steve Jamison.
- Hardcover Book
- John Wooden (Author)
- English (Publication Language)
- 201 Pages - 04/22/1997 (Publication Date) - Contemporary Books (Publisher)

- TOP NOTCH CRAFTSMANSHIP: Our Kitchen Premium Wooden Utensils for Cooking are specially made, high-quality wooden utensils that serve all your cooking needs. Our Wooden Kitchen Utensil Set consists of 6 utensils that include a salad spoon, salad fork, serving spoon, skimmer, spatula and turner. These Wood Utensils Set bring a classic and elegant touch to your kitchen with the perfect assortment of practical sizes that are ergonomically shaped for the ideal functionality.
- EASY TO CLEAN, EASY TO STORE: This Wooden Spoon Set for Cooking is made with long-lasting outstanding quality! Teak wood is particularly valued for its durability and water resistance. It is recommended to give these Wooden Cooking Spoons a quick thorough rinse with a bit of soap and water and then either hang-dry them or dry them in an upright position. This Wooden Spoon Set is coated and well-polished with a clear lacquer which is ideal for retaining its beautiful gloss.
- SCRATCH-FREE DESIGN: Our Wooden Cooking Utensil Set is made of Premium Quality Teak Wood close-grained hardwood with high organic oil, and silica content that is known for being one of the hardest, strongest, and most durable of all timbers. Beautifully crafted, soft to touch, lightweight, and very solid basically defines these Wooden Spoon Sets for Cooking. Now you can use your precious non-stick cookware without worrying about damages and scratches.
- IDEAL GIFT FOR COOKING ENTHUSIASTS: These Kitchen Utensils are beautifully crafted from teak wood which gives these Wooden Utensils an aesthetically pleasing ambiance to any kitchen. Great gift idea for Housewarming, Birthday, Christmas and Thanksgiving. Perfect for loved ones that like to cook, chefs or even for your own personal use. A perfect tool for freshening up or starting up your very own kitchen, a very attractive addition that will bring class and sophistication to your kitchen.
- NO HASSLE, ZULAY GUARANTEE: We love and take pride in our Wooden Cooking Utensil Set and we back this up with a Lifetime Guarantee. Have the confidence that these Wood Kitchen Utensils will last, if there are ever any issues, just contact us and we will make it right. Order now and be assured that this product will live up to your expectations, guaranteed. If it does not, we got you covered. Chances are, you will never need to reach out!
- Set Includes: Spoon, Turner and Slotted Spoon
- Solid beechwood construction
- Natural oil finish protects the wood for long-term use
- Large, comfortable handle
- Hand wash only

- Clothes Hanger Lightweight, yet strong in construction, to efficiently hang heavy garments like coats, suits, and jackets Suitable for all types, sizes, and styles of clothing.
- Coat Hanger that are Suitable for all types, sizes, and styles of clothing.
- Wood Hangers with Perfectly shaped notches along the shoulders allow you to hang shirts, blouses and dresses effortlessly.
- Suit hangers heavy duty & non-slip, provide the perfect solution for hanging pants and other garments.
- Pant hangers elegantly crafted from wood have unsurpassed strength & durability.

- Hardcover Book
- John Wooden (Author)
- English (Publication Language)
- 302 Pages - 04/05/2005 (Publication Date) - McGraw Hill (Publisher)

- Complete Cooking & Serving Utility – Discover why this set belongs among the best cooking utensils set non toxic, offering long-lasting quality for daily use. Designed to enhance your kitchen counter decor, these spoons look as good as they perform. A durable wooden kitchen utensil set makes flipping, stirring, and serving effortless. Built from premium bamboo utensils, they resist cracks and stains. Dependable wooden utensils provide the right tool for every dish.
- High-Quality Bamboo – Upgrade your kitchen with a wood utensils set for cooking crafted from 100% organic bamboo that’s safe for every pot and pan. A durable wooden spatula for cooking ensures smooth flipping and stirring without scratching cookware. Versatile bamboo cooking utensils resist stains and odors for long-lasting freshness. Each wood spatula is lightweight yet sturdy, perfect for everyday meal. This wooden cooking utensils set is part of the finest cooking utensil sets for home chefs.
- Practical Design and Functionality – Cook with confidence using non toxic cooking utensils crafted for everyday use. This versatile spoon set includes slotted, solid, and turner options to handle a wide range of tasks. A complete wood cooking utensils set makes flipping, stirring, and tasting effortless. Designed as a reliable cooking utensil set, it ensures you always have the right tool. Classic wood spoons and a durable wood kitchen utensils set bring style and function to any kitchen.
- Easy to Clean & Durable – Simplify daily cooking with a kitchen cooking utensils set that wipes clean quickly after use. Made from strong bamboo kitchen utensils, this collection is built for lasting performance. Classic wood spoons for cooking handle stirring, mixing, and serving with ease. A well-crafted range of wooden kitchen utensils gives you dependable tools for every recipe. Essential kitchen spoons and sturdy bamboo spoons provide style and convenience for any kitchen.
- Limited Lifetime Manufacturer’s Warranty – While many brands simply speak about complete customer satisfaction and utensil guarantees, we’re so confident about our wooden cooking spoons that we offer a limited lifetime warranty. Each bamboo spatula and spoon in this set is built to last, making them thoughtful kitchen gifts. If you’re not 100% happy with your wooden utensils for cooking, our wood cooking utensils and wooden kitchen essentials are backed by our promise of lasting quality.

- 【Natural Wood】Wooden kitchen cookware set, handmade 100% natural teak, BPA not included, keeping in view the health standards, environmentally friendly and harmless. Don't worry about invading toxic substances into food when cooking like other cooking utensils
- 【7-Piece Cooking Utensils】 7-piece kitchen wooden spoons set consists of kitchen spatula, strainer spoons, fried spatula, serving Spoon, wooden spoon, salad fork, mixing spoon and other spoons, Teak is recognized as hard and durable wood with exquisite craftsmanship, can meet all your request for cooking and you don't have to worry about the spatula cooker deforming or melting.
- 【Durable Sturdy Smooth Wood Kitchen Utensils】wood shovel, the wooden spoon has high heat resistance, not easy to damage or deform, sleek surface,superb handhold feeling. You will definitely find NO dents, small gaps or splinters from our kitchen cooking utensils! good heat insulation performance, can prevent scald your hand!
- 【Scratch-Resistant Kitchen Utensils】This durable teak frying pan shovel, wooden spoons, it can prevent kitchen tools from being scratched or expensive non-stick cookware from being damaged. and with hanging holes for wall storage, high-quality and earth-friendly type teak wooden spoons. Every kitchen needs a wooden spoon to cook and decorate.
- 【Easy to Clean】 Wooden cooking set recommended to wash by hand with a mild detergent, store naturally dry. we have the confidence that this product will last. If there are ever any issues, just contact us and we will make it right. Order now and be assured that this product will live up to your expectations, guaranteed. If it does not, we got you covered. Chances are, you will never need to reach out!

- This wooden keepsake box features a beautiful Tree of Life Engraving With Flame Work painted finish to give a vintage feel
- Create the perfect and unique vintage gift box. Be the perfect birthday, engagement or housewarming gift.
- Also can be used to keep precious stones, watches, tarot cards, herbs, Feng shui items and add a touch of class to your dressing table or any other desk.
- Perfect gift for Professionals-Mother's Day-Father's Day-Eduactional & Hobby | Home Decor Gift | Decorative Box | Home Decor Accents | Office Storage & Supplies |
- Size (Inches): 8" x 5" x 3" ,Size (CM): 20.32cm x 12.7cm x 7.62cm This is a Handmade item and slightly variation can be found. Each piece will remail unique. In fact this is the actual beauty of these products.

- 【Wooden Trivets for Hot Dishes】With its floriferous decorative trivet design, it not only protects your countertops and table surfaces from hot pots and pans,It can also serve as a decoration for natural trees, beautifully adorning your kitchen counter.
- 【Special texture】Our tripod is carefully crafted from high-quality wood and undergoes a meticulous eight step polishing process to make it smooth and delicate.Each hot pads is meticulously handcrafted, carved, and polished to perfection.After working with different high-temperature equipment, different black marks may be formed, and over time, special patterns will be formed.
- 【Stylish and Functional kitchen decor】The tree shaped decorative tripod design not only adds a touch of elegance to your kitchen space, but also protects your dining table from damage caused by hot pots and pans. Take one from the bracket and place it directly on the table without flattening it beforehand. Pick up the utensils from above and slowly put them down. Due to the effect of gravity, it will automatically unfold and play its due role.
- 【Multifunctional Mat】Wooden trivets for hot dishes can put cups,bowls,plates,teapots,frying pans,hot pots,etc,can be used for different textures of countertops such as glass,marble,wood,etc,and can be placed in the kitchen, living room, dining room, etc. scenarios.The tree shaped design can be used for decoration or as a wooden storage,and every use is a fun experience
- 【Exquisite Gift】Our insulation pad set is the perfect choice for kitchen gifts! It can be given as a holiday or birthday gift to friends and family,making it an ideal Christmas or housewarming gift.You will have a natural accessory that beautifully decorates your kitchen counter,just like decorating a Christmas tree.This unique kitchen accessory is a one-of-a-kind wooden gift

- 7 Pieces Utensils: Included fried spatula, slotted spoon, strainer spoon, soup ladle, salad fork, spatula, kitchen tongs. Go from cooking to serving, let the dishes have a natural and fresh flavor
- Healthy & Safe: Natural bamboo wood, fine texture on the surface, clearly visible; light weight and solid quality, which is highly renewable, it is a great sustainable option
- Easy To Store: The insulated handle protects your hands from injury, and the tail with round hole design to hang up, more convenient storage, saving kitchen space without chaos
- Easy To Maintain: Simply wash with mild soap and water, and dry thoroughly to store. Please do not put bamboo spatula into the dishwasher and soak them, and regularly care these wooden spoons with oil
- Multipurpose: Our wooden utensils for cooking is perfect for stirring, serving, mixing, tossing and tasting. Multiple specifications are available, which helps you create a culinary masterpieces. As a great giftware for mom, dad or any cook

- High quality exotic long longer lasting and is free from alcohol
- Comes in roll-on vials makes it easy to anoint
- One of the most popular perfume oils in the world
- Inexpensive price does not sacrifice high quality

- TIMELESS ELEGANCE: Ideal for the office, special events, or romantic dinners, this versatile women perfume offers a subtle yet captivating allure. Experience the luxury of an Arabic perfume for women, with delicate vanilla perfume notes that leave a lasting impression.
- Arabian Perfumes for Women : Experience all-day allure with our parfum for women, crafted to keep you captivating from morning till night. A few sprays of this women's fragrances reveal complex, lingering notes that embrace your skin, eliminating the need for reapplication
- ELEGANTLY PRESENTED: Housed in a sleek, modern bottle, it makes the ideal gift for women on birthdays, anniversaries, or any special occasion where sophistication is appreciated
- TOP NOTES: Citruses, Caramel, Orchid
- MIDDLE NOTES: Jasmine, Woody Notes, Vetiver BASE NOTES: White Musk, Vanilla

- Soft by Al-Rehab is a fragrance for women
- Top Notes: Rosemary, Petitgrain, Lavender and Neroli
- Heart Note: Galbanum, Clary Sage, Geranium and Jasmine
- Base Notes: Amber, Sandalwood, Oakmoss, Vetiver and Cedar
- Suitable for all time wear

- Delicate mix of floral and musky tones
- Long-lasting and alcohol-based spray
- Suitable for both men and women

- Contains one (1) 25-ounce container of Milk-Bone Soft & Chewy Chicken Recipe With Chicken Breast dog treats
- Soft and chewy dog treats made with real chicken breast
- Fortified with 12 vitamins and minerals
- Great for dogs of all sizes
- Loved since 1908

- Amazon Prime Video (Video on Demand)
- Stefanie Estes, Jayden Leavit, Cissy Ly (Actors)
- Beth de Araújo (Director) - Beth de Araújo (Writer) - Joshua Beirne-Golden (Producer)
- Audience Rating: R (Restricted)

- FACE, BODY AND HAND CREAM: An all-in-one face moisturizer, body cream and hand cream that delivers 48-hour hydration for softer skin
- NEW! MORE NATURALLY DERIVED FORMULA(1,2): This NIVEA moisturizing cream has a light, vegan(1) formula that is 95% Naturally Derived(3) including purified water and 5% skin safe synthetic ingredients(4)
- FAST-ABSORBING: NIVEA Soft is a fast-absorbing, lightweight moisturizer for dry skin with Vitamin E and Jojoba Oil that provides softer, smoother skin without a greasy feel
- ALL SKIN TYPES: This body moisturizer cream is suitable for all skin types
- BEST OF BEAUTY AWARDS: Allure Best of Beauty 2023 Award Winner

- ELEVATE YOUR BEAUTY REST: Upgrade your nighttime routine with the Kitsch Charcoal Satin Eye Mask. Crafted with ultra-soft satin, this luxurious softer than Slik Sleep Mask ensures ultimate comfort while protecting your skin. It's a must-have accessory for beauty and relaxation.
- GENTLE ON ALL SKIN TYPES: This Softer than Silk Eye Mask for sleeping is ideal for travel, home, flight, train, or anywhere where light disrupts your sleep.
- PROMOTES RESTFUL SLEEP: Designed to block out light and promote deep, restful sleep, the padded softness of the Satin Eye Masks material gives you a comfortable night rest, all while looking chic.
- SOFT AND EASY TO USE. Our soft satin blindfold with the elastic strap keeps the sleeping mask in place and adjusts to fit your head for comfort. Suitable Sleep Masks for Women and Men.
- THE PERFECT GIFT FOR BEAUTY & RELAXATION: Treat your loved ones to the gift of restful sleep with the Kitsch Charcoal Satin Eye Mask. Its luxurious satin design not only promotes beauty sleep but also adds a touch of elegance to any nighttime routine and Eye Care. Ideal for birthdays, holidays, or self-care packages, this Charcoal Black Mask is the ultimate gift for those who value comfort, style, and wellness. Give the gift of comfort and relaxation!

- Bathtubs: gets rid of unsightly build-up caused by dirt, soap scum and stains, no more bathtub rings
- Shower: removes unsightly soap scum and keeps glass sparkling
- Sink: removes soap scum, toothpaste and other stains
- Tiles: makes grout cleaning easy and leaves tiles gleaming
- This package includes six 36 fluid ounce bottles of Soft Scrub Antibacterial Surface cleanser with Bleach.

- DERMATOLOGIST-TESTED COMFORT: Crafted from hypoallergenic, cloud-soft white fabric that’s certified irritant-free. These fuzzy socks for women and men are ideal for sensitive skin and all-day cozy comfort.
- PROVEN SLEEP IMPROVEMENT: Wearing bed socks improves sleep quality, 87% of users reported deeper, longer rest. These soft, fluffy thick-knit socks create the calming warmth needed to relax and fall asleep faster.
- ALL-SEASON WARMTH: Engineered with a 2.5 TOG rating for breathable warmth in 50–70°F. Cozy slipper socks with stretch-fit design that work great year-round, no overheating, just fuzzy comfort.
- ONE-SIZE-FITS-MOST (US 6–12): Our unisex lounge socks stretch to fit most women’s and men’s sizes. Perfect as travel socks, comfy hospital socks, or cozy socks for women to unwind in after a long day.
- GIFT-READY & WASHABLE: Arrives in a charming cotton bag, ideal for travel gifts, relaxation gifts, or self-care surprises. Machine washable and lab-tested to retain 95% softness after 50+ washes.
Picture exposed wooden beams spanning across your ceiling, their rich grain and knots adding natural texture. The beams contrast beautifully against a light-colored ceiling, creating a layered, dimensional look. The warm tones of the wood evoke comfort, making your space feel like a retreat from the hustle. Combined with soft lighting, these beams cast subtle shadows that enhance their rustic appeal, making the room feel grounded and cozy.
Beams can be left natural for a raw, organic look or stained in darker shades for a more refined appearance. For smaller bedrooms, using thinner beams avoids visual heaviness, while larger rooms can handle chunky, bold wood accents. You can run the beams parallel or perpendicular to the length of the room, depending on your space and style preference. Incorporate rustic metal fixtures or vintage-inspired hardware to enhance the farmhouse charm.
Start by selecting the right wood—cedar, pine, or reclaimed barn wood work well. Measure and plan the placement—usually across the width or length of the room. Attach the beams securely to the ceiling joists using heavy-duty screws or brackets, ensuring they’re level. If you prefer a floating look, you can install the beams on a false ceiling frame. Finish with a protective stain or clear sealant to preserve the wood’s natural beauty, and add warm LED lighting hidden behind or along the beams for a soft glow.
Mix and match wood tones for an eclectic vibe or keep everything uniform for a sleek, cohesive look. Add decorative elements like lantern-style fixtures or vintage pendant lights hanging from the beams. You can also incorporate faux beams made of lightweight polyurethane if structural work feels daunting. Personal touches like painted accents or carvings can make the beams uniquely yours, adding a bespoke feel.
Wooden beams are a classic way to add instant personality to any bedroom, and they blend seamlessly with various decor styles—rural, industrial, or even modern. Once installed, you’ll feel proud of how a simple change can make your space so much more inviting. It’s an easy upgrade that delivers timeless charm, making every night feel like a retreat.
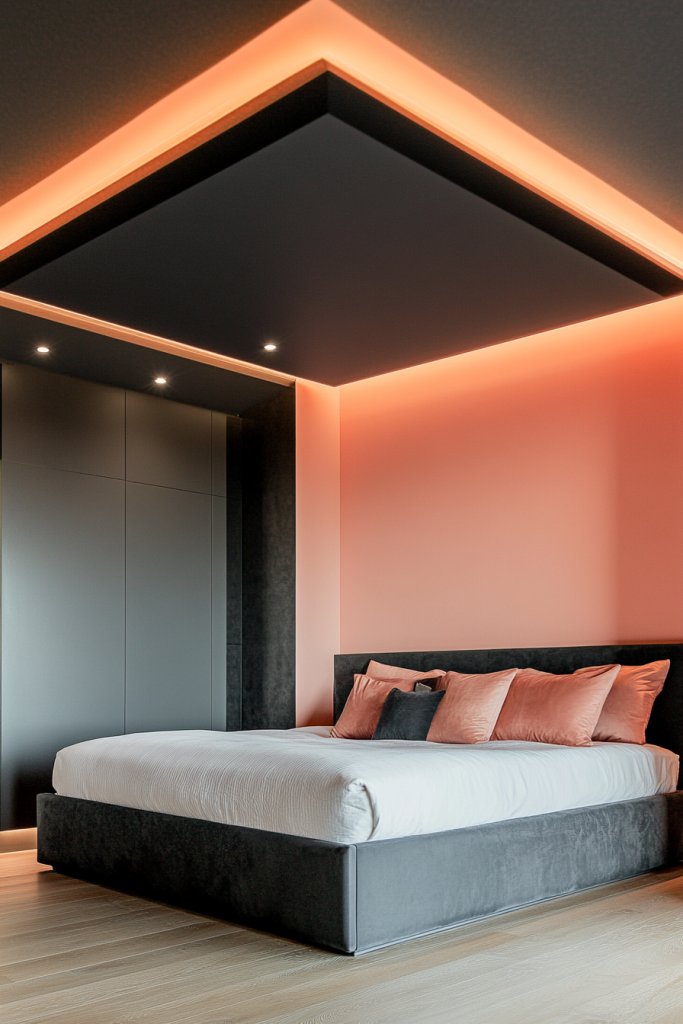
2. Tray Ceiling with Color Contrast for Visual Drama
Feeling like your bedroom lacks that wow factor despite your efforts? A flat ceiling can make a room feel dull or uninteresting. You crave a design element that adds depth, height, and a splash of personality. Enter the tray ceiling—a layered, recessed ceiling that creates a striking visual impact.

- Friendly Materials: Sparkling crystal rhinestones over high quality alloy to ensure that provides an extremely tough, durable, aesthetic. It's gonna be your favorite tiaras and handmade product.
- Size and Package: Our tiara crown are suitable for adult women and girls, Diameter about: 4.72 inches, Height about: 2.0 inches, Weight about: 0.344 lb. The package includes clear box and four clips to fix the crown on your head and brings you a long and comfortable wearing experience.
- Stylish: Its classic design, unique wearing design and sparkling rhinestones always make you feel like a princess or queen when you wear this royal crown on any improtant occasion. Like a natural diamond crown is a splendid choice you are sure to adore.
- Applicable Occasions: The crowns has various color, You can select them as you like. Perfect gifts for princess or queen on Birthday, Valentine's Day, Christmas, weddings, Halloween, prom, party, Photography , Graduation and any special occasions.
- Customer Service: Any question about our crown, please contact us, we will answer your question within 24 hours and give you a satisfactory answer.

- Friendly Materials: Sparkling crystal rhinestones over high quality alloy to ensure that provides an extremely tough, durable, aesthetic. It's gonna be your favorite tiaras and handmade product.
- Size and Package: Our tiara and crown are suitable for adult women and girls, Diameter about: 5.9 inches, Height about: 2.17 inches, Weight about: 0.139 lb. The package includes four clips to fix the crown on your head and brings you a long and comfortable wearing experience.
- Stylish: Its classic design, unique wearing design and sparkling rhinestones always make you feel like a princess or queen when you wear this royal crown on any improtant occasion. Like a natural diamond crown is a splendid choice you are sure to adore.
- Applicable Occasions: The Tiaras has various color, You can select them as you like. Perfect gifts for princess or queen on Birthday, Valentine's Day, Christmas, weddings, Halloween, prom, party, Photography , Graduation and any special occasions.
- Customer Service: Any question about our crown, please contact us, we will answer your question within 24 hours and give you a satisfactory answer.


- MATERIAL - Made of alloy and rhinestone. Alloy is with diamond look and hard texture for practicality and aesthetics. High-quality material will not broke and fade easily. It is friendly for environmental, it wearing comfortable. Have no nickel and lead, won’t make your skin allergenic.
- SIZE - 2.7 inches (7 cm) in height, 5.9 inches (15 cm)in diameter. Full crown design, crafted specifically to fit women head size and perfectly fit in your glamorous hairstyles.
- OCCASIONS - Perfect for Halloween, Thanksgiving, Theater, Cosplay, Prom, Birthday, Celebration, Holiday, Anniversary, Wedding, Costume party or for any other special occasion.
- PERFECT GIFT - This crown is a perfect product as a gift for your queen or princess, bride, bridesmaid, wife, girlfriend, friend, mum, sister or yourself on engagement, wedding, Mother's Day, Valentine day, Thanksgiving or Christmas.
- SERVICE GUARANTEE - Please feel free to contact us if you have any questions or are not clear about the product, we will do our best to solve the problem for you.

- [Exquisite Craftsmanship] - Crafted from high-quality alloy and adorned with shimmering rhinestones
- [One Size] - Measuring 2.7 inches in height and 5.8 inches in diameter, this full crown design is expertly crafted to fit head sizes perfectly.
- [Versatile Design] - This queen crown is the perfect accessory to complete your look. Its versatile design allows it to seamlessly transition from celebrations to wedding ceremonies, making it a versatile and stunning piece
- [Comfortable to Wear] - Designed for comfort, this headpiece crown ensures a secure and comfortable fit throughout the day.
- [Gift Ideal] - Ideal for a variety of special events including Halloween, Thanksgiving, theater productions, cosplay, prom, birthdays, celebrations, holidays, anniversaries, weddings, and costume parties.

- ♕ After Sale - We stand by what we sale, If you are not satisfied or have any issues after receiving the goods, we will give you Full-refund or New of our tiara, please feel free to contact me and we will try our best to solve your problem.
- ♕ Material: Encrusted with stunning crystals of various sizes, the gentle gems add to the elegance of the crown. Made of durable hard alloy, pearl and rhinestone. This tiara design based on vintage style, greatly to show its culture and fashion. Alloy is with diamond look and hard texture for practicality and aesthetics. The rhinestone headband won’t fall out crystal and broken easily and we provide excellent after-sales service, so please rest assured to buy.
- ♕ Every Queen Needs A Crown - Every women deserves to feel like a queen/princess on her important occasions. This stunning crystals crown will make your dream come true. The queen crown is beautiful and makes you feel fabulous.
- ♕ Size - Luxury bridal tiara is silver, approximately 2.76 inches in height, 5.70 inches in diameter. Perfectly suit for any age women and teen girls. This crown is suitable as a traditional crown for adult women.
- ♕ Occasions - Sparkling queen headpiece design can be applied in various occasions, ideal for Wedding, Birthday, Quinceanera, Bridal Showers, Halloween, Thanksgiving, Theater, Cos-play, Church, Prom, Anniversary, Music Festival, Costume Party or any other special occasions. Add a magical touch to your big day by wearing this sparkling tiara. You are looking at the sensational and unique rhinestone crown.

- [Flexible Metal] - Flexible metal frame gently to contour your head, paired with dual side hoop or combs for slip-proof stability
- [Comfortable to Wear] - This tiara crown offers a secure, adjustable fit with its lightweight, flexible design, ensuring all-day comfort for your special moments
- [Lightweight design] - It’s lightweight metal, ensuring a glamorous, secure fit for all-day wear
- [Special Occasions] - Ideal for wedding, bachelorette party decorations, bridal shower gift, bachelorette party favors
- [Precious Keepsake] - This headpiece is capturing the joy of your special day with a timeless design that evokes fond memories

- Classic Design - It is a dazzling and beautiful crown for women girls. With the shiny, attractive, beautiful rhinestones paved on the crown, your feeling like a princess or a queen when wearing it. Make the most stunning at any occasions decorated for the special women and girls.This crown is lucky and beautiful, just to meet the perfect you.
- Material - The shiny gold crown is made of alloy, rhinestone and crystal. It is a shiny, charming handmade product, suitable for women and girls.
- Perfect Size - Length 5.5 inches (13.97cm), Height 1.9 inches (4.83cm); Weight: 2.18oz (62g). No size trouble + Comfortable wearing. You can use clips or ribbons to fix the crown on your head (The package includes four gold clips).
- Wide Usages - The crown is suitable for in wedding, birthday, prom, pageant, parties, photography, Halloween costume. It's perfect for those who obsesses over the perfect shot for Instagram.
- The Perfect Gift - A wonderful gift for your famlily, friends and anyone you loved in your life, and for yourself. Commemorate every memorable day.

- Classic Design: Classic styles and colors can be freely matched with the outfits you want to match. The headband features a round hole on both sides of the end of the princess crown, allowing you to insert a hairpin for secure fixation. It is not easy to fall off and will keep your beauty in place at all times.
- Premium Material: Our crowns are made of carbide and high quality rhinestones. The alloy with a diamond-like appearance and hard texture is paired with high-quality rhinestones, which will sparkle and sparkle for a long time. High-quality materials will not crack and fade easily, comfortable and safe to wear. The weight of the product is 110 grams, and there is no sense of weight on the head after wearing the crown.
- One Size Fits Most: Our crown is gold and measures approximately 2.76 inches (7cm) tall and 5.71 inches (14.5cm) in diameter. Specially designed to fit women's head size, suitable for adults, perfectly fit your charming hairstyle and face shape.
- Occasions: The sparkly queen tiara headband design can be applied to various occasions, perfect for weddings, birthdays, Halloween, bar mitzvahs, Thanksgiving, theater, cosplay, church, prom, anniversaries, music festivals, masquerades, or any other special occasion. We hope it brings you a lot of joy and leaves you with unforgettable memories!
- Gifts Choice: If you wants to feel like a princess or queen on big occasions and this stunning rhinestone tiara will make your dream come true. It must be a perfect gift for your lover, sister, family and friends.Add a magical touch to their big day!

- DAZZLING ASSORTED GEMS: Luxurious Gold Royal Crowns adorned with an array of colorful gemstones, making each crown stand out and catch the eye at any event or party.
- DURABLE MATERIAL: Crafted from high-quality plastic, these crowns are not only lightweight and comfortable to wear but also durable, ensuring they last through all your regal and royalty-themed events.
- PERFECT PARTY ACCESSORY: Ideal for a wide range of occasions, such as birthday parties, royal-themed weddings, proms, costume parties, stage performances, or simply to bring an extra touch of elegance to any décor.
- REUSABLE & ENVIRONMENTALLY FRIENDLY: Save money and reduce waste with our fabulous reusable crowns that can be used over and over again to transform any gathering into a majestic celebration.
- SET OF 24 CROWNS: Measuring 0.75" x 8", each set of Luxurious Gold Royal Crowns comes in a pack of 24, making them the ideal choice for creating a memorable and enchanting atmosphere for your guests and loved ones.

- Commercial standard - Class A fire-rated,low-emission, waterproof, washable, flexible and durable. No sag, rot, rust and breakage
- Stylish - Blank smooth solid ceiling panel is a universal fit to all kinds of interior decoration
- Easy DIY - Cut with a utility knife or a table saw, fit into a standard 15/16" T grid ceiling system
- Pack Size: Pack of 10 tiles with size of 2ftx4ft, cover 80 sq.ft.Be aware that white is incompatible with the other Art3d 3D ceiling tiles
- Exceptional Customer Service - We offer full service 24/7 for our customers for any product related issues

- LED Light Source and Memory Function: The LED energy-saving light has 120 voltage output and brightness from 10%-100% with 2200LM. 3 color temperature from warm(3000K) to white(6000K) and light memory function
- Remote and App Control: This small ceiling fan with light can be controlled by a smart app(Bluetooth) and remote. The fan and the light can be controlled separately. 6 speeds, LED Dimmable, 2H timer setting, customize the mode you need as you like
- Reversible DC Motor and Noiseless Fan: Our flush mount ceiling fan offers 2 airflow modes. It runs downdraft cool airflow during summer, updraft airflow in winter.The pure copper motor runs smoothly, provides strong wind power
- 6 Speeds and Quiet: Experience superior airflow with our 7-blade ceiling fan, offering 6 wind speeds. The pure copper motor runs smoothly, with strong wind and low noise. And canceled the beeping sound when the remote control transmission signal
- Easy Installation: The instructions we provide contain detailed installation guide video that are easy to follow and can be completed in a short time. We provide 2-year support. If you have any issues please tell us, we'll reply within 24 hours

- Complete Set: We offer a complete set of Drop Ceiling Grid Systems include 6pcs main beams TT00, 16pcs cross tee TT10, 6pcs wall molding TT20, 14pcs Installation Kit TA00. Tip: The package does not include PVC panels. If you need, we recommend purchasing it with our Muzata PVC ceiling tiles TBP0
- Safer and Lighter: Our galvanized steel drop ceiling grid system is lighter and safer than traditional wooden ceiling systems. Not prone to collapse and fire hazards, ensuring the safety of your family
- Durable and Long-Lasting: These ceiling tees are made of high-quality galvanized steel, which is durable and long-lasting. Add white premium paint texture on the bottom to provide a modern style to your home or office
- Versatile Applications: These white galvanized steel tees are compatible with a variety of ceiling tiles and grid systems. Whether for residential, commercial, or industrial use, our tees offer a reliable foundation for any type of ceiling installation
- Easy installation: Our ceiling system has a snap-in design that doesn't require too many screws. Saying goodbye to the trouble of the traditional ceiling system, the novice can also easily install

- [Wide application] Ceiling fans with lights adopts modern creative petal design, with a 6 gear fan suitable for 8-15 ㎡ living room, bedroom, dining room, study room,etc.
- [Creative design] A flower ceiling fan with light, you can get two functions of lighting and cool.Ceiling fan with lights can come in handy no matter the season, as lighting and cooling can be used simultaneously or separately.
- [Timing function] The ceiling fan has 6 gear speeds, and you can choose the 1-2 speed (slow wind), the 3-4 speed (medium speed wind), and the 5-6 speed (fast wind) according to your needs.If you feel that running a fan all night while you sleep is bad for your health, then our timer feature can help you with that problem. You can set the time through the remote control or mobile app, no matter how long the time is.
- [Performance specifications] 110v ceiling fan with light product size:69cm*69cm*13cm.Power consumption: 50w.Acrylic lampshade, uniform and transparent light; high-quality ABS fan blades, smoother rotation.
- [Service first]If you have any questions about the installation and quality, please contact us, we will provide you with the best solution within 24 hours.Due to the influence of light and display, the color of the item may be slightly different from the picture. Manual measurement may have an error of 1in. Please understand that.

- Perfect Size for Rooms: This 52-inch ceiling fan is ideal for cooling and illuminating spacious areas like living rooms, bedrooms, and kitchen, featuring an 20W 2000LM bright light and powerful 3057 Cubic Feet Per Minute airflow.
- High Configuration: The flush mount fan is equipped with APP & Remote Control, 10~100% Dimmable, Stepless Color Temperature (warm → neutral → cool white), Memory Function (the memory function retains your settings), Energy-efficient LED Light, Pure Copper High-performance DC Motor, High-Quality Tough Plywood.
- Quiet and Efficient Operation: Experience peaceful relaxation with the energy-efficient, quiet, high-RPM motor that provides strong airflow without the noise.
- Stylish and Functional: Enhance your home decor with this modern ceiling fan featuring a sleek design and a built-in light kit. Choose from a variety of finishes to match your style.
- Year-Round Comfort: Enjoy a cool breeze in the summer and improved air circulation in the winter with the reversible blade feature.

- Ceiling Fan with Light: Decorate your home with Amico ceiling fan! While bringing you coolness and comfort, it also becomes a beautiful decorative piece for your home. Our 42 inch small ceiling fan with light remote control has A energy efficiency rating, which can avoid 80% of electricity loss compared with traditional fans.
- Ceiling Fans with Remote: All operations can be controlled by the remote controller, adjust the fan speed with 6 levels, select light color temperature, and supports timing (1/2/4 hour) sleep shutdown, on/off. The fan and light can be turned on separately. (Tips: After fixed, the remote control can be used as a wall switch)
- Low Profile Flush Mount: We provide very detailed instructions and installation videos to help you complete the flush mount installation. Suitable for farmhouse, living room, bedroom, office, study, kitchen or other small indoor spaces. Besides, this is also a outdoor ceiling fan for patio, breezeways, gazebos, pergolas and other outdoor spaces. (Not to be exposed directly to rain)
- Noise-free Experience: This modern ceiling fan with light is designed for light sleepers, brings you comfortable sleeping with a quiet living environment. The volume is low to 35dB when the fan is running, like the sound of falling leaves, or like a butterfly flaps its wings(30dB). It is more suitable for families with babies or elders. Super quiet, only wind.
- Reversible DC Motor: The high-quality & high-speed motor brings a perfect wind experience. The wind speed can be adjusted in 6 gears, you can choose between comfortable wind, natural wind and strong wind. Reversible dual-direction fan improves air circulation to keep you warm in winter and cool in summer. Our fan blades are double sided in different colors, one side is black and the other side is walnut. Choose the fan blade color that best fits your home decor!

- Ceiling Fan with Light: Passky sleek ceiling fan with light, pass the breeze, light you sky. Our 52 inch modern classic ceiling fan with light remote control has A energy efficiency rating, which can avoid 80% of electricity loss compared with traditional fans. While bringing you coolness and comfort, we want to fit perfectly into your home decor!
- Ceiling Fan with Remote Control: Through the remote control, you can turn the fan on/off, adjust wind speeds, as well as realize the function of 1/2/4 hours timer off, at the same time, you can also realize the forward and reverse rotation control directly on the remote control. The fan and light can be turned on separately. (Tips: After fixed, the remote control can be used as a wall switch)
- Indoor & Outdoor Ceiling Fan: Try install it youself! We provide very detailed instructions and installation videos to help you complete the installation. Suitable for farmhouse, living room, bedroom, office, study, kitchen or other indoor spaces. Besides, this is also a outdoor ceiling fan for patio, breezeways, gazebos, pergolas and other outdoor spaces. (Not to be exposed directly to rain)
- Super Quiet Experience: Enjoy the wind, but keep the noise out! This ceiling fan is designed for light sleepers, brings you comfortable sleeping with a quiet living environment. The volume is low to 35dB when the fan is running, like the sound of falling leaves, or like a butterfly flaps its wings(30dB). It is more suitable for families with babies or elders.
- Reversible DC Motor: The high-quality & high-speed motor brings a perfect wind experience. The wind speed can be adjusted in 6 gears, you can choose between comfortable wind, natural wind and strong wind. Reversible dual-direction fan improves air circulation to keep you warm in winter and cool in summer. Our fan blades are double sided in different colors, one side is white and the other side is yellow wood grain. Choose the fan blade color that best fits your home decor!

- Ample Area Solution - With 12 well-packed PVC drop ceiling tiles, each of 2 x 4 feet size, this set provides 96 square feet coverage, perfect for sizable areas ceiling makeover
- Material - Made from high-quality PVC, these ceiling tiles are not only durable and sleek but also waterproof and flexible, ensuring a perfect blend of functionality, resilience and aesthetics
- Lightweight & Easy Installation - Art3d ceiling tiles seamlessly fit into a standard 15/16" T-bar grid system with lightweight design for easy installation. Ideal for both residential and commercial spaces, offering a modern and sleek appearance to any room
- User-Friendly Construction - Crafted to be thin and light, these tiles are not only paint-friendly but also simple to trim with tools like scissors, snips or a utility knife, ensuring a swift and straightforward installation process
- Wide Application - With modern and sleek 3D design, these tiles bring a refined flair to ceiling and wall decorations, making them a versatile choice for various decor needs

- Practical meets decorative - 52-inch ceiling fan with light and 5 double-sided fan blades. Acrylic cover with flicker-free LED light source for a softer light. The simple and modern design style makes your room more stylish and upscale. It is perfect for any indoor and covered dining room, kitchen, living room, bedroom and more.
- Adjustable Light & Color Temperature - The ceiling fan uses an energy-efficient and long-lasting LED light source that can be controlled remotely. You can easily adjust the brightness from 10% to 100%, and change the color temperature from warm white (3000K) to natural white (4000K) to cool white (6500K) to suit your mood and activities.
- Multifunctional Silent Ceiling Fans with Remote Control - With 6 air speed settings and 3 timer settings (1H/3H/6H), this fan works quietly without interrupting sleep or study. With the remote control, you can easily adjust all settings from anywhere in the room.
- Reversible DC Motors - The reversible control feature switches the air direction of the bedroom ceiling fan from downward airflow in summer to upward airflow in winter, thereby recovering heat lost from the ceiling and distributing it evenly throughout the room. Energy savings of up to 80% compared to conventional AC motors and noise levels of less than 35 dB.
- Easy To Install - We have already installed most of the parts, you don't need to do complicated assembly. The package comes with a detailed user manual where you can find solutions to all your problems.

- Multicolored Lighting: The main light of smart ceiling light is RGB+WW, while the back light is RGBIC. With 16 million background colors, the back light enriches the whole house atmosphere. Note: The WW of the main light and back light cannot be on simultaneously.
- Adjustable Brightness and Color Temperature: The color temperature of led ceiling light can be changed from 2200K to 6500K, making it easy to select warm lights for relaxation and cold light for work. Features 1% - 100% brightness up to 2400 lumens for any scenario.
- Smart Control: Control the ceiling light with Alexa or Govee Home App (not compatible with external dimmer switches and smart switches), which supports individual or group control. You can also set a timer to turn off the lights before sleeping.
- Multiple Scene Modes & Music Modes: Includes 71 scene modes, allowing you to DIY any light effect you want. With Govee Home App, you can set the ceiling light as the main device to sync the colors to other Govee lights for a one-of-a-kind light show.
- Rhythm Lighting: Create a custom circadian lighting scheme that can realize automatic dimming and color control, simulate the natural lighting environment for the whole house, and better adapt to your daily routine.
Imagine a ceiling with a central section that’s slightly lower or higher than the surrounding border, painted in a bold or contrasting color. The layered effect creates an illusion of height and dimension, making the room feel larger and more luxurious. The border can be accented with crown molding or a different finish, adding refined detail. When the lighting is dimmed, the color contrast enhances the room’s mood, making it feel intimate and dramatic.
Choose contrasting hues—deep navy with white, charcoal with light gray, or even a daring black with metallic accents. For a softer look, use shades within the same color family but with different finishes, like matte and gloss. The depth of the tray can vary from subtle to pronounced, depending on your ceiling height and style preference. Adding indirect lighting around the perimeter accentuates the layered effect further.
Start by measuring your ceiling and sketching the tray layout. Use a level and straightedge to mark the border lines. Construct the recessed sections with drywall or plasterboard, attaching them securely to the ceiling joists. Sand and paint the entire ceiling, focusing on the contrasting color of the tray and border. Install LED strip lighting around the edges for a modern, floating effect. Finish with crown molding if desired for a polished look. Professional help might be needed for precise framing and wiring.
Add metallic or textured paints inside the tray for extra depth. Incorporate accent lighting like spotlights or sconces to highlight the layered design. Use wallpapers or textured wall finishes that complement the ceiling colors for a cohesive aesthetic. Personalize further with decorative trim or molding that matches your decor style—be it ornate or minimal.
A tray ceiling is a bold statement that instantly elevates your bedroom’s style. Once done, you’ll enjoy a sense of accomplishment and a room that feels tailored and unique. It’s a versatile design that suits both classic and contemporary tastes, making your space truly stand out. Ready for a simple yet stunning upgrade? Dive in!
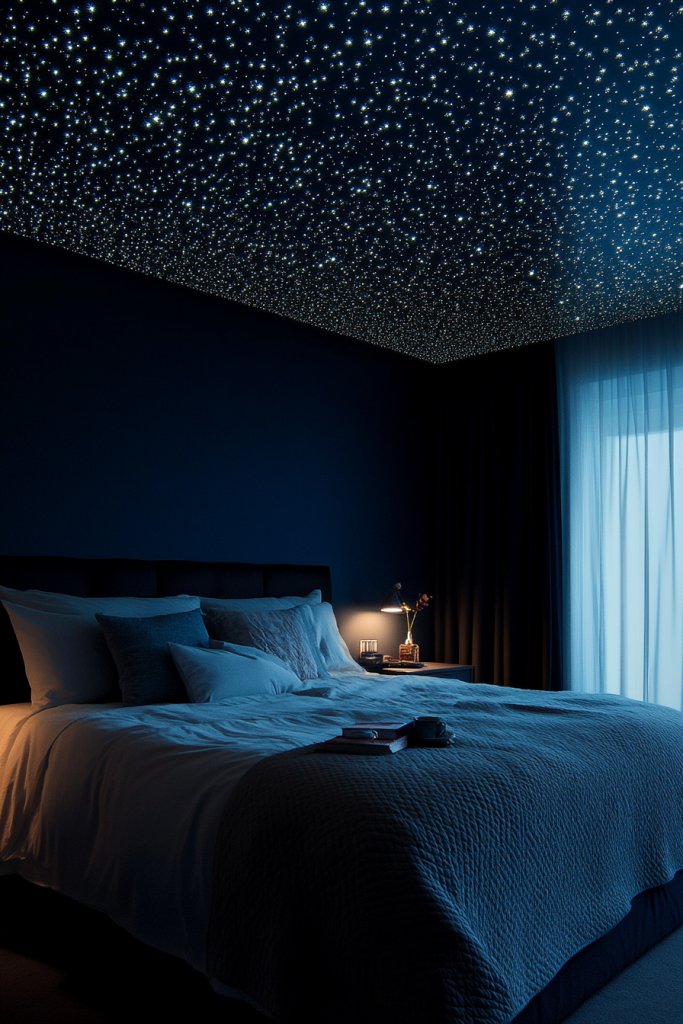
3. Starry Night Effect with Fiber Optic or LED Lights
Ever wanted to recreate the magic of a clear night sky right in your bedroom? Conventional lighting can feel dull and uninspiring, especially when you crave a cozy, dreamy atmosphere. The starry night effect with fiber optics or LED strips offers an enchanting escape, turning your ceiling into a celestial wonderland. It’s an easy upgrade that makes bedtime feel like stargazing.

- 4 HEALTH BENEFITS, 1 DAILY FIBER. Metamucil is the only leading fiber brand made with psyllium husk fiber
- for 4-in-1 health benefits!
- PSYLLIUM HUSK FIBER helps support: digestive health*, heart health by lowering cholesterol, healthy blood sugar levels*, and appetite control*.
- SUGAR-FREE fiber powder with refreshing orange flavor (not a low calorie food).
- FEEL WHAT LIGHTER FEELS LIKE. Metamucil psyllium husk fiber helps promote regularity* so you can feel lighter and more energetic**.

- MULTIPLE HEALTH BENEFITS* in daily fiber capsules. Metamucil is the only leading fiber brand made with psyllium husk fiber
- !
- PSYLLIUM HUSK FIBER CAPSULES help support: digestive health*, heart health by lowering cholesterol, and healthy blood sugar levels*.
- DAILY FIBER CAPSULES. Metamucil fiber capsules are designed for daily use. No spoon or mixing required!
- PROMOTE DIGESTIVE HEALTH & REGULARITY*. Metamucil psyllium fiber capsules help trap and remove the waste*.
- Orange, lemon and strawberry flavors with other natural flavors
- Soft, pectin-based vegetarian gummy
- Vegetarian. Gluten-free, no wheat, no dairy, no soy, no egg.
- 90 gummies - 45 servings, one-and-a half month supply (taken daily at listed serving size)
- Solimo is an Amazon brand. We stand by the products we make. If you're not completely satisfied, we'll give you a full refund. Contact us at 1-877-485-0385.

- INTESTINAL HEALTH*/HELPS MAINTAIN REGULARITY*: Psyllium has the ability to swell up to 50 times its initial volume when added to liquid. This bulking action can play an important role in maintaining regularity and gastrointestinal health*
- NATURAL SOLUBLE FIBER: Surveys have shown that the fiber content of the American diet is typically about half of government recommended levels. NOW Psyllium Husk capsules can be a convenient way to increase the intake of dietary fiber*
- CERTIFICATIONS/CLASSIFICATIONS: Non-GMO Project Verified, Kosher, Vegan/Vegetarian, Soy Free, Made without Gluten, Corn Free, Keto Friendly
- GMP Quality Assured: NPA A-rated GMP certification means that every aspect of the NOW manufacturing process has been examined, including our laboratory/testing methods (for stability, potency, and product formulation)
- Packaged in the USA by a family owned and operated company since 1968

- #1 Adult Gummy Vitamin Brand
- Each delicious serving provides 5g of prebiotic fiber.
- Aids Digestive Health*
- Supports Regularity*
- Contains NO high-fructose corn syrup, NO gluten and NO synthetic (FD&C) dyes

- One 17.6-ounce bottle of unflavored Benefiber Daily Prebiotic Fiber Supplement Powder for Digestive Health (1)
- Prebiotic fiber supplement designed to help support gut health (1)
- Daily fiber powder that strengthens and nourishes good bacteria to support gut health (1) using wheat dextrin
- Unflavored fiber powder that dissolves clear and completely, allowing you to mix it into your favorite foods and non-carbonated beverages (3)
- Gluten-free, sugar-free, grit-free dietary prebiotic fiber supplement made with wheat dextrin and no artificial flavors (2)

- One package of 28 unflavored powder stick packs of Benefiber On the Go Prebiotic Fiber Supplement Powder for Digestive Health, Daily Fiber Powder
- Daily fiber powder supplement that nourishes the growth of good bacteria that exist naturally in your gut to help you maintain good digestive health (1)
- Prebiotic fiber powder that contains no sugar, gluten or artificial flavors
- Unflavored fiber powder that dissolves clear and completely in your favorite foods and beverages (2)
- Benefiber prebiotic supplement made with wheat dextrin (3)

- Prebiotics
- Relieves constipation
- Mix it in your favorite foods
- Low calorie
- Sugar free

- GREAT TASTING GUMMY FORMULA: orange flavored fiber gummies for adults with no sugar added
- FROM THE FIBER BRAND YOU TRUST: Metamucil Fiber Gummies for adults are from the makers of the #1 selling fiber supplement brand
- 5g OF PLANT-BASED FIBER: Metamucil Gummies contain a blend of plant-based fibers that work together to add 5g of fiber to your diet
- PREBIOTIC FIBER GUMMIES TO MAINTAIN DIGESTIVE BALANCE*: Inulin fiber in Metamucil Gummies help feed the good bacteria in your gut*
- PROMOTES DIGESTIVE HEALTH*: Soluble Corn Fiber (Fibersol***) helps support digestive health*

- Level up your day with Kashi GO Peanut Butter Crunch breakfast cereal; Enjoy a sweet and crispy combo of plant protein and peanut butter clusters
- Peanut butter goodness and crunchy multigrain clusters combine for a wholesome fiber cereal with nourishing whole grains
- 10g protein (16% daily value) and 10g fiber (contains 9g total fat per serving); Kosher Dairy; Contains soy, peanut, and wheat ingredients?
- Endless delicious flavor to enjoy with your favorite nut or dairy milk; Makes a tasty snack at work, before the gym, or as a part of a quick dinner
- Includes 1, 16.9oz box of Kashi GO Peanut Butter Crunch cereal; Packaged for freshness and great taste

- APP and IR Remote Contorl: With a stable bluetooth connection,control your LED lights,freely change in 16 million colors,adjust brightness,customize modes (Flashing,Jump,Fade,etc) in different speeds.
- Music Sync: The built-in mic make the LED lights color-changing with the ambient music,easily create party atmosphere.
- Timing Setting: The Led strip will turn on/off automatically at the setting time, repeat this seting on date you set.
- Widely use: The led strip lights 100FT is long enough, perfect for decorating your bedroom, kitchen, ceiling, living room . Widely used on holidays and party (such as christmas, halloween,birthday,wedding .etc )
- Easily Setup: Tear off strong adhesive tape on light strips,stick the strip lights on a clean,dry surface,finish in minutes.

- Smart APP and IR remote control: The 130 feet led strip lights support both app DAYBETTER and 24 keys ir remote for control, Different modes can be chosen, like Flashing, Quick, Jump, Fade, etc. You can freely choose to control 16 million colors
- Music sync: Led lights strip color changing sync to music by smart phone with App, make your party up to the high peak, light up your life and makes life more colorful and wonderful
- Smart Timing Settings;With timer function,The led strip has color memory and setting the time function,so it can automatically turn on and off
- Room / Bedroom Decor:The 130FT bedroom decor aesthetic, is long enough for bedroom, ceiling, kitchen, living room, bar and party decoration

- Music Sync Mode: Let your LED light strips 100 foot dance to the beat in real-time.Perfect for birthday parties, Christmas, Easter, Halloween, carnival, prom, wedding or everyday use because these RGB LED light bars can bring you a visual feast.
- DIY Remote and APP Control:These LED strips are very easy to control via remote control or Bluetooth smart app, and 16 million colors with a large number of interesting modes can enhance the beauty of your room decor aesthetic.
- 100ft Extra Long Lighting: These RGB LED strip lights for bedroom 100 ft are long enough to decorate and colorize larger areas giving you more coverage and more design options. Suitable for bedrooms, kitchens, stairs, dining rooms, ceilings.
- Easy Installation: It's easy to install and you can use the adhesive to mount the RGB LED strip lights 100 feet to any dry, clean surface.
- Special Timer: The led lights for bedroom 100+ ft can be used as a light alarm clock, you can set the wake-up time and end time to turn it on/off automatically,Putting you in a good mood every day.

- 【Creating a perfect atmosphere】LED light strips come in 16 million colors and 22 dynamic scene modes, allowing you to explore your favorite or most suitable for your mood, bringing yourself a truly dreamy lighting experience
- 【Convenient control method】You can easily adjust the color, brightness, and lighting effects of LED light strips using intelligent applications or controllers
- 【Immersive music experience】Built in sensitive microphone that pulsates with ambient sound or the rhythm or melody of music on your phone, synchronizing with the rhythm of your favorite music, movies, or games, allowing lighting to enhance your audiovisual entertainment experience
- 【Intelligent timing function】Set the LED lights to automatically turn on or off at a fixed time through an intelligent application. After the scheduled time, the LED light strip will gradually wake you up with soft light in the morning, accompanying you to sleep in the dark and giving you a sense of security
- 【Easy to install and versatile】Stick the LED light strip onto a clean, dry surface without the need for any tools. Add exciting, expressive, and personalized lighting to your bedroom, living room, and game room decor

- Smart RGBIC Effects: RGBIC LED Strip lights for bedroom display multiple colors on one line at a time compared with traditional RGB lights. A colorful combination of LED strip lighting for bedroom brings a strong visual impact. (Not Support Alexa)
- Smart APP Control: You can unlock various features to personalize smart LED strip lighting via Govee Home App, getting rid of simple remote control. Adjust the colors and brightness to your preferences, turning a single light to vivid light shows.
- DIY with Inspiration: You can choose from a variety of lighting effects (16 million colors) and share your piece of art on the APP community. Also, we will regularly update AI-created themes on the APP to provide you with more options.
- Upgraded Music Sync Mode: Make your smart LED strip lighting for dance for an immersive home concert experience. Choose from 11 music modes and the integrated high-sensitivity mic will effortlessly sync with your favorite audio.
- 64+ Preset Scenes: Find the proper lighting effects that fit your emotions. You can choose from a selection of scenes to bring vivid colors, inspired by party, holidays, movie and more with a simple click on the Govee Home App.

- 【Super Bright & Even】Each LED backlight panels measures 19.3x9.6 inches, with 242 built-in high-quality LED lamp beads, and only 36W power consumption can release an astonishing brightness of up to 3600 lumens. The CRI 95 ensures true and natural colors in the light, perfectly reproducing the natural texture and texture of stone, jade or glass, providing professional-grade, dark-zone-free uniform lighting for your space.
- 【Flexible Cutting】 Our flexible LED light panels are designed with innovative circuits that support fine cutting as small as 0.87"x0.87", which can be freely cut horizontally, vertically, or diagonally, easily adapting to any irregular or complex shape of the installation area. At the same time, the light panel can be bent and spliced, allowing you to completely get rid of the constraints of size and achieve personalized lighting design in DIY or professional projects such as cabinets, bars, and background walls.
- 【Easy Installation】 The back of the backlight countertop comes with a strong 3M adhesive backing, which can be directly pasted on a smooth and clean surface for quick installation. The package includes: 4 LED light panels (total coverage area of about 5 square feet), 8 chip-to-chip cables, 8 input cables, 32 silicone posts and mounting screws, and a detailed graphic manual. (Note: 24V DC power supply is required to be purchased separately)
- 【Stable and Compatible】 The working voltage of the led countertop panel is 24V DC, which is compatible with all standard 24V LED power supplies/transformers on the market. The high-quality LED chip ensures an ultra-long service life of 36,000 hours, and the IP20 degree of protection is designed for indoor use.
- 【Ideal Choice】 Our led countertop sheet are the ideal solution for illuminating translucent countertops such as quartz, agate, jade, marble. Pro tip: For best results, it is recommended for natural stones that are more than 3/4 inch (19mm) thick. If you are using glass or thin quartz that is less than 1/4 inch (7 mm) thick, be aware of possible spot issues.

- 【Sync with Music】Built-in sensitive microphone, the led lights 50ft can change colors and speed by detecting the rhythm of the surrounding sound and music. It can also sync to music by a smartphone with the app. These ambient lights will let you enjoy the dynamic party atmosphere
- 【Smart App and Remote Control】You can use the remote and app to control the rgb led strips, freely choosing multicolour and different modes (like Flash, Jump, Fade, etc.), enhancing the beauty of your room decor aesthetic. Multiple identical rolls of led tape lights with remote can be controlled by the same remote control
- 【Timing Setting】With the timer function, it can automatically turn on and off, you can set the wake-up time and end time to turn it on/off automatically, putting you in a good mood every day
- 【Adjustable Brightness】The dimmable led strip lights brightness can be adjusted via the remote control to one of five levels: 20%, 40%, 60%, 80% or full brightness. Alternatively, the brightness can be adjusted between 1% and full brightness via the app, allowing users to meet their specific requirements
- 【Wide Use】These RGB LED lights can bring you a visual feast. They are perfect for birthday parties, Christmas, Easter, Halloween, carnival, prom, and weddings. The led lights for bedroom are suitable for house ornamentation, especially for festival needs

- 【APP and IR Remote Control】 Ledagic LED lights for bedroom 150 ft are very easy to control via remote control or smart app. There are 16 million colors available, along with a lot of interesting modes, which can enhance the beauty of your room decor aesthetic
- 【Music Sync】 The color of LED strip lights will sync with the beat of music or sound in real-time, creating a romantic, relaxing, magical, gorgeous, and interesting atmosphere for you
- 【Timing Mode】 The LED Light Strip can serve as your light alarm clock. You can pre-set the desired time and choose a suitable color for it to automatically turn on or off, putting you in a good mood for the day
- 【Applicable place】 The light strip has a lot of scene modes to create a festive atmosphere that matches your mood or activity, perfect for birthday parties, Christmas, Easter, Halloween, carnival, prom, wedding, or everyday use. It is a great gift for your children and friends
- 【Easy installation】 It's easy to install, just use the adhesive to mount the RGB LED strip lights 150 feet to any dry, smooth, clean surface

- Upgraded Light-emitting Base, Dynamic RGB+IC: our corner lamp has a patented design and invention, no shadow or dark area when it is lit.Built-in high-quality RGB+IC technology,the brightness is increased by 30% compared with traditional lamps beads. Let you unleash creativity and create a completely new space. Immerse yourself in a truly fantastic mood lighting color experience.
- Multiple Control Methods: The floor lamp for bedroom can be controlled via Bluetooth APP, remote control, and control buttons on the sunset lamp.There are 16 million colors, multiple dynamic and static modes on the Magic Lantern App. You can also adjust the brightness and light speed.
- Synchronized with Music: The floor lamps for living room can change color light synchronously with the rhythm of music or the changes of game sound effects. Create various atmospheres and bring you into a new realm of auditory and visual enjoyment.
- Easy Installation and Timing Function: This LED lamp is easy to operate, quick to install,With the detachable colorful light segments, plug and play, you can install the bar lamp at the right height according to your needs.Timing function, which allows you to set the on and off time as needed.It will match any room decor. Place it in your living room, bedroom, game room, or anywhere else you want to add a touch of style.
- Selected High-quality Materials: Our corner light is made of solid aluminum alloy shell, which is stable, durable and has good heat dissipation. Heavy-duty base prevents the tall lamp from tipping. Download the magic lantern APP to experience more cool room lighting and functions.
Imagine tiny fiber optic threads or micro LED lights embedded in the ceiling, twinkling softly like distant stars. The lights are discreetly hidden, creating a seamless starry sky that’s both mesmerizing and calming. You can choose warm white or cool tones, mimicking different times of night or seasons. The effect is immersive, transforming your room into a tranquil, otherworldly space that invites relaxation and wonder.
Opt for a subtle scattering of stars across the ceiling or a dense constellation for dramatic impact. Use fiber optic strands for a more realistic, pinpoint star effect, or install LED strips with adjustable color and brightness. Seasonal themes can be added with color-changing LEDs—think icy blue for winter or warm amber for cozy fall nights. The starry sky can be complemented with blackout curtains and soft textiles for maximum effect.
Begin by marking the star placement and installing fiber optic cables or LED strips across the ceiling. Use a central hub to control the lighting, allowing you to dim or change colors easily. Fiber optics require a light source at the edge or base, so choose a powerful yet quiet illuminator. Conceal wiring behind crown molding or within ceiling cavities to keep the look tidy. Test different lighting configurations and angles to achieve the most realistic star pattern.
Add shooting stars or meteor effects with small projectors or fiber optic bundles. Incorporate a dimmable switch or remote control for easy mood adjustments. You can also layer the starry sky with soft cloud effects using textured paint or fabric for a dreamy, layered look. Personalize further by assigning specific constellations or celestial symbols meaningful to you.
Creating a starry night ceiling is a fun project that deeply enhances your sleep environment. It’s a simple way to add a touch of magic and tranquility to your daily routine. Once complete, you’ll love how it transforms your bedroom into a peaceful retreat from the world. Ready to turn your ceiling into a universe of your own? Let the stars guide you!
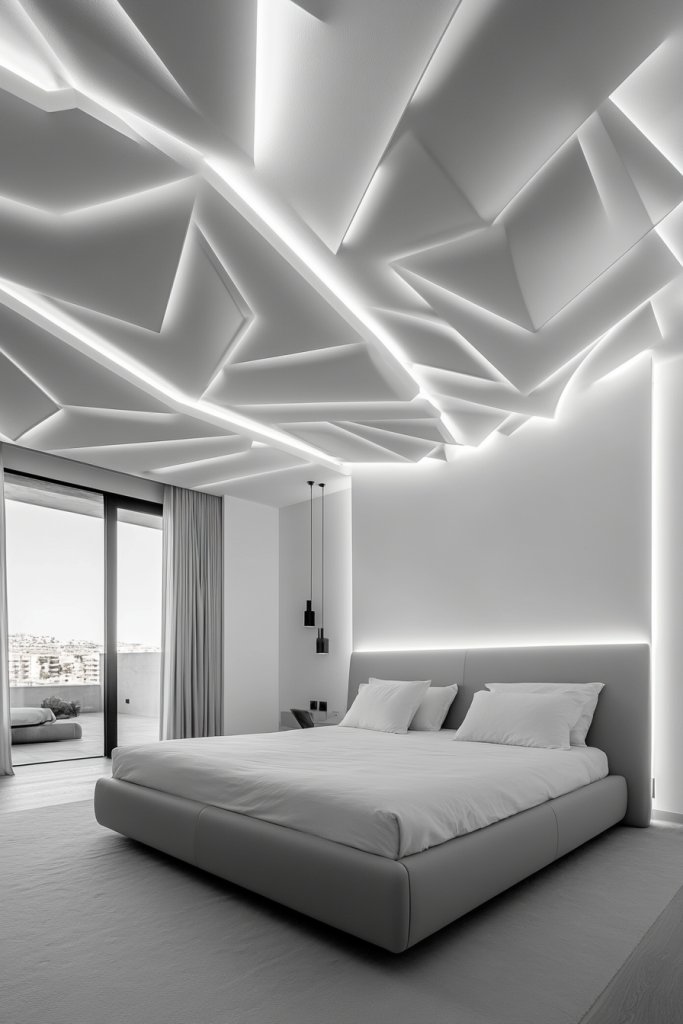
4. Ceiling Panels with Geometric Patterns for Modern Appeal
Does your bedroom feel a little flat and in need of a modern upgrade? Flat ceilings can sometimes make a space look dull or uninspired, especially if you love contemporary design. Geometric patterned ceiling panels can inject a fresh, dynamic vibe that instantly redefines the room’s character. It’s a clever way to add visual interest without overwhelming the space.
- Commercial standard - Class A fire-rated,low-emission, waterproof, washable, flexible and durable. No sag, rot, rust and breakage
- Stylish - Blank smooth solid ceiling panel is a universal fit to all kinds of interior decoration
- Easy DIY - Cut with a utility knife or a table saw, fit into a standard 15/16" T grid ceiling system
- Pack Size: Pack of 10 tiles with size of 2ftx4ft, cover 80 sq.ft.Be aware that white is incompatible with the other Art3d 3D ceiling tiles
- Exceptional Customer Service - We offer full service 24/7 for our customers for any product related issues
- LED Light Source and Memory Function: The LED energy-saving light has 120 voltage output and brightness from 10%-100% with 2200LM. 3 color temperature from warm(3000K) to white(6000K) and light memory function
- Remote and App Control: This small ceiling fan with light can be controlled by a smart app(Bluetooth) and remote. The fan and the light can be controlled separately. 6 speeds, LED Dimmable, 2H timer setting, customize the mode you need as you like
- Reversible DC Motor and Noiseless Fan: Our flush mount ceiling fan offers 2 airflow modes. It runs downdraft cool airflow during summer, updraft airflow in winter.The pure copper motor runs smoothly, provides strong wind power
- 6 Speeds and Quiet: Experience superior airflow with our 7-blade ceiling fan, offering 6 wind speeds. The pure copper motor runs smoothly, with strong wind and low noise. And canceled the beeping sound when the remote control transmission signal
- Easy Installation: The instructions we provide contain detailed installation guide video that are easy to follow and can be completed in a short time. We provide 2-year support. If you have any issues please tell us, we'll reply within 24 hours
- Complete Set: We offer a complete set of Drop Ceiling Grid Systems include 6pcs main beams TT00, 16pcs cross tee TT10, 6pcs wall molding TT20, 14pcs Installation Kit TA00. Tip: The package does not include PVC panels. If you need, we recommend purchasing it with our Muzata PVC ceiling tiles TBP0
- Safer and Lighter: Our galvanized steel drop ceiling grid system is lighter and safer than traditional wooden ceiling systems. Not prone to collapse and fire hazards, ensuring the safety of your family
- Durable and Long-Lasting: These ceiling tees are made of high-quality galvanized steel, which is durable and long-lasting. Add white premium paint texture on the bottom to provide a modern style to your home or office
- Versatile Applications: These white galvanized steel tees are compatible with a variety of ceiling tiles and grid systems. Whether for residential, commercial, or industrial use, our tees offer a reliable foundation for any type of ceiling installation
- Easy installation: Our ceiling system has a snap-in design that doesn't require too many screws. Saying goodbye to the trouble of the traditional ceiling system, the novice can also easily install
- [Wide application] Ceiling fans with lights adopts modern creative petal design, with a 6 gear fan suitable for 8-15 ㎡ living room, bedroom, dining room, study room,etc.
- [Creative design] A flower ceiling fan with light, you can get two functions of lighting and cool.Ceiling fan with lights can come in handy no matter the season, as lighting and cooling can be used simultaneously or separately.
- [Timing function] The ceiling fan has 6 gear speeds, and you can choose the 1-2 speed (slow wind), the 3-4 speed (medium speed wind), and the 5-6 speed (fast wind) according to your needs.If you feel that running a fan all night while you sleep is bad for your health, then our timer feature can help you with that problem. You can set the time through the remote control or mobile app, no matter how long the time is.
- [Performance specifications] 110v ceiling fan with light product size:69cm*69cm*13cm.Power consumption: 50w.Acrylic lampshade, uniform and transparent light; high-quality ABS fan blades, smoother rotation.
- [Service first]If you have any questions about the installation and quality, please contact us, we will provide you with the best solution within 24 hours.Due to the influence of light and display, the color of the item may be slightly different from the picture. Manual measurement may have an error of 1in. Please understand that.
- Perfect Size for Rooms: This 52-inch ceiling fan is ideal for cooling and illuminating spacious areas like living rooms, bedrooms, and kitchen, featuring an 20W 2000LM bright light and powerful 3057 Cubic Feet Per Minute airflow.
- High Configuration: The flush mount fan is equipped with APP & Remote Control, 10~100% Dimmable, Stepless Color Temperature (warm → neutral → cool white), Memory Function (the memory function retains your settings), Energy-efficient LED Light, Pure Copper High-performance DC Motor, High-Quality Tough Plywood.
- Quiet and Efficient Operation: Experience peaceful relaxation with the energy-efficient, quiet, high-RPM motor that provides strong airflow without the noise.
- Stylish and Functional: Enhance your home decor with this modern ceiling fan featuring a sleek design and a built-in light kit. Choose from a variety of finishes to match your style.
- Year-Round Comfort: Enjoy a cool breeze in the summer and improved air circulation in the winter with the reversible blade feature.
- Ceiling Fan with Light: Decorate your home with Amico ceiling fan! While bringing you coolness and comfort, it also becomes a beautiful decorative piece for your home. Our 42 inch small ceiling fan with light remote control has A energy efficiency rating, which can avoid 80% of electricity loss compared with traditional fans.
- Ceiling Fans with Remote: All operations can be controlled by the remote controller, adjust the fan speed with 6 levels, select light color temperature, and supports timing (1/2/4 hour) sleep shutdown, on/off. The fan and light can be turned on separately. (Tips: After fixed, the remote control can be used as a wall switch)
- Low Profile Flush Mount: We provide very detailed instructions and installation videos to help you complete the flush mount installation. Suitable for farmhouse, living room, bedroom, office, study, kitchen or other small indoor spaces. Besides, this is also a outdoor ceiling fan for patio, breezeways, gazebos, pergolas and other outdoor spaces. (Not to be exposed directly to rain)
- Noise-free Experience: This modern ceiling fan with light is designed for light sleepers, brings you comfortable sleeping with a quiet living environment. The volume is low to 35dB when the fan is running, like the sound of falling leaves, or like a butterfly flaps its wings(30dB). It is more suitable for families with babies or elders. Super quiet, only wind.
- Reversible DC Motor: The high-quality & high-speed motor brings a perfect wind experience. The wind speed can be adjusted in 6 gears, you can choose between comfortable wind, natural wind and strong wind. Reversible dual-direction fan improves air circulation to keep you warm in winter and cool in summer. Our fan blades are double sided in different colors, one side is black and the other side is walnut. Choose the fan blade color that best fits your home decor!
- Ceiling Fan with Light: Passky sleek ceiling fan with light, pass the breeze, light you sky. Our 52 inch modern classic ceiling fan with light remote control has A energy efficiency rating, which can avoid 80% of electricity loss compared with traditional fans. While bringing you coolness and comfort, we want to fit perfectly into your home decor!
- Ceiling Fan with Remote Control: Through the remote control, you can turn the fan on/off, adjust wind speeds, as well as realize the function of 1/2/4 hours timer off, at the same time, you can also realize the forward and reverse rotation control directly on the remote control. The fan and light can be turned on separately. (Tips: After fixed, the remote control can be used as a wall switch)
- Indoor & Outdoor Ceiling Fan: Try install it youself! We provide very detailed instructions and installation videos to help you complete the installation. Suitable for farmhouse, living room, bedroom, office, study, kitchen or other indoor spaces. Besides, this is also a outdoor ceiling fan for patio, breezeways, gazebos, pergolas and other outdoor spaces. (Not to be exposed directly to rain)
- Super Quiet Experience: Enjoy the wind, but keep the noise out! This ceiling fan is designed for light sleepers, brings you comfortable sleeping with a quiet living environment. The volume is low to 35dB when the fan is running, like the sound of falling leaves, or like a butterfly flaps its wings(30dB). It is more suitable for families with babies or elders.
- Reversible DC Motor: The high-quality & high-speed motor brings a perfect wind experience. The wind speed can be adjusted in 6 gears, you can choose between comfortable wind, natural wind and strong wind. Reversible dual-direction fan improves air circulation to keep you warm in winter and cool in summer. Our fan blades are double sided in different colors, one side is white and the other side is yellow wood grain. Choose the fan blade color that best fits your home decor!
- Ample Area Solution - With 12 well-packed PVC drop ceiling tiles, each of 2 x 4 feet size, this set provides 96 square feet coverage, perfect for sizable areas ceiling makeover
- Material - Made from high-quality PVC, these ceiling tiles are not only durable and sleek but also waterproof and flexible, ensuring a perfect blend of functionality, resilience and aesthetics
- Lightweight & Easy Installation - Art3d ceiling tiles seamlessly fit into a standard 15/16" T-bar grid system with lightweight design for easy installation. Ideal for both residential and commercial spaces, offering a modern and sleek appearance to any room
- User-Friendly Construction - Crafted to be thin and light, these tiles are not only paint-friendly but also simple to trim with tools like scissors, snips or a utility knife, ensuring a swift and straightforward installation process
- Wide Application - With modern and sleek 3D design, these tiles bring a refined flair to ceiling and wall decorations, making them a versatile choice for various decor needs
- Practical meets decorative - 52-inch ceiling fan with light and 5 double-sided fan blades. Acrylic cover with flicker-free LED light source for a softer light. The simple and modern design style makes your room more stylish and upscale. It is perfect for any indoor and covered dining room, kitchen, living room, bedroom and more.
- Adjustable Light & Color Temperature - The ceiling fan uses an energy-efficient and long-lasting LED light source that can be controlled remotely. You can easily adjust the brightness from 10% to 100%, and change the color temperature from warm white (3000K) to natural white (4000K) to cool white (6500K) to suit your mood and activities.
- Multifunctional Silent Ceiling Fans with Remote Control - With 6 air speed settings and 3 timer settings (1H/3H/6H), this fan works quietly without interrupting sleep or study. With the remote control, you can easily adjust all settings from anywhere in the room.
- Reversible DC Motors - The reversible control feature switches the air direction of the bedroom ceiling fan from downward airflow in summer to upward airflow in winter, thereby recovering heat lost from the ceiling and distributing it evenly throughout the room. Energy savings of up to 80% compared to conventional AC motors and noise levels of less than 35 dB.
- Easy To Install - We have already installed most of the parts, you don't need to do complicated assembly. The package comes with a detailed user manual where you can find solutions to all your problems.
- Multicolored Lighting: The main light of smart ceiling light is RGB+WW, while the back light is RGBIC. With 16 million background colors, the back light enriches the whole house atmosphere. Note: The WW of the main light and back light cannot be on simultaneously.
- Adjustable Brightness and Color Temperature: The color temperature of led ceiling light can be changed from 2200K to 6500K, making it easy to select warm lights for relaxation and cold light for work. Features 1% - 100% brightness up to 2400 lumens for any scenario.
- Smart Control: Control the ceiling light with Alexa or Govee Home App (not compatible with external dimmer switches and smart switches), which supports individual or group control. You can also set a timer to turn off the lights before sleeping.
- Multiple Scene Modes & Music Modes: Includes 71 scene modes, allowing you to DIY any light effect you want. With Govee Home App, you can set the ceiling light as the main device to sync the colors to other Govee lights for a one-of-a-kind light show.
- Rhythm Lighting: Create a custom circadian lighting scheme that can realize automatic dimming and color control, simulate the natural lighting environment for the whole house, and better adapt to your daily routine.
- NATURAL LOOK WITH A MEDIUM HOLD - Our hair powder for men gives you that desired natural look while providing you with volume and texture.
- EASY TO APPLY - Our men's styling hair powder is very easy to apply and use. Simply sprinkle a small amount of powder and spread it through your hair.
- ENHANCES TEXTURE FOR DRY HAIR - Perfect to use for pompadours, quiffs, fauxhawks, and more.
- DELIVERS MATTE FINISH - The textured powder for men gives you the styling and volume you need, while also delivering a clean matte finish.
- ADDS VOLUME AND TEXTURE - Our powder for hair gives you that second-day hair feel on clean hair!

- LIGHTWEIGHT TEXTURE POWDER: Unlike heavy gels or pastes, our Texture Powder is lightweight, volumizing and easy to apply. We formulated our powder to instantly add volume with a clean matte finish by absorbing any excess oil.
- SHORT TO MEDIUM HAIR TYPE: To provide proper hold and volume, our texture powder is best for hair under 6 inches in length.
- HOW TO USE: With your hand at least 2 inches from your head, apply 3-4 pumps of powder to dry hair. Use your fingers to evenly distribute the powder throughout your hair. If you need more hold, add some more product.
- CONVENIENT SPRAY BOTTLE DESIGN: The spray bottle design allows you to get a consistent amount of powder every time. Simply take off the cap, pump, and style. No more making messes with shaker bottles.
- QUALITY INGREDIENTS: Our Hair Texturizing Powder is 100% vegan and cruelty free. Made in The United States with no Sulfates, Parabens, or Phthalates. We only use 5 ingredients: Silica Silylate, Oryza Sativa (Rice) Starch, Silica, Mica, & Maranta Arundinacea Root Extract so you know exactly what you’re putting in your hair.

- 【48 Unique Designs】Discover 48 stunning and exclusive designs encompassing 12 different themes, from adorable animals to space adventurers, abstract watercolors, van gogh's starry sky, serene ocean scenes, geometric shapes, calming words, and more, middle school classroom must haves, suitable for adults, children, and any occasion.
- 【2 Different Surface Patterns】Enjoy sensory stickers with two tactile surface designs - classic gravel touch and stronger diamond touch. mental health stickers can hlep relieving anxiety, Perfect for fidgets for classroom, We have also rounded off all corners to ensure greater safety for children.
- 【Waterproof and Multifunctional】 Our anxiety stickers are waterproof, tear-resistant, and stretch-resistant. They are versatile, reusable, and residue-free, making them ideal sensory items for students, children, and adult sensory items. you can stick them on phones, computers, notebooks, cups, steering wheels, desktops, classroom supplies for teachers middle school, etc.anywhere you like.
- 【Improves Concentration】Keep these stickers handy to enhance focus and relaxation. They offer help stress and anxiety relief, making them perfect for creating calm down corner kit. These stickers can also serve as award-winning items and aid students with anxiety/ADHD in staying focused.
- 【Packaged with Storage Box - Ideal Gift】with a convenient storage box, making it easy to carry and store, making it a thoughtful gift for students, family members, children, colleagues, friends, including autistic patients. Appreciated by people of all ages, the textured surface provides an extra pleasing experience, making it a great addition to craft projects.

- Sensory Fidget Toys for Adults: Harder than our colorful kids fidget worry stone, this hard version is more suitable for teens and adults to get stronger stimulation. Repeatedly rubbing these textured fidget toys through fingers up and down to replace unconscious repetitive behaviors. Roll these quiet fidget sensory stones in one hand, which helps adults with anxiety to lower the anxiety level and pressure in the brain during working or meeting
- Worry Stone Calming Toys: Perfect tactile fidget sensory set for students to avoid picking fingers, control most nervous habits and calm down. Autism children with special needs could also benefit from this sensory-based play. Meet all your older kids sensory needs through rubbing and touching these silent sensory stone stress toys
- Quiet Fidgets for Office and Classroom: it's small, non-noise and hidden, you can keep these mini sensory stones in your pocket and bring it with you when studying or working. These adult anti-anxiety toys are perfect to keeping hands moving in stressful and anxious moments as a distraction. Popular tactile fidget toy for adults with autism playing. Use it whenever, wherever, without bothering or distracting anyone around you
- Multi-functional Fidget Toys Sensory Stone: Bulk prize box toys and fidget party favors for classroom. These rubber worry stones are good non-noise fidget desk toys for students and staff to relax and refresh mind. Good as goodie bag stuffers, preschool classroom prizes, kids birthday gifts, fidget party favors, Christmas stocking stuffers, and carnival prizes. It also can provide silent entertainment for boys and girls in cars, airplanes, home, restaurants, libraries and more
- Durable and Washable: Made from customized material, these adults fidget item are sturdy and strong. All the edges of stress reliever sensory stones are made into smooth and rounded shapes for autistic boys and girls. You can provide these sensorial fidget toys to children with complete confidence. These autistic quiet fidget sets can also fit easily in a backpack or pocket when teens are outdoors with friends. Your premier choice for a delightful and soothing experience

- Increases texture & fullness
- Absorbs oils & impurities
- Ultra-lightweight, non-drying formulation
- Provides flexible hold with a matte finish

- ❤❤PRODUCT INCLUDES: You will receive 20 Anxiety sensory strip Calm Stickers in 10 styles, 1 of each style; approximately 2.5 x 10 cm / 0.98 x 3.94 inches in size; the styles are varied enough for everyday needs.
- ☀☀PREMIUM MATERIAL: Made of PEVA material, this calming sticker is lightweight yet strong, hard-wearing and won't wear out or fade easily; Plus, these fidget textured strips have a rough and tactile finish that's bright and refined for lounging around your time and distract your anxiety.
- ✔✔Easy to use: first clean and dry the surface of the object to be attached, then peel off the calming sticker, you can stick the sensory adhesive to any place you like, such as mobile phone, computer, desktop, etc., and then gently stick it where you need it. The place where it is pasted will not leave any traces and dirt after tearing off.
- ✿✿Anxiety Sensory Stickers: This anti-stress rough touch decompression strip can help people in need to relieve stress and anxiety, also suitable for youth with ADD or ADHD and with obsessive-compulsive disorder or high stress/anxiety, autistic stimuli.
- ►►EASY TO CARRY FOR EVERY OCCASION: These are highly portable, you can use them anywhere or take them anywhere, such as office, home, church, library, station, classroom, hiking; this relief bag is highly shareable and very Perfect as birthday party favors, classroom rewards, Easter basket gifts and Halloween prizes.

- MECHANICAL PENCIL TRANSFORMATION: Our gidgets slide effortlessly onto most mechanical pencils and pens, providing a comfortable, satisfying grip and sensory stress relief. *Does not fit on wooden pencils.
- FOCUS TOOL: Research shows that fidget tools may help manage ADHD, autism, SPD, anxiety, and dysgraphia. Unlike other fidgets that are noisy or distracting, this fidget provides tactile input for quiet and discreet stimming. Created for special education (SPED) students, but no 504 or IEP accommodations required for use!
- DURABLE SILICONE: Made from premium, food-grade silicone to ensure flexibility and durability. Super easy to clean and strong enough to endure daily use for the entire school year. *Not intended as a chew toy.
- TEACHER APPROVED: Perfect teacher gift to stock up your classroom for back-to-school. A favorite prize for rewards and treasure boxes.
- ADAPTIVE USES: Great writing tool for fine motor skill accommodations. Full-length, soft, compressible texture provides a cushion for small or stiff hands.

- VIRAL ON TIKTOK: Join thousands discovering the difference — search “BlackMask Hair” to see why this hair powder for men is taking over.
- INSTANT TEXTURE: This lightweight hair texture powder delivers fuller, thicker-looking hair in seconds with natural grip and definition.
- ALL NATURAL: Crafted with ingredients like Mica, Titanium Dioxide, and Silylated Silica — a texture powder for men that’s free from harsh chemicals.
- LONG-LASTING HOLD: Designed to hold your style all day without greasiness — no mess, just clean confidence.
- UV PROTECTION: Citric Acid helps guard against sun damage, keeping your hair healthy and vibrant.

- BUILD TACTILE AWARENESS: Scratchy, slippery, silky, or soft? Young learners build tactile awareness as well as fine motor & vocabulary skills with a variety of "hands-on" sensory play activities
- SENSORY ROOM MUST HAVES: Provide sensory-seeking kids with these tools for stimulation and emotional regulation at school and at home; add to a calm down corner or playroom, or try in therapy
- SPARK MORE CONFIDENCE! Boost confidence with core learning toys that build the skills kids need for school success
- INCLUDES: 20 texture squares (10 different pairs) in a drawstring carry bag and activity guide that covers matching, descriptors, communication, and tactile discrimination
- THE PERFECT GIFT: Have an upcoming birthday or holiday? Our toys & games make the perfect activity for the home or classroom, no matter the occasion

- Patented Design Fidgets Calming Toys for Kids: Repeatedly rubbing these textured fidget toys through fingers up and down to replace autistic children's unconscious repetitive behaviors. It’s quiet and easy to roll these fidget sensory stone toys in one hand, which helps to lower the anxiety level and pressure in your brain. Besides, it's perfect tactile fidget sensory set for kids to avoid picking fingers, control most nervous habits and calm down
- Fun and Bright Sensory Worry Stone: Each fidget stone toys comes in vibrant colors and features a unique texture, providing a satisfying tactile experience for kids, teens, and adults. Autism children with special needs could also benefit from this sensory-based play. Meet all your kids sensory needs through rubbing and touching these quiet sensory stone stress toys
- Silent Stress Toys for Anxiety: it's small, quiet and hidden, you can keep these mini sensory stones in your pocket and bring it with you when studying and working. Use it whenever, wherever, without bothering or distracting anyone around you. These worry-stone anti-anxiety toys are perfect to keep hands moving in stressful and anxious moments as a distraction. Popular tactile fidget stress toy for kids with autism playing in the school calming corner
- Multi-functional Fidget Toys Sensory Stone: These soft rubber worry stones are good non-noise fidget desk toys for students and staff to relax and refresh mind. It also can provide silent entertainment for boys and girls in cars, airplanes, home, restaurants, libraries and more. Good as goodie bag stuffers, preschool classroom prizes, kids birthday gifts, fidget party favors, carnival prizes, and Christmas stocking stuffers
- Soft, Durable and Washable: Made from customized material, these Patented Design worry stone fidget packs for kids are sturdy, soft and squishy. All the edges of stress reliever sensory stones are made into smooth and rounded shapes for autistic boys and girls. You can provide these sensorial fidget toys to children with complete confidence. These autistic quiet fidget sets can also fit easily in a backpack or pocket when kids are outdoors with friends. Your premier choice for a delightful and soothing experience
Visualize a ceiling divided into panels featuring bold geometric shapes—hexagons, triangles, or abstract patterns—created with textured materials or painted finishes. The panels can be arranged in symmetrical or asymmetrical layouts, adding a sense of movement and energy. When illuminated with directional or recessed lighting, the patterns cast intriguing shadows, emphasizing their shapes and creating a layered, textured effect. The overall look is sleek, stylish, and distinctly modern.
Opt for materials like textured tiles, 3D wall panels, or painted geometric motifs that suit your budget and skill level. For a minimalist style, stick to monochrome palettes with subtle patterns; for bold aesthetics, use contrasting colors or metallic finishes. Install panels in a grid, herringbone, or random arrangement to match your decor. You can even combine different materials for a mixed-media look that’s uniquely yours.
Start by selecting your favorite geometric pattern and measuring your ceiling. Use precision tools like a laser level and straightedge for accurate layout. Attach the panels securely with adhesive, nails, or screws, depending on the material. If painting, tape off edges and use high-quality paints designed for ceilings. For textured tiles or 3D panels, follow manufacturer instructions for installation and sealing. Add accent lighting to highlight the patterns and create depth.
Customize by choosing colors that complement your wall decor or go for metallic accents for a touch of glamour. Incorporate LED lighting strips along the edges of each panel to emphasize the patterns. Mix in subtle textures or finishes—matte, gloss, or metallic—to add further dimension. Personal touches like custom shapes or asymmetric arrangements can make the ceiling a true focal point.
Geometric ceiling panels are a fantastic way to showcase your modern style and elevate your decor. Once installed, they add a layer of sophistication and visual intrigue that impresses everyone. It’s a DIY win or a professional project that pays off visually. Your bedroom will feel vibrant, stylish, and uniquely designed by you—ready to make a statement?
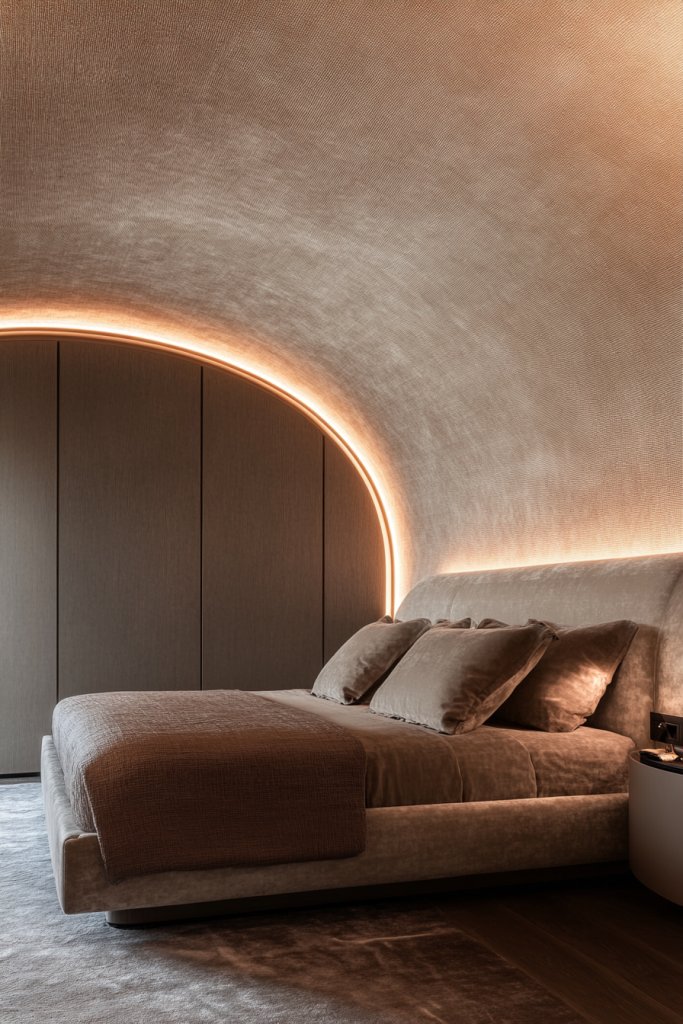
5. Fabric-Covered Ceilings for Soft Sophistication
Are your ceilings feeling a little too stiff and uninspiring? Sometimes, all it takes is a soft, luxurious touch to change the entire vibe of a room. Fabric-covered ceilings create a plush, elegant look that softens the space and adds a sense of comfort. It’s perfect for those who want a cozy, sophisticated retreat without major renovations.

- Silk Organic Unsweetened Soy Milk, Natural, Vegan, 64 Fluid Ounces (Pack Of 6)
- Smooth and Seriously Creamy: One 64 fl oz carton of Silk Unsweet Almondmilk is made with three kinds of almonds grown by Mother Nature
- Zero Sugar, Just 30 Calories: 0g of sugar per serving — unsweetened plant based milk tastes great poured over cereal or in your favorite smoothies
- Deliciously Wholesome: Lactose free, gluten free, and dairy free milk alternative with absolutely no soy, casein, eggs, or MSG
- Smooth and Nutritious: Vegan milk with 50% more calcium than dairy milk; an excellent source of Vitamin D to help support strong bones
- Power of Plants: Silk supports regenerative agriculture because we believe in the power of plants (learn more on our packaging) — it’s not just almondmilk, it’s Milk of the Land
- CREATES SMOOTH & SHINY HAIR: For centuries, silk has been celebrated for its luxurious texture and brilliant luster. This treatment is designed as a weightless, leave-in formula that repairs, smooths, and protects all hair types.
- SILK THERAPY: In 1986, Farouk Shami discovered the benefits of silk & how it could be used for hair. He knew that women wanted their hair to be shiny, healthy looking & conditioned. He found that Silk was capable of solving these 3 issues.
- BIOSILK HAIR TREATMENTS: BioSilk has some of the most powerful and effective treatments. Whatever your style, we have a treatment just for you. Choose yours today.
- HOW TO USE: Shake well before use. Place a small amount of Silk Therapy in your palms and apply from the scalp to ends. May be used on wet or dry hair or skin. Use as often as necessary.
- BIOSILK: The quest for healthier hair is how BioSilk Silk Therapy emerged in 1986. The creation of the BioSilk Silk Therapy Original treatment has led to the development of a full range of BioSilk hair products.

- RICH BUT : No need to be afraid of the big bad sweetness craving anymore. Silk Vanilla Almondmilk will save you with its smooth rich vanilla goodness & more calcium than dairy milk. Silk Pure Almondmilk is the smart way to indulge your sweet tooth.
- DELICIOUS ANYWAY YOU WANT: At 25 calories a serving, how can you not enjoy the creamy goodness of Silk Vanilla Almondmilk? Kissed with a hint of vanilla, it’s delicious over cereal, with coffee, added to favorite recipes or straight from the carton.
- WHOLESOME AND NOURISHING: Silk believes in the goodness (and good-for-you-ness) of plant-based foods. Our soymilk, almondmilk, coconutmilk, cashewmilk and other delicious, plant-based products are simple, wholesome and nourishing, as nature intended.
- DAIRY FREE AND DELICIOUS: We know you have so many choices for dairy alternatives: soymilk, almondmilk, hempmilk, coconutmilk, cashewmilk, ricemilk, peamilk, goats milk, flaxmilk, and so many more. Silk Almondmilk has been a trusted brand for decades.
- NO COMPARISON: Hold Silk's dairy-alternative products up to Veggemo, Freydas, Charged Chocolate, Good Karma, Augason Farms, Milkadamia, Almond Breeze, Meyeberg, Tigers Milk, Instant Milk, Honeyville Farms, Rice Dream, Tempt, Healthworks, or Coconut Cloud. Container Type: Paperboard Carton

- The Original Nutrition Powerhouse: One 64 fl oz carton of Silk Original Soymilk is made with whole harvested soybeans grown by Mother Nature
- Deliciously Wholesome: Plant based milk with 50% more calcium than dairy milk* per serving
- Plant Protein: Every serving of this milk alternative has 8 grams of complete plant-based protein (16% DV)
- Smooth and Nutritious: Vegan milk is an excellent source of Vitamin D to help support strong bones
- Non-GMO Project Verified, Vegan-Friendly: Lactose free, gluten free, and dairy free milk alternative is free from gluten, carrageenan and cholesterol

- Smooth and Seriously Creamy: One 96 fl oz bottle of Silk Vanilla Almondmilk is made with three kinds of almonds grown by Mother Nature
- Just 80 Calories Per Serving: Plant based milk tastes great poured over cereal or in your favorite smoothies
- Deliciously Wholesome: Lactose free, gluten free, and dairy free milk alternative with absolutely no soy, casein, eggs, or MSG
- Flavor and Quality: Vanilla vegan milk with 50% more calcium than dairy milk*; an excellent source of Vitamin D to help support strong bones
- Power of Plants: Silk supports regenerative agriculture because we believe in the power of plants (learn more on our packaging) — it’s not just almondmilk, it’s Milk of the Land***

- 【High-Waisted Tummy Control】Achieve a stunning silhouette with our high-waisted design that smooths and flattens your tummy for a sleek look
- 【Invisible Fit】Enjoy an ultra-invisible design that effortlessly blends under any outfit, making it perfect for dresses, skirts, or everyday wear
- 【Silk Crotch】The luxurious silk crotch adds an extra layer of comfort and moisture-wicking properties, ensuring freshness throughout the day
- 【Comfortable Ice Silk Fabric】Experience the softness of comfortable ice silk fabric that is lightweight and breathable, perfect for all-day wear without irritation
- 【No Lines Even Under Skirts】Our specialized construction guarantees no visible lines, allowing you to feel confident and beautiful in every ensemble

- ADD ORGANIC SOYMILK TO YOUR PANTRY: Certified organic Soymilk is delicious whether poured over cereal, added to coffee, or enjoyed on its own
- SHELF-STABLE: Comes in special packaging for convenient, non-refrigerated storage
- DELICIOUSLY WHOLESOME: Dairy-, lactose-, and casein-free; absolutely no carrageenan, gluten, egg, peanut, MSG, or added sugar
- A NUTRITIONAL POWERHOUSE: A good source of heart-healthy soy protein; low in saturated fat; zero cholesterol
- NON-GMO PROJECT VERIFIED, VEGAN-FRIENDLY Soymilk with no artificial colors or flavors

- Lusciously Creamy: One 32 fl oz Silk Vanilla Dairy Free, Gluten Free Almond Creamer Carton
- Nothing but Delicious: This vanilla flavored creamer has no dairy, lactose, carrageenan or gluten, just smooth and creamy goodness
- Have a “Me” Moment: Add these non dairy creamers to coffee, smoothies and shakes to make your mornings - or any time of day - more special
- Only The Best: Silk dairy free creamer is the 1 brand of plant based, dairy free creamers, based on national sales data
- More Than Great Taste: Silk is passionate about doing right by the planet, which is why we're helping almond farmers implement regenerative agriculture practices

- Lusciously Creamy: One 32 fl oz Silk Vanilla Dairy Free, Gluten Free Soy Creamer Carton
- Nothing but Good: This soy creamer has no dairy, lactose, carrageenan or gluten, just smooth and creamy goodness
- Have a “Me” Moment: Add these non dairy creamers to coffee, smoothies and shakes to make your mornings - or any time of day - more special
- Only The Best: Silk dairy free creamer is the #1 brand of plant based, dairy free creamers, based on national sales data*
- Simple Ingredients: Lactose free, gluten free, and dairy free creamer with absolutely no dairy, gluten, carrageenan or cholesterol

- Amazon Prime Video (Video on Demand)
- Paula Echevarría, Miguel Ángel Silvestre, Aitana Sánchez-Gijón (Actors)
- David Pinillos (Director) - Ramón Campos (Writer) - Ramón Campos (Producer)

- High Quality: Made of high quality luxury velvet upholstery fabric material, super soft touch feel.
- Packaging Includes: 12 sheets velvet Fabric in the package, 1 sheet/color, each sheet measures 29x20cm/11.41x7.87inch.
- Neat Edges: No fleece, even cut edges, the reverse is clear and the organization is dense.
- High Performance: Our velvet fabric sheets are of high quality and workmanship, breathable and comfortable.
- Wide Usage: Excellent for clothing, making costumes, decorations, backdrops, good for many craft projects, sewing DIY craft and teaching.

- INCLUDES: 30 suit clothes hangers in Black/Silver for keeping shirts, blazers, slacks, and more neatly hung and organized
- CLOSET FRIENDLY: Slim profile helps maximize closet space
- NON-SLIP DESIGN: Velvet surface and notched shoulders prevent items from shifting and slipping
- DURABLE: Each sturdy metal-core hanger can hold up to 10 pounds
- PRODUCT DIMENSIONS: 17.24 x 9.06 x 0.24 inches (LxWxH)

- Self adhesive DIY flocking velvet, sound absorption art.(It is our newest velvet product, without grid on the back, velvet is thicker)
- Easy to use, the felt was easy to cut, the paper backing came off easily.
- Use it to the lining of jewelry boxes and also as a decoration background for a showcase.
- It was packed it into a roll, it won't have creases when using.
- Comes on a 17.7" x 117" per roll (45cm X 3m).

- When you wear this cape you'll quickly get into your character, this hooded cloak is a must have for occasions such as halloween and Masquerade.
- Perfect for big events, shows, and fancy dress parties. Bringing a lot of fun and creating some amazing memories with family and friends.
- 100% Velvet Cape, soft and comfortable, with string from neck tie, not easy to loose.
- Four colors available: Black, Purple, Red, Green, choose your favorite ones.
- What You Get: You will receive a stylish hooded cloak, about 150 cm/59 inches long (from shoulder to foot), and great customer service.

- DURABLE SWEATER HANGERS - Featuring smooth, black, non-slip velvet, 360 degree swivel hooks, and notched shoulders, this coat hanger set makes storage simple and stylish.
- STRONG & FIRM GRIP - Whether you need to hang up a 10 lb coat or a thin satin top, these non slip hangers have you covered. The strong hold and grip on this coat hanger will keep your clothes happily hung!
- SAVES SPACE - We've designed these felt hangers for all of your closet clearing and organizational purposes. The slim design makes these hangers space saving wonders for your storage needs.
- PRESERVES CLOTHING SHAPE - Our clothing hangers' design doesn't stop at strength. Not only are our space saving hangers non slip, but the curved shoulder line preserves the natural shape of your clothing.
- ADDED HORIZONTAL BAR - This velvet hanger pack includes a connected bar design, so you don't have to just use them as shirt hangers - you can use them as pants or suit hangers too!

- ✨️Excellent Fabric: This velvet fabric is composed of 90% polyester fiber and 10% spandex, which allows it to stretch and recover while maintaining its shape and softness.And is easy to cut and not prone to pilling.
- ✨️Soft and elastic: The velvet fabric texture is soft and comfortable, full of elasticity. Its smooth texture slides on your skin and has a pleasant touch, as if soft feathers bring warmth and intimacy when touched.
- ✨️Care instructions: The stretch fabric supports machine washing and drying, but it is recommended to use a low temperature setting for cleaning and drying, or hand wash and air dry to maintain the luxury and elasticity of the fabric.
- ✨️Versatile Use: Due to velvet fabric is luxurious texture and comfortable elasticity, it is highly favored in costume design for dance performances and role-playing, often used to create elegant evening dresses, dresses, skirts, and tops. It is also suitable for sewing household textiles, such as curtains and chair covers.
- ✨️Warm tips: Each quantity is sold as a separate part, providing greater flexibility for you to purchase the required length as needed and ensuring receipt of the separated parts.


- Durable and Sturdy: Crafted from velvet and ABS Plastic; Steadily hold heavy clothing of up to 11lbs; As strong as wooden suit hanger but much thinner and lighter; Durable hanging bar with black velvet to hold your shirt, jeans and pants
- Space Saving: The ultra-thin design with an optimal size of 17.5"L x 1/4"W x 9"H; Each hanger maximizes the storage space and makes full use of your wardrobe and room to make it clutter-free; Increases closet space by up to 75%, good for clothing sorting
- Non Slip Design: The specially developed shoulder line help to promise worry-free preservation of the clothing's shape; The groove on shoulder could be used to hang clothes with thin shoulder strap, great without slipping off for clothes on closet storage
- Stylish Finish: Soft and luxurious velvet, unlike plastic or metal hangers; The finest velvet material for all our velvet hangers help to keep the fuzz from shedding off and stain your clothing; Prevents clothes from slip-off the velvet flocked hangers
- Daily Use 60 Pack: Galvanized 360° swivel metal hook meets different hanging angle needs; A perfect combination on college back to school supplies bulk items for girls boys; Premium quality hangers, popular in individuals and businesses in global markets

- 1.5 inch x 2 yard per roll, 6 yards in total
- Premium matte velvet delivers a smoother, softer and thicker touch
- Handmade frayed fringe edges add unique artistic beauty to your decorations
- The dyeing process of vivid colors adopts non-toxic and sustainable reactive printing technique
- Definitely a delicate choice to Christmas ornaments, gift wrapping, wedding decor, flower wreathes, bridal shower, bows making, holiday decorations
Imagine a ceiling draped in a flowing, textured fabric—think velvet, silk, or linen—that cascades gently down the walls. The fabric can be stretched taut or gathered in soft folds, creating a subtle wave effect. When illuminated softly with hidden lighting, the fabric diffuses the light beautifully, casting a warm, inviting glow. The tactile quality of the fabric adds depth and luxury, making you want to lounge and relax.
Choose fabrics based on the mood you want—rich velvet for opulence, lightweight linen for airy freshness. Colors can be neutral for understated elegance or bold for dramatic flair. Install the fabric using a stretched frame, adhesive, or tension rods, making sure it’s taut without sagging. For a layered look, combine different fabrics or add decorative trims and trims matching your decor.
Start by measuring your ceiling and selecting a fabric that complements your room’s palette. Attach a sturdy frame or use tension rods to hold the fabric in place. Stretch the fabric evenly across the ceiling, securing it with adhesive or staples at the edges. Use LED hidden lighting behind the fabric to create a soft ambient glow. For maintenance, choose washable fabrics or treat the fabric with stain-resistant spray for durability.
Add decorative trims, embroidery, or piping along the fabric edges for a bespoke touch. Layer different fabrics or textures for a more complex look. Incorporate subtle patterns or metallic threads for extra richness. Personalize by selecting fabrics that reflect your style—floral, geometric, or plain—so your ceiling feels truly customized.
A fabric ceiling exudes softness and sophistication, elevating even the simplest bedrooms. It’s an unexpected detail that invites compliments and admiration. Once installed, you’ll feel a sense of achievement knowing you’ve created a luxe retreat with minimal fuss. Ready to add a touch of softness and elegance? Fabric your way to a dreamy space!
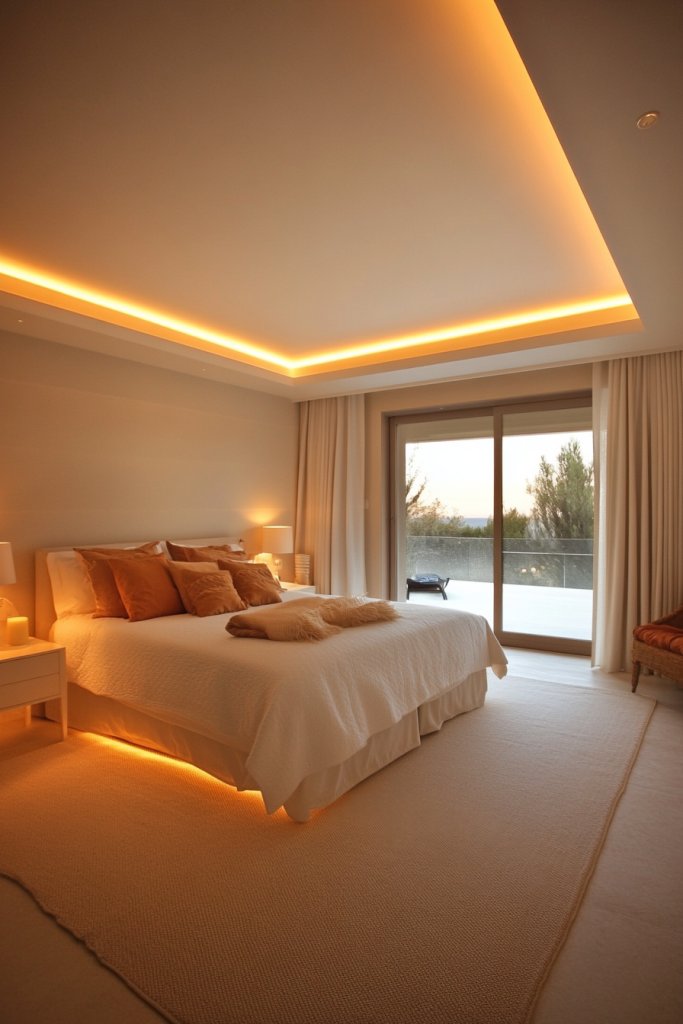
6. Hidden Cove Lighting for Subtle Elegance
Tired of harsh overhead lights that kill the mood in your bedroom? You want a lighting solution that’s subtle, stylish, and versatile—something that enhances the space without dominating it. Hidden cove lighting offers an elegant way to bathe your ceiling in a gentle glow, creating ambiance that’s perfect for winding down or relaxing.
- APP and IR Remote Contorl: With a stable bluetooth connection,control your LED lights,freely change in 16 million colors,adjust brightness,customize modes (Flashing,Jump,Fade,etc) in different speeds.
- Music Sync: The built-in mic make the LED lights color-changing with the ambient music,easily create party atmosphere.
- Timing Setting: The Led strip will turn on/off automatically at the setting time, repeat this seting on date you set.
- Widely use: The led strip lights 100FT is long enough, perfect for decorating your bedroom, kitchen, ceiling, living room . Widely used on holidays and party (such as christmas, halloween,birthday,wedding .etc )
- Easily Setup: Tear off strong adhesive tape on light strips,stick the strip lights on a clean,dry surface,finish in minutes.
- Smart APP and IR remote control: The 130 feet led strip lights support both app DAYBETTER and 24 keys ir remote for control, Different modes can be chosen, like Flashing, Quick, Jump, Fade, etc. You can freely choose to control 16 million colors
- Music sync: Led lights strip color changing sync to music by smart phone with App, make your party up to the high peak, light up your life and makes life more colorful and wonderful
- Smart Timing Settings;With timer function,The led strip has color memory and setting the time function,so it can automatically turn on and off
- Room / Bedroom Decor:The 130FT bedroom decor aesthetic, is long enough for bedroom, ceiling, kitchen, living room, bar and party decoration
- Music Sync Mode: Let your LED light strips 100 foot dance to the beat in real-time.Perfect for birthday parties, Christmas, Easter, Halloween, carnival, prom, wedding or everyday use because these RGB LED light bars can bring you a visual feast.
- DIY Remote and APP Control:These LED strips are very easy to control via remote control or Bluetooth smart app, and 16 million colors with a large number of interesting modes can enhance the beauty of your room decor aesthetic.
- 100ft Extra Long Lighting: These RGB LED strip lights for bedroom 100 ft are long enough to decorate and colorize larger areas giving you more coverage and more design options. Suitable for bedrooms, kitchens, stairs, dining rooms, ceilings.
- Easy Installation: It's easy to install and you can use the adhesive to mount the RGB LED strip lights 100 feet to any dry, clean surface.
- Special Timer: The led lights for bedroom 100+ ft can be used as a light alarm clock, you can set the wake-up time and end time to turn it on/off automatically,Putting you in a good mood every day.
- 【Creating a perfect atmosphere】LED light strips come in 16 million colors and 22 dynamic scene modes, allowing you to explore your favorite or most suitable for your mood, bringing yourself a truly dreamy lighting experience
- 【Convenient control method】You can easily adjust the color, brightness, and lighting effects of LED light strips using intelligent applications or controllers
- 【Immersive music experience】Built in sensitive microphone that pulsates with ambient sound or the rhythm or melody of music on your phone, synchronizing with the rhythm of your favorite music, movies, or games, allowing lighting to enhance your audiovisual entertainment experience
- 【Intelligent timing function】Set the LED lights to automatically turn on or off at a fixed time through an intelligent application. After the scheduled time, the LED light strip will gradually wake you up with soft light in the morning, accompanying you to sleep in the dark and giving you a sense of security
- 【Easy to install and versatile】Stick the LED light strip onto a clean, dry surface without the need for any tools. Add exciting, expressive, and personalized lighting to your bedroom, living room, and game room decor
- Smart RGBIC Effects: RGBIC LED Strip lights for bedroom display multiple colors on one line at a time compared with traditional RGB lights. A colorful combination of LED strip lighting for bedroom brings a strong visual impact. (Not Support Alexa)
- Smart APP Control: You can unlock various features to personalize smart LED strip lighting via Govee Home App, getting rid of simple remote control. Adjust the colors and brightness to your preferences, turning a single light to vivid light shows.
- DIY with Inspiration: You can choose from a variety of lighting effects (16 million colors) and share your piece of art on the APP community. Also, we will regularly update AI-created themes on the APP to provide you with more options.
- Upgraded Music Sync Mode: Make your smart LED strip lighting for dance for an immersive home concert experience. Choose from 11 music modes and the integrated high-sensitivity mic will effortlessly sync with your favorite audio.
- 64+ Preset Scenes: Find the proper lighting effects that fit your emotions. You can choose from a selection of scenes to bring vivid colors, inspired by party, holidays, movie and more with a simple click on the Govee Home App.
- 【Super Bright & Even】Each LED backlight panels measures 19.3x9.6 inches, with 242 built-in high-quality LED lamp beads, and only 36W power consumption can release an astonishing brightness of up to 3600 lumens. The CRI 95 ensures true and natural colors in the light, perfectly reproducing the natural texture and texture of stone, jade or glass, providing professional-grade, dark-zone-free uniform lighting for your space.
- 【Flexible Cutting】 Our flexible LED light panels are designed with innovative circuits that support fine cutting as small as 0.87"x0.87", which can be freely cut horizontally, vertically, or diagonally, easily adapting to any irregular or complex shape of the installation area. At the same time, the light panel can be bent and spliced, allowing you to completely get rid of the constraints of size and achieve personalized lighting design in DIY or professional projects such as cabinets, bars, and background walls.
- 【Easy Installation】 The back of the backlight countertop comes with a strong 3M adhesive backing, which can be directly pasted on a smooth and clean surface for quick installation. The package includes: 4 LED light panels (total coverage area of about 5 square feet), 8 chip-to-chip cables, 8 input cables, 32 silicone posts and mounting screws, and a detailed graphic manual. (Note: 24V DC power supply is required to be purchased separately)
- 【Stable and Compatible】 The working voltage of the led countertop panel is 24V DC, which is compatible with all standard 24V LED power supplies/transformers on the market. The high-quality LED chip ensures an ultra-long service life of 36,000 hours, and the IP20 degree of protection is designed for indoor use.
- 【Ideal Choice】 Our led countertop sheet are the ideal solution for illuminating translucent countertops such as quartz, agate, jade, marble. Pro tip: For best results, it is recommended for natural stones that are more than 3/4 inch (19mm) thick. If you are using glass or thin quartz that is less than 1/4 inch (7 mm) thick, be aware of possible spot issues.
- 【Sync with Music】Built-in sensitive microphone, the led lights 50ft can change colors and speed by detecting the rhythm of the surrounding sound and music. It can also sync to music by a smartphone with the app. These ambient lights will let you enjoy the dynamic party atmosphere
- 【Smart App and Remote Control】You can use the remote and app to control the rgb led strips, freely choosing multicolour and different modes (like Flash, Jump, Fade, etc.), enhancing the beauty of your room decor aesthetic. Multiple identical rolls of led tape lights with remote can be controlled by the same remote control
- 【Timing Setting】With the timer function, it can automatically turn on and off, you can set the wake-up time and end time to turn it on/off automatically, putting you in a good mood every day
- 【Adjustable Brightness】The dimmable led strip lights brightness can be adjusted via the remote control to one of five levels: 20%, 40%, 60%, 80% or full brightness. Alternatively, the brightness can be adjusted between 1% and full brightness via the app, allowing users to meet their specific requirements
- 【Wide Use】These RGB LED lights can bring you a visual feast. They are perfect for birthday parties, Christmas, Easter, Halloween, carnival, prom, and weddings. The led lights for bedroom are suitable for house ornamentation, especially for festival needs
- 【APP and IR Remote Control】 Ledagic LED lights for bedroom 150 ft are very easy to control via remote control or smart app. There are 16 million colors available, along with a lot of interesting modes, which can enhance the beauty of your room decor aesthetic
- 【Music Sync】 The color of LED strip lights will sync with the beat of music or sound in real-time, creating a romantic, relaxing, magical, gorgeous, and interesting atmosphere for you
- 【Timing Mode】 The LED Light Strip can serve as your light alarm clock. You can pre-set the desired time and choose a suitable color for it to automatically turn on or off, putting you in a good mood for the day
- 【Applicable place】 The light strip has a lot of scene modes to create a festive atmosphere that matches your mood or activity, perfect for birthday parties, Christmas, Easter, Halloween, carnival, prom, wedding, or everyday use. It is a great gift for your children and friends
- 【Easy installation】 It's easy to install, just use the adhesive to mount the RGB LED strip lights 150 feet to any dry, smooth, clean surface
- Upgraded Light-emitting Base, Dynamic RGB+IC: our corner lamp has a patented design and invention, no shadow or dark area when it is lit.Built-in high-quality RGB+IC technology,the brightness is increased by 30% compared with traditional lamps beads. Let you unleash creativity and create a completely new space. Immerse yourself in a truly fantastic mood lighting color experience.
- Multiple Control Methods: The floor lamp for bedroom can be controlled via Bluetooth APP, remote control, and control buttons on the sunset lamp.There are 16 million colors, multiple dynamic and static modes on the Magic Lantern App. You can also adjust the brightness and light speed.
- Synchronized with Music: The floor lamps for living room can change color light synchronously with the rhythm of music or the changes of game sound effects. Create various atmospheres and bring you into a new realm of auditory and visual enjoyment.
- Easy Installation and Timing Function: This LED lamp is easy to operate, quick to install,With the detachable colorful light segments, plug and play, you can install the bar lamp at the right height according to your needs.Timing function, which allows you to set the on and off time as needed.It will match any room decor. Place it in your living room, bedroom, game room, or anywhere else you want to add a touch of style.
- Selected High-quality Materials: Our corner light is made of solid aluminum alloy shell, which is stable, durable and has good heat dissipation. Heavy-duty base prevents the tall lamp from tipping. Download the magic lantern APP to experience more cool room lighting and functions.

- Transformative - Art3d pre-cut molding trim adds depth and character to walls, gives traditional elegance with a hint of contemporary refinement
- Premium Polystyrene Material - Unlike flexible PVC molding trim, it's stiff and sturdy that can align straightly. It's paintable, resistant to moisture, warping and cracking, ensuring a long-lasting, pristine finish
- Easy & Quick Installation - Our pre-cut wall molding kit is designed for easy application with the use of adhesive or glue(not included). Achieve a professional finish without the need for complicated tools or techniques, perfect for both novice and experienced DIYers
- Wide Application - Our versatile wall moulding panel can enhance the look of your living room, bedroom, bathroom,door, cabinet or hallway by adding a decorative touch to walls or creating custom frames
- Coverage - Package comes with 24 wall molding kits, including 3 Top 3 Bottom pieces, for a wall measure around 10ft high by 11ft wide

- What You Will Receive: you will receive 3 sets of pre cut wall decorations, each set has 10 pcs, total 30 pcs, which can be freely matched according to your needs, they attaches easily and gives doors or walls elegant finished look
- Interior Decoration: this pre made wall moulding kit will add depth and style to any room; Try out different spacing and quantities! You can even mix and match our different sizes to add variety to you space
- Self Adhesive Application: wall moulding kit stick with built-in adhesive backing, which can be easily use without the need for additional adhesive or tools, these ready made molding wall trims can be effortlessly applied with cold or hot silicone quick adhesive or stainless steel wall nails, offering flexibility to match your DIY style
- Ready to Paint Decorate: our DIY kits come pre cut and ready to adorn your walls; No more tedious cutting or aligning these wall and door moulding kits can be painted with any interior paint; Wainscot wall panels are ready to beautify your space, ensuring a quick and efficient transformation of your decor
- Lightweight: these molding panel kits for walls are lightweight yet durable; Unlike foam or alternatives, they retain a wood like texture without the bulk; This balance is not only aesthetically pleasing but also highly practical

- Artistic-Can be a frame or decoration for all backspalsh tiles and the edge.
- Flexible-Just peel and stick,cut with scissior and fit well into corner.
- Performance-Made of superior PVC, good performances of heat, water resistence and durality.
- Superior Adhesion - The acrylic tape can stick on all kinds of unstickable smooth surfaces. No residue when removing.
- WARRANTY: Art3d – The industry well-known brand, quality guarantee and exceptional customer service

- 3D Retro Trim: The skirting trim adopts 3d relief pattern design, and the pattern texture is convex, so that the wall is no longer monotonous
- Size: Wallpaper border about 88.6 inch Long (7.38Ft) x 2 inch wide, thickness: 0.15 inch, easily trimmed to the desired length according to needs (please do not pull it hard, the foam will shrink back)
- Flexible Foam: Made of high-quality XPE foam, soft and elastic, odorless, safe, waterproof, dustproof surface, stain resistant and easy to clean and wipe
- Peel and Stick Trim: Self-adhesive backing, just peel and stick the place, easy to use, not to paste wallpaper, wall covering, and wall stickers on the surface, fitting for smooth surfaces, like tile, plastic, marble, metal, glass, wood, wall, and more.(Please stick it on a smooth, clean surface)
- Widely Application: The wallpaper border is suitable to decorate wall, door frame, doorway, stair, tv backdrop, wall cabinet, mural, painting on wall, ceiling, window and other home decorations, adding a sense of elegance at your home.

- Elegant Semi-pearl Wall Molding Trim: this DIY peel and stick molding trim features a delicate 3D semi-pearl design made of flexible PVC, adding a touch of sophistication to any space; The white finish blends seamlessly with modern, classic interiors
- Customizable Perfection: with a generous length of 118.11 inches, the flexible molding trim offers versatile options to suit any space; Simply cut the trim to your desired size, making it a suitable fit for various decorative requirements, from mirror frames to ceiling cabinets
- Versatile Decor: revamp any area in your home; The DIY decorative peel and stick wall molding enhances imperfect corners, backsplashes, tile edges, wall moldings, and more; Elevate the appeal of kitchen, bathroom, or living spaces effortlessly with this widely applicable trim
- Effortless & Hassle-free Installation: our peel-and-stick molding trim, equipped with a durable adhesive tape, empowers you to install it yourself with ease; The adhesive remains reliably sticky over time, ensuring a flawless finish without any peeling, bubbling, or adhesion issues
- Low-maintenance Brilliance: durable and practical, the PVC material of the decorative trim molding ensures it is waterproof, oil-proof, and resistant to damage; Cleaning is a breeze, just wipe it gently with a towel to maintain its pristine appearance, making it a nice decor

- Color & Size Specification: 1.5IN/38mm(With), 10.5FT/3.2m(Length), 0.04IN/1mm(Thickness) Color: White This waterproof sealant caulk tape strip with a crease in the middle.
- EASY TO USE AND TRIM: Waterproof Sealant PVC sealing strip with crease design, foldable any degree white sealant to tightly seal seams and corners between walls. Clean, flexible and cuttable tape caulk. Peel and stick material adheres easily. Daily wiping is all it takes to keep surfaces as clean as new.
- Wide Applications: The self adhesive caulk strip provides a professional look to the bathroom area and kitchen, keeping your house clean and tidy for a long time. Adhesive tapes is ideal for tubs, toilets, corners, bathrooms, kitchen countertops, basins, sinks, gas cooktops, marble countertops as bathtub caulk tape, show tape, clear bathroom caulk. Whether it is glass surface, wood surface, metal surface, plastic surface, tile surface, marble surface, our tape can be used.
- Sealing and Durable: White sealing tape, high-quality PVC material shower caulking strip, self-adhesive bathroom caulking tape, durable caulking tape is mainly made of PVC material, middle and new nano double-sided tape, with Long lasting seal and adhesion. self adhesive tape covers cracks, crevices and damaged corners perfectly.
- After-sale Guarantee:We are committed to providing quality products and 100% customer satisfaction. If you have any questions about self-adhesive caulking tape, please contact us, we will serve you 7x24 hours wholeheartedly!

- 【Self-adhesive and Flexible】Our Flexible molding trim or wall panel made of high quality PVC material.The surface is spray-painted, It is moisture-proof, anti-corrosion, oil-proof, dust-proof, waterproof, non-toxic and odorless, easy to clean.Self Adhesive molding trim can be attached to almost any smooth surface.Flexible materials can meet our requirements for different shapes.
- 【Peel and Stick】White wall trim is ready to use out of the box. It can be directly pasted (when the weather temperature is below 77℉, you can use a hair dryer to heat the adhesive to increase the stickiness), or you can use nail-free glue to reinforce it.
- 【DIY Simple Installation】1️⃣ Measure 2️⃣ Cut 3️⃣ Peel 4️⃣ Paste. Each roll is 10FT, suitable for clean, dry, non-skinning and dusty walls. Use with caution on wall coverings. Use a utility knife or tool scissors to cut directly, and can also be painted, suitable for various combinations.
- 【Wide Application】Peel and stick wall trim is suitable for most corners and surfaces (tile, plastic, marble, metal, glass, wood, smooth wall, exterior wall), perfect for bathroom, bedroom, living room, kitchen, TV background, baseboards, ceilings, borders, cabinets, mirrors, etc. Enhance the beauty of multiple areas in your home effortlessly!
- 【After-Sales Service】 Your satisfaction is our greatest pursuit. After-sales service guarantee. If you have any dissatisfaction, please feel free to contact us. We will provide you with an exchange or refund.

- Natural Matte TPE – The non-gloss texture is a result of the raw material's authenticity (not a defect), built to resist stains, water, and fading while remaining flexible and easy to wipe clean for years. The line is 1.6 inches/40cm wide, about half the length of a standard credit card, so we recommend confirming the width before purchasing
- Effortless Installation: Our trim molding is designed for a simple, 3-step installation process—just cut, peel, and stick! No special tools are needed, making it the perfect solution for any DIY enthusiast. For best results, apply when the adhesive backing is above 68°F (20°C), or use a hairdryer to gently heat the adhesive for improved bonding. Note: In hot summer temperatures, the adhesive may soften, so avoid applying in extreme heat for optimal performance
- Self-Adhesive Convenience:The window trim molding Featuring a strong adhesive backing, our 1.6-inch x 20-foot flexible trim molding adheres securely to various surfaces such as walls, doors, mirrors, floors, and windows. Unlike traditional wood trims, it's hassle-free and ready to use.
- Versatile Usage:Our chair rail moulding for walls Suitable for a wide range of applications including tile, plastic, marble, metal, glass, wood, and smooth walls. Perfect for enhancing bathrooms, bedrooms, living rooms, kitchens, and even as decorative accents for baseboards, ceilings, borders, cabinets, and mirrors.
- Note: This TPE product comes unpainted in its natural white finish. Not suitable for spray painting, but please note the raw material has a matte texture.

- All-In-One Hand Casting Kit – Includes everything you need for an easy and meaningful experience: 600g molding powder, 1000g casting stone, plastic molding container, gloves, sandpapers, sculpting knife, and detailing tools. Clear instructions walk you through each step so you can enjoy the process and create a lasting keepsake
- Memorable Birthday Gifts for Women - Surprise her with a DIY Hand Casting Kit you can create together. It’s the perfect birthday gift for mom, wife, girlfriend, sister, or friend—turning quality time into a heartfelt keepsake that lasts forever.
- High-Detail, Premium Results - Luna Bean’s premium hand casting kit captures every fingerprint and fine line with ultra-precise alginate mix. Includes simple instructions and a video tutorial so anyone can create a professional-grade casting at home
- Celebrate Love with a Lasting Keepsake - Perfect for anniversaries, weddings, or engagement gifts, this hand casting kit for couples turns a special moment into a work of art. Ideal for date nights, bridal showers, or anytime you want to create something unforgettable together.
- A Gift That Makes an Impression - Whether it’s for mom, boyfriend, girlfriend, or your favorite couple, this DIY hand casting kit makes a standout gift. Great for any occasion - birthday, holiday, or just because, it’s a meaningful way to show you care.

- WIDER SELF-ADHESIVE,QUARTER ROUND TRIM: W 0.5” x H 0.5”, L 158”. Self-adhesive tape on both sides, no additional glue or tape required. What's more, the width of the tape is 20% wider than that of molding trim on the market, providing a stronger adhesive that stays in place lasts longer so you don't have to worry about the flexible trim peeling off over time. Quarter round designed for use as a frame or decoration in all curved edge areas. Accessible and friendly to wheelchairs.
- SUPERIOR QUALITY, EASY CLEAN :The quarter round molding is made of superior rubber material, flexible and durable, resistant to high temperature, corrosion resistance, easy to cut and color not easy to turn yellow after long-term use. Easy to clean with a wet towel. Great flexible trim molding for tub kitchen corner decorations with flexible trim.
- WIDELY APPLICABLE, NO RESIDUE : Peel and stick vinyl trim suitable for gaps between door, windowsills, stoves, countertops, bathtubs and walls. It can be applied to shower pan, kitchen sink, toilet, desk and so on. This adhesive strip can be stuck on almost any smooth surface without leaving any residue when removed. The perfect solution for aesthetics and water leaks.
- EASY INSTALLATION ,PEEL AND STICK:There are self-adhesive strips on both sides of the back, just peel and stick, no needed extra glue or tape . Installation steps: 1.Simply clean the surface 2. Measure and cut the desired length 3. Peel off the film, stick firmly and fit the flexible quarter round well into the corner. In addition, you can apply extra glue to the connection for long-term use to strengthen the fixing and waterproof effect.
- FAST RESPONSE, EXCELLENT SERVICE : These flexible quarter round molding trim are the perfect combination of elegance and function. Our round flexible trim with 39/79/118/158 inch , suitable for wall corner ceiling, backsplash tile edge, countertops, baseboard, floor .Includes neutral colors in white ,gray and black, which easily match your home decor and your styles.
Visualize a perimeter of your ceiling lined with a narrow ledge or recess, concealed behind a molding or architectural feature. Soft LED strips are installed within this cove, emitting a diffused light that gently washes the ceiling and walls. The effect is a seamless, floating glow that elevates the room’s atmosphere without the glare of direct lighting. It’s like having a secret light source that enhances every detail quietly and beautifully.
You can choose warm white or color-changing LEDs to match your mood or decor. The cove can be simple or ornate, with decorative moldings or hidden within architectural features like beams or soffits. For smaller rooms, a subtle cove adds height and depth; for larger spaces, multiple coves create a layered lighting effect. Dimming controls allow you to adjust brightness for different times of day.
Begin by planning the perimeter of your ceiling where the cove will be installed. Use a level and measuring tape for precise placement. Install a sturdy ledge or molding that conceals the LED strips, ensuring it’s securely attached. Run wiring from a power source, and hide the cables behind crown molding or within ceiling cavities. Connect the LEDs to a dimmer or remote control, and test the lighting for even distribution and desired brightness.
Add color-changing options for dynamic effects during parties or cozy evenings. Incorporate programmable timers or voice control for convenience. Decorate the cove with decorative moldings or ornate trims that match your style. Personalize the lighting scene settings to create a calming or energizing environment tailored to your preferences.
Hidden cove lighting creates a sophisticated, high-end look that instantly upgrades your bedroom. It’s a subtle detail that makes your space feel more luxurious and thoughtfully designed. Once installed, you’ll enjoy a warm ambiance that’s perfect for unwinding. Ready to add elegant, hidden glow? Your bedroom will thank you!
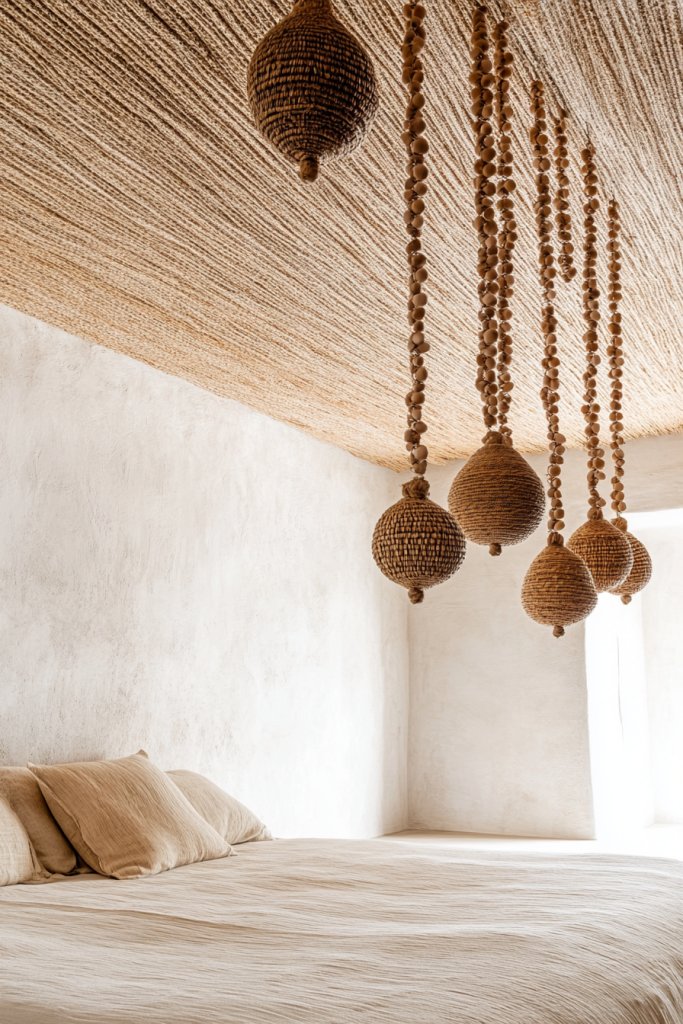
7. Beaded or Wicker Ceiling Details for Boho Vibe
Craving a laid-back, bohemian vibe that makes your bedroom feel relaxed and inviting? Flat, plain ceilings just don’t cut it anymore. Beaded or wicker accents can introduce natural textures and tactile interest, giving your space an effortless, boho-chic charm. It’s a simple upgrade that packs a punch in style.

- Amazon Prime Video (Video on Demand)
- James McAvoy, Bruce Willis, Anya Taylor-Joy (Actors)
- M. Night Shyamalan (Director) - M. Night Shyamalan (Writer) - M. Night Shyamalan (Producer)
- English (Playback Language)
- English (Subtitle)

- Tumbler and Rocks Glass Set: Level up your hosting game with the perfect balance and elegance of our everyday glasses drinking set – this set of glasses includes eight 16 oz tumbler glasses and eight 13.3 oz rocks glasses
- Elegant Drinking Glasses: Our kitchen dinner glasses features an elegant curvature and smart, strong lines; the graceful curved base of these clear drinking glasses meet pin-straight walls for a starkly elegant presentation
- Serve Any Cocktail: Our aesthetic rocks and glass tumblers set are suited for all purposes – serve up any cocktail you can dream up in this graceful cocktail glasses set mixed drink glasses
- Versatile Glass Set: The unique drinking glasses in our beverage glasses set are versatile enough to upgrade any table setting and showcase any drink imaginable, making your dinner parties the must-attend event on everyone’s weekend list
- Effortless Care: Designed to be durable and dishwasher safe, our modern drinking glasses offer a quick and easy clean up; handle these modern glassware with care to preserve their charm and longevity for years to come

- Libbey Glass 1639HT - Mixing Glass 16 Oz
- , Heat Treated Clear, 24 Pack As America's Glassmaker since 1818, Libbey Foodservice knows the vital role glassware plays in your business
- Libbey is renowned as the leading producer of glassware products in the Western Hemisphere, including stemware, beer, spirits and barware glasses
- More than vessels for beverage service, the right glass enhances presentation to elevate value and helps you control portions to maximize profitability
- PRODUCT CONFIGURATION: Drinking glass set includes 4 glass cups [ Diameter - 3 inches, Height - 5.8 inches ],4 nature bamboo lids, 4 reusable glass straws and 2 cleaning brushes, Classic design tumbler
- DURABLE and SAFE: The glasses are made of high-quality durable clear glass, Lead-free and BPA-free. It can be used safely for a long time. This thick clear glass can withstand the sudden changes in the temperature difference between -68°F to 212°F, making them dishwasher safe. If you want to decorate this glass, you can do DIY easily without breakage
- MULTI-PURPOSE: The glassware Great for any Occasion, any hot and cold drinks, home essentials. It is widely loved by families, kitchen, breweries, cafes, bars and restaurants. You can use it to make perfect tea, bubble Pearl Milk Tea, soda, water, iced coffee, smoothie, fruit juice or any other interesting holiday drinks
- AMAZING GIFT: This jar is very fashionable, aesthetic and characteristic. Excellent workmanship. Perfect Gifts for Women, House warming gifts, Tea mug Sets, Highball Glasses, Home Bar Accessories, Birthdays, Graduation, Weddings and Christmas Gifts
- SATISFIED SERVICE: This glass set is packaged in the heavy bubble holder and thick carton box to prevent damage while in transport. If the glass set you received was damaged or imperfect or you are not satisfied, we will offer a satisfactory solution

- A RATHER CLASSY GLASS: On the surface it may look like an average highball glass. But this is the JoyJolt Faye Glass, and it’s anything but average. Crafted from Lead-Free Crystal and 2.5” wide it’s the perfect sized drinking glass for ice, and the perfect glass for your finest and shiniest cocktails!
- LOVELY TO BEHOLD: With its slimline 2.5” grip, 1.7oz heft and 3mm rolled rim, Faye alcohol glasses feel fantastic to hold. They’re light enough so as not to weigh your summer mojito down, but not so light that you feel as though it would break when you SET it down. Take a sip of satisfaction and see.
- LEAD-FREE CRYSTAL GLASSES: Notice how thick, robust and slender your skinny drink glasses are. Strong crystal glass like this is free from glass bubbles, easier to set down without worrying about breakage, and easier to clean. These 6” Tall drink glasses are Dishwasher Safe and effortless to fit!
- FOR DAILY USE: When you’re not filling your 13oz glass cups with a vibrant cocktail, you’ll also love using them as sturdy kitchen glasses and general drinkware. Popular as: a fresh squeezed juice glass that makes colors pop, dainty iced tea glasses, mocktail glasses, water glass and 12oz skinny beer glass
- SECURELY BOXED: Faye 6 PC Bar Glasses Sets for the home, come securely bubble-wrapped in a thick box, so any plans for gifting will be success! Affordably priced for this type of quality, and with a 12 Month Guarantee, they’re a practical and beautiful gift for anyone who likes to imbibe joy.

- Elevate your drinkware collection with our American-made 8-piece set that includes four 12 ounce glasses and four 16 ounce glasses. Made from high-quality plastic material that's free of harmful chemicals, our cups provide a reliable option for you and your party guests.
- These cups feature a smooth top edge for easy sipping and a thick base that provides a glass-like appearance, making them both comfortable and stylish. This design will add an updated look to your kitchen aesthetic.
- Think outside the house- This Classic plastic glass set is a great addition to any college dorm room, first apartment, rv, and camper. Consider adding these as a wedding registry gift for a new household.
- Stock your home bar for cocktail hour or prepare for breakfast, brunch, and dinner with this selection of highball and rocks tumblers. Entertain outdoors at the patio, pool, or hot tub with these durable and shatterproof pieces.
- The 12oz cup (3.25" diameter x 3.75" tall) and 16oz cup (3.00" diameter x 6.13" tall) are versatile and suitable for any drinkware need.

- Set includes six 12-ounce glasses. The Picardie tempered glasses are suitable for hot or cold drinks and conveniently stackable
- The original french tumbler, made by the company that invented tempered glass
- Duralex is 2-1/2 times more resistant to breakage and chipping than normal glass, can also withstand sudden thermal shock: from -4-degree F to 212-degree F
- Duralex glass is very hygienic: it is non-porous and does not absorb liquids, colors or flavors
- Dishwasher, fridge and microwave safe; Products maintain the original look for years

- Insulated mug: a set of Two double-wall pavina glasses, 8 ounces each; perfect for Coffee, espresso, or a multitude of other hot and cold beverages
- Heat resistant: Bodum glasses are made of mouth-blown, lab-quality borosilicate-glass construction for a durable and heat resistant glass
- 2-Layer design: insulated glass has a sleek 2-layer design that creates a dramatic optical illusion and prevents condensation
- Microwave safe: quickly reheat your Coffee in the microwave and toss in the dishwasher when you need a clean; microwavable and dishwasher safe glass
- Award winning: Bodum double wall glasses are the winners of the prestigious European if design award; 1 year Limited

- 10-PIECE SET: Set includes (5) 4-cup square glass containers with plastic lids. The non-toxic lids fit glass and plastic Snapware containers (of the same shape/size). These are the perfect containers for meal prepping or storing leftovers.
- HIGH QUALITY: Made from high-quality glass and durable BPA-Free plastic, these containers are an indispensable addition to your storage and organizing needs. The containers and lids stack to save space, so you can put them away neatly until needed.
- NON-TOXIC LIDS: These Snapware containers feature airtight, leak-proof lids with 4 locking tabs that are BPA-free. They're also top-rack dishwasher, freezer and microwave safe. Save food for tomorrow or warm today's lunch with less worries.
- LABEL YOUR FOOD: Built-in Write + Erase label on lids provide convenience and fun. When you have too much stuff, or just need to make sure that everyone knows which container belongs to you, simply write on the lid to avoid any confusion.
- LIMITED WARRANTY: This item has limited warranty. Made in USA

- PRODUCT CONFIGURATION: Drinking glass set includes 4 can-Design Highball Glasses [ Diameter - 3 inches, Height - 5.8 inches ],4 reusable glass straws and 2 cleaning brushes, Classic design, Very practical combination suit.
- DURABLE and SAFE: The can Design glasses are made of high-quality durable clear glass, Lead-free and BPA-free. It can be used safely for a long time. This thick clear glass can withstand the sudden changes in the temperature difference between -68°F to 212°F, making them dishwasher safe. If you want to decorate this glass, you can do DIY easily without breakage.
- MULTI-PURPOSE: The can Design glassware Great for any Occasion, any hot and cold drinks. It is widely loved by families, kitchen, breweries, cafes, bars and restaurants. You can use it to make perfect tea, bubble Pearl Milk Tea, iced coffee, smoothie, fruit juice or any other interesting holiday drinks.
- AMAZING GIFT: This jar is very fashionable, aesthetic and characteristic. Excellent workmanship. Perfect for Birthdays, House warming gifts, Tea Sets, Home Bar Accessories, Graduation, Weddings, Bachelorette Parties and Christmas Gifts.
- ATISFIED SERVICE: This glass set is packaged in the heavy bubble holder and thick carton box to prevent damage while in transport. If the glass set you received was damaged or imperfect or you are not satisfied, we will offer a satisfactory solution


- ★[COLOR]: This wicker replacemenet material is not monochromatic but gradiant dark brown with mixed color stripes. ''Gradiant dark brown'' means this wicker's color is not consistant in only one brown color but mixed with cappuccino brown and espresso brown, and these two brown colors gradually transitions along with the wicker strand.
- ★[DIMENSIONS] Width = 8mm; Thickness = 1.2mm; Length = 120 ft; Weight = 0.55 lbs. This is a flat-shaped wicker, not round or half round either.
- ★[WICKER REPAIR KIT]: Save money and time with fun by fixing your patio furniture yourself and improve the value of your lawn furnitue while protecting your investment. You can also have fun to create some innovative DIY gadgets or art crafts like flower basket, food basket etc with this plastic wicker material.
- ★[HEAVY DUTY]: Synthetic plastic, 100% virgin polyethylene (PE), not natural rattan, high strength, waterproof, UV resistant, non-toxic, resistant to fading, cracking, and peeling, ensuring long-lasting use.
- ★[WARM TIPS]: This wicker's color may not exactly match your damaged wicker, but you can match the color either by spray painting the wicker or cut properly per your needs. In most cases a pretty close match wicker material can always blends in nicely with your originals.

- Amazon Prime Video (Video on Demand)
- Josh Hartnett, Diane Kruger, Matthew Lillard (Actors)
- Paul McGuigan (Director) - Gilles Mimouni (Writer) - Andre Lamal (Producer)
- English (Playback Language)
- English (Subtitle)

- 【Eco-friendly Tall Hamper】 15D x 20H inches tall round laundry hamper is 100% natural hand woven jute thread rope has no plastics, harsh chemicals, toxins, or harmful additives. Perfect for clothes, blanket, throws and stuffed animals
- 【Large and Portable Hamper】 The hamper was larger than other basket. It can store a week's clothes, save more time to enjoy life. The handle is sturdy enough to hold at least 44 lbs weights. The long design handle makes it much easier tote to anywhere you want
- 【Long-lasting Laundry Basket】The cute and elegant hamper provide a nice fine Nordic touch to any room of the house. The slim and tall basket is very suitable for any place of your home and decor your room in the meantime. You can put it in living room, bedroom, laundromat, baby room or dorm room. It's easy to fold up and store to save space when you not use. We use highest grade materials and construction that will last for years of continuous use
- 【Multipurpose Storage Baskets】58L capacity basket can keep things organized in a stylish and decorative way. You can use them to store extra towels, blanket, clothing, toys for baby and dogs, books, pillows or any other household items around the house, anything you can imagine
- 【Services Commitments】For any reason you're not completely happy with your purchase, please reach out and we will attempt to resolve any issues and ensure your contentment. Your satisfaction is our goal. Wish YOUDENOVA beautify and light your life

- Elegant & Safe Handwoven Synthetic Rattan: Our Cantalop Cord storage organizer with attached lid boasts a handmade polypropylene rattan like plastic, adding a touch of rustic elegance to any room. This cable organizer is carefully designed to hide wires and improve your space with a charming touch.
- Organize and Decorate with Versatility: Transform your workspace with our large capacity Cantalop Cable organizer box, a multifunctional solution that not only tidies cables but also serves as a shelf for small plants and decorative trinkets. Streamline organization while enhancing visual appeal.
- Simplify Access, Conceal Clutter: Say goodbye to cable chaos with our thoughtfully designed Cord box organizer with 2 entry/exit points. Conceal power strips, USB hubs, and more within its compact 13 x 5.1 x 5.1-inch frame. Thoughtful cutouts ensure easy access without compromising on a clutter-free workspace in home or office.
- Cool and Durable for Lasting Performance: Keep cool and stay sturdy with our Cantalop Cable storage box. Engineered with a hollow heat sink, it efficiently dissipates heat for long-lasting durability, ensuring your cables stay organized and your workspace stays functional.
- Secure and Pet-Friendly Cable Management: Prioritize safety with our cord organizer storage, crafted to keep your little ones and furry friends safe from electrical hazards. Our baby- and pet-proof design ensures a secure home environment, offering peace of mind for all.

- ★Color: light wood grain; Width: 7mm; Thickness 1.2mm; Weight: 250 grams. Please note that the color of our plastic wicker may not be exactly the same as that of the wicker furniture you need repair. You can match the color of our plastic rattan with the color of the wicker furniture you need repair by spray painting.
- ★Wicker repair kit: repair patio wicker furniture including plastic wicker chair, sofa, table, storage box and chaise lounge etc
- ★Wicker repair supplies: synthetic polyethylene (PE), high strength
- ★Can also have fun to create some innovative DIY gadgets or art crafts like flower basket, food basket etc.
- ★Our Service: We offer risk-free satisfaction service to you. If for any reason you are not satisfied, please feel free to contact us, and we will be very glad to do our best to help you solve your problem.

- EXCELLENT HAND CRAFTSMANSHIP – Each Rattan Weave Table Lamp is meticulously crafted by skilled artisans. The combination of antique willow creates a visually captivating and unique design that showcases the intricacies of the rattan weave. The intricate weaving and textures create a visually stunning masterpiece (lamp shade diameter: 8.66 inches, overall height: 10.6 inches). Please note: Due to the handmade nature of this product, slight variations in size may occur
- UNIQUE VINTAGE ELEGANCE STYLE - With a vintage inspired design, this rattan woven table lamp exudes timeless elegance. The combination of rustic willow wood weaving evokes a sense of nostalgia and creates a captivating focal point that complements any interior from traditional to modern
- VARIETY OF LIGHTING OPTIONS - This vintage wicker table lamp is equipped with an E26 LED bulb that is available in 3 attractive colors - warm, neutral and white. Whether you want to create a cozy and intimate atmosphere, a calm and balanced mood, or a bright and invigorating glow, this table lamp can be effortlessly adapted to your mood and preference
- CONVENIENT SHADE INSTALLATION - Installation of our table lamp shade is simple. Simply insert the end of the bulb clip into the center hole of the shade and tighten the nut. Press the bulb clip into the bulb head to form a strong retaining clip. Enjoy easy and secure lampshade installation
- PERFECT FOR A VARIETY OF SPACES – This rattan wicker table lamp is suitable for any room or setting. It can effortlessly enhance the ambiance of your bedroom, living room, den or even entryway, adding a touch of warmth and sophistication to any space. Its compact size and lightweight construction make it easy to move around and experiment with different placements. Tip:Please refer to the effect when the lamp is turned off to better understand its actual color

- 【Natural Material】The bathroom tray is made of natural and renewable water hyacinth by hand, feeling thick and soft, reducing our impact on the environment.
- 【Versatile Basket】The utility wicker tray keeps the bathroom clean and simple and can store toilet paper, towels, candles, toiletries, wet wipes, cosmetics, fresheners, and more.
- 【Multi-scenario Use】The Vanity Tray can be placed in any place that needs to be organized, such as bathroom countertops, dining tables, end tables, bedside tables, end tables, vanity, shelves, and desks, suitable for bathroom, kitchen, living room, dining room, bedroom, etc.
- 【Sturdy Hand-woven Tray】Handcrafted wicker baskets for organizing with strong metal frames are last-long and unique. And the natural color of the toilet paper basket adds a touch of warmth to the room.
- 【Dimensions】10 x 6 x 2 inches (L x W x H); Item dimensions have been marked in detail in the picture, please measure the top of the toilet tank before purchasing. Due to the handmade nature, the dimensions may vary within 1/4 inch.

- Amazon Prime Video (Video on Demand)
- Nicolas Cage, Ellen McRae, Kate Beahan (Actors)
- Neil LaBute (Director) - Neil LaBute (Writer) - Nicolas Cage (Producer)
- English (Playback Language)
- English (Subtitle)
Picture a ceiling adorned with strings of beads or woven wicker panels arranged in a pattern that complements your decor. The beads can be glass, wood, or metal, hanging in varying lengths for a layered, textured effect. Wicker panels add a tactile, handcrafted element, bringing warmth and organic beauty. When light filters through or reflects off the beads or wicker, it creates a cozy, sun-dappled ambiance that feels relaxed and earthy.
Mix different bead sizes and materials for an eclectic look or stick to uniform beads for a cleaner style. Wicker panels can be installed in geometric patterns or as a border around the ceiling. Keep the color palette neutral or go for bold earthy tones like terracotta or moss green. For a more refined boho look, combine beaded curtains with textured wall hangings and layered textiles.
Install a lightweight frame or directly attach your beads or wicker panels to the ceiling using hooks or adhesive strips. Ensure the structure can support the weight—especially for heavier wicker pieces. Arrange beads in strands or clusters, securing ends with hooks or small nails. For wicker, use a staple gun or adhesive to attach panels securely. Finish with soft lighting that enhances the textured details, like string lights or indirect LEDs.
Personalize by choosing beads that reflect your personality—sea glass, recycled materials, or metallic accents. Layer beads with tassels, feathers, or small charms for a personalized, layered look. Incorporate a mix of textures and colors that tie into your overall decor theme. These details make your ceiling a playful, tactile feature that invites touch and admiration.
Beaded and wicker ceiling details add a handcrafted, artisanal touch that elevates your boho-chic style. Once complete, you’ll love the relaxed, welcoming vibe it creates. It’s a simple project with big style impact, making your bedroom a cozy retreat. Ready to embrace your inner free spirit? Bead your way to a charming space!
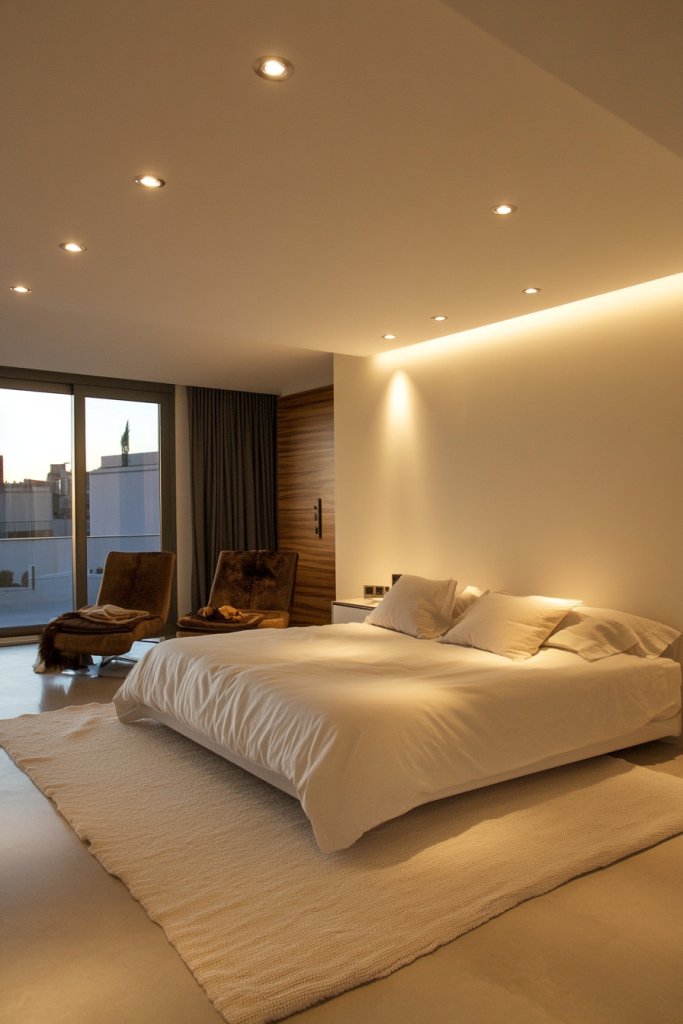
8. Ceiling with Recessed Spotlights for Practical Illumination
Ever struggle with uneven lighting or harsh overhead fixtures? Recessed spotlights provide a sleek, unobtrusive way to light your bedroom effectively. They’re perfect for creating a bright, functional space without cluttering the ceiling with lamps or pendants. If you want a versatile lighting scheme that adapts to your needs, this might be the best option.

- 5 CCT-in-1: 5 color temperature(2700K, 3000K, 3500K, 4000K, 5000K) is selectable to you, which successfully eliminates the hassle of returning or exchange products due to inappropriate color temperature. Just slide the switch on the side of the J-box and you will get the most-desired color that best fit in your room type.
- IC Rated: Amico's canless LED recessed light is IC rated, which is permitted to be in contact with insulations in ceilings, meaning the junction box is thermally protected. It only requires as small as 2 inches ceiling space. It won't have a fire hazard when light was installed in various ceilings and overhead joists.
- Easy Install: The low profile recessed lighting is suitable for retrofit and new decoration: Cut a hole in ceiling with 1:1 hole template; Connect the Jbox to the cable; Use spring clip to fix it on the ceiling. Hassle-free, the installation can be completed in minutes.
- High Brightness: The 6 inch slim pot lights use the world's leading LED chips with higher lumens and lower power. 1050LM consumes 12 Watts, which equals to 110W halogen lamp, saving you up to 90% in energy costs a year.
- Amico Benefits: Its long lifespan also reduces maintenance costs. All Amico's recessed lighting are certified by ETL of a high standard. Our customer support team will also address your concerns within 12 hours.

- 💡【5 Temperature Settings】Choose from 2700K, 3000K, 3500K, 4000K, 5000K with a simple click on the side of the J-box. Ensenior recessed ceiling lights can seamlessly fit into your bedroom, living room, kitchen, bathroom, workplace and other rooms.
- 💡【IC Rated】Ensenior's wafer downlight is IC rated, ETL & Energy Star certified, and features UL-certified wire terminals. Engineered for safety, the junction box requires only a 2-inch ceiling space and provides thermal protection and insulation compatibility.
- 💡【High Brightness】5%-100% smooth dimming, compatible with most Lutron dimmers. 1200LM consumes 12 Watts. Enjoy up to 88% energy savings without compromising on brightness. The LED lens is frosted for anti-glare and scratch-resistant.
- 💡【Easy Installation】Upgrade your can light with ease! Simply follow three steps: cut a hole with the provided template, connect the light to the cable, and secure it with the spring clip. Recessed cans are no longer a barrier to your lighting choices.
- 💡【Choose Ensenior】Ensenior’s led recessed lights enjoy 50000 hours life span and 5-Year Warranty. We are committed to your satisfaction, and our friendly customer service team will address your concerns within 12 hours.

- IC Rated: Amico's canless LED recessed light is IC rated, which is permitted to be in contact with insulations in ceilings, meaning the junction box is thermally protected. It only requires as small as 2 inches ceiling spaces, fits various ceilings, and joists. It won't cause a fire in the roof or overhead joist space.
- 5 CCT: 2700K, 3000K, 3500K, 4000K, 5000K, 5 color temperature selectable, no need to worry about what color temperature to buy, eliminates the hassle of returning or exchange products due to inappropriate color temperature.
- Easy Install: The low profile recessed lighting is suitable for retrofit and new decoration: Cut a hole in ceiling with 1:1 hole template; Connect the Jbox to the cable; Use spring clip to fix it on the ceiling. Hassle-free, the installation can be completed in minutes.
- High Brightness: The 6 inch led recessed light use the world's leading LED chips with higher lumens and lower power. 1050LM consumes 12 Watts, which equals to 100W halogen lamp, saving you up to 90% in energy costs.
- Amico Benefits: Its long lifespan also reduces maintenance costs. All Amico's recessed lighting are certified by ETL of a high standard. Our customer support team will also address your concerns within 12 hours.

- 5 CCT-in-1: 5 color temperature(2700K, 3000K, 3500K, 4000K, 5000K) is selectable to you, which successfully eliminates the hassle of returning or exchange products due to inappropriate color temperature. Just slide the switch on the side of the J-box and you will get the most-desired color that best fit in your room type.
- IC Rated: Amico's canless LED recessed light is IC rated, which is permitted to be in contact with insulations in ceilings, meaning the junction box is thermally protected. It only requires as small as 2 inches ceiling space. It won't have a fire hazard when light was installed in various ceilings and overhead joists.
- Easy Install: The low profile recessed lighting is suitable for retrofit and new decoration: Cut a hole in ceiling with 1:1 hole template; Connect the Jbox to the cable; Use spring clip to fix it on the ceiling. Hassle-free, the installation can be completed in minutes.
- High Brightness: The 6 inch slim pot lights use the world's leading LED chips with higher lumens and lower power. 1050LM consumes 12 Watts, which equals to 110W halogen lamp, saving you up to 90% in energy costs a year.
- Amico Benefits: Its long lifespan also reduces maintenance costs. All Amico's recessed lighting are certified by ETL of a high standard. Our customer support team will also address your concerns within 12 hours.

- 【5 CCT-in-1】5 color temperature options (2700K/3000K/3500K/4000K/5000K) for different application scenarios,eliminates the hassle of returning or exchange products due to inappropriate color temperature
- 【Easy Installation】Canless recessed lighting suitable for retrofit and new decoration,installation can be completed in minutes.Slim size suitable for all kinds of ceilings and joists
- 【High Brightness】Use world's leading LED chips with higher lumens and less power,up to 1100LM consumes 10 watts only, equivalent to 100W of incandescent lamps,saving up to 92% in energy costs per year
- 【Dimmable】Compatible with most dimmers,5%-100% smooth dimming for various application scenarios
- 【Safety】IC rated and ETL certified without fire risk

- [Selectable Colors] There are 5 selectable color temperatures (2700K, 3000K, 4000K, 5000K, and 6000K) available for our LED can lights. You do not have to worry about the color temperature before selecting the product.
- [Smoothly Dimming] You may easily adjust the can lights' brightness from 10% to 100% to get the brightness that will result in a comfortable environment. Note: This light is compatible with most dimmers on the market, except for the smart dimmer.
- [Simple Installation] With a universal E26 base, these 6-inch LED recessed lights can be installed as easily as a bulb. You can install them independently without needing an electrician, saving you time and resources with a quick 3-minute installation.
- [Reliable and Safe] You don't need to worry about safety because these recessed lights pass IC rating and ETL safety standards certification. They are surrounded by insulation and do not produce excessive heat, minimizing the risk of fire on the roof.
- [Wide Application] Amico retrofit downlights are damp-rated, suitable for installation in bedrooms, living rooms, kitchens, hallways, and even bathrooms. Their versatility eliminates the need to pick multiple lights for various applications.

- Night light Feature: 6 inch led recessed light in night light mode emits 2000K amber for very soft illumination and added ambiance. It also can provide no-glare lighting when you wake up at night which is very convenient.
- Synchronization Reset Function: All of our led recessed lighting with night light have synchronization reset function, every time when you turn on the downlight, it will always been downlight mode. Sometimes the lights get out of sync after installation. Please after turning off the light for 10 seconds, turn on again, then the synchronization will be done.
- 5CCT: Our slim recessed light in downlight mode offers you the option of 2700K, 3000K, 3500K, 4000K, 5000K, 5 color temperature you can choose before install into ceiling, no need to worry about what color temperature to buy, eliminates the hassle of returning or exchange products due to inappropriate color temperature.
- Trustworthiness: This canless LED recessed light possesses IC rated, ETL certification and FCC certification. It is permitted to be in contact with insulations in ceilings, meaning the junction box is thermally protected.
- Amico Benefits: The Amico LED recessed lighting with Night Light is certified by ETL of a high standard. Our service team is 7/24 online, we will give you a satisfactory solution.

- HIGH BRIGHTNESS - Ensenior 6 inch recessed lighting enjoy up to 90% energy savings without compromising on brightness. The enhanced LED chip emits 1200LM and consumes only 12 Watts. 5%-100% smooth dimming, compatible with most dimmers.
- EASY INSTALLATION - Cut a hole with provided template, connect the wires to the box & light, and secure the wafer light with its sturdy spring clips. Upgrade your lighting with ease!
- IC RATED - Ensenior's 6 inch led recessed light is ETL & FCC certified. The IC rated junction box and UL listed terminals provide thermal protection and insulation compatibility. No fire hazard. The panel light is damp rated and can be installed above shower.
- 5CCT in ONE - Choose from 2700K, 3000K, 3500K, 4000K, 5000K with a simple click on the side of the J-box, Ensenior's canless recessed light 6 inch provides perfect lighting for your bedroom, living room, kitchen, bathroom, home office and other rooms.
- ENSENIOR BENEFITS - 5-Year warranty & 50000 hours life span & 7/24 customer service. Ensenior’s led recessed ceiling light is trusted by most customers and contractors.

- HIGH BRIGHTNESS: Ensenior 6 inch recessed lighting enjoy up to 90% energy savings without compromising on brightness. The enhanced LED chip emits 1200LM and consumes only 12 Watts. 5%-100% smooth dimming, compatible with most dimmers.
- EASY INSTALLATION: Cut a hole with provided template, connect the wires to the box & light, and secure the wafer light with its sturdy spring clips. Upgrade your lighting with ease!
- SAFETY GUARENTEED: Ensenior's 6 inch canless light is ETL & FCC certified. The IC rated junction box and UL listed terminals provide thermal protection and insulation compatibility. No fire hazard. The panel light is damp rated and can be installed above shower.
- 5CCT in ONE: Choose from 2700K, 3000K, 3500K, 4000K, 5000K with a simple click on the side of the J-box, Ensenior's canless recessed light 6 inch provides perfect lighting for your bedroom, living room, kitchen, bathroom, home office and other rooms.
- ENSENIOR BENEFITS: 5-Year warranty & 50000 hours life span & 7/24 customer service. Ensenior’s led recessed ceiling light are trusted by customers and contractors.
- Top Rated BR30 LED Light Bulb - Indoor Flood Light, can light bulbs
- ✅ DIMMABLE FLOOD LIGHT - Seamless dimming capabilities (10%-100%) to fit any mood or decor.
- ✅ APPLICATIONS - Fits 5" or 6” recessed cans. Our BR30s give off sunlight-like quality for true color rendering, ideal applications include bedroom, kitchen, living areas, and offices.
- ✅ UL CERTIFIED - We uphold the highest standards for all our products by testing each product for optimal performance and safety. Our BR30 LED bulbs provide instant on, bright light with no buzzing or flickering for maximum eye comfort.
- ✅ SUNCO BENEFITS - 5 Year Protection! Sunco is proudly based in the USA, offering quality products at affordable prices backed by industry-leading warranties and knowledgeable support specialists.

- DUAL-SIZE SET FOR VERSATILE USE: This 2-piece set includes 6-inch and 10-inch adjustable wrenches, designed for everyday household tasks such as plumbing fixes, furniture assembly, bike repairs, and garage work. A great toolkit essential for DIYers and homeowners.
- HIGH-QUALITY MATERIAL: Made from drop-forged Chrome Vanadium Steel with a corrosion-resistant black oxide finish. Built for durability in home and workshop use, but not for industrial or high-stress mechanical tasks.
- PRECISE ADJUSTMENT WITH DUAL SCALES: Laser-etched SAE and metric scales on both sides of each wrench allow for quick and accurate jaw alignment. Smooth worm gear provides consistent control and grip without slippage.
- MAX JAW CAPACITIES CLEARLY DEFINED : 6" wrench fits up to 15/16" (24mm); 10" wrench fits up to 1-5/16" (33mm). Suitable for nuts and bolts from M6 to M14 (6" wrench) and up to M20 (10" wrench). For better performance, avoid using on rusted or oversized fasteners that exceed jaw capacity.
- COMFORTABLE GRIP & TOOLBOX-FRIENDLY: The ergonomic rubberized handle reduces hand strain during extended use. Both wrenches feature hanging holes for easy storage, and the set fits neatly into standard toolboxes or bags.

- 8-inch (200 mm) adjustable wrench with inch/metric measurement scale
- Drop forged and heat-treated Cr-V steel construction, black oxide finish resists corrosion, meets or exceeds ANSI standards
- 1-1/4 in jaw capacity; Precision-machined slide jaw and worm gear allow for exact fastener fit and smooth adjustment
- Ergonomic grip and portable design make it easier for you to use; Round hole design at the tail for easy hanging and storage
- Good for basic home use, our long-lasting tools help you with auto repair, general assembly, maintenance, plumbing, and more

- ADJUSTABLE DUMBBELLS SET: Elevate your fitness and performance with strength-training equipment that adjusts with you. These PowerBlock dumbbells have a range of 5-50 pounds per hand, a padded handle, and easy weight identification.
- COMPACT & PORTABLE: The adjustable, convenient, and compact dumbbells provide innovative strength training for an easy-to-use solution. Bring the workout with you anywhere. Dimensions are 12″L x 6″ W x 6″ H.
- EASY & QUICK ADJUSTABILITY: Quickly adjust the weight set up or down for your exercise with the secure magnetic polypropylene pin. Increments include 2.5 (adder weight), 5, 7.5, 10, 15, 17.5, 20, 25, 27.5, 30, 35, 37.5, 40, 45, 47.5, 50 lbs. per hand.
- LONG LASTING FOR YEARS OF USE: This dumbbell set is engineered with a reliable build for years of use. Replace 16 pairs of dumbbells, equivalent to 825 lbs. of free weights for an all-in-one strength training solution. Comes with a 5-year residential warranty - warranty does not apply for commercial use.
- EXPANDABLE WITH EXPANSION KITS: PowerBlock offers Elite EXP 50 Stage 2 and Stage 3 Expansion Kits to increase the weight to 70 or 90 pounds per hand as your fitness level grows (sold separately). The Elite EXP's expansions and accessories are not compatible with the Elite USA 90's expansions and accessories.
- EASY TO USE AND REPOSITIONABLE: Poster Strips can be repositioned up to 3 times within the first 20 minutes, so you can get your décor just right
- DECORATE DAMAGE FREE: Say good bye to holes, marks or sticky residue on your walls; Command Adjustables by 3M remove cleanly and keep your walls looking beautiful
- REMOVES CLEANLY- Redecorate when inspiration strikes; Command Adjustables leave no sticky adhesive behind; Perfect to use in your college dorm, apartment, home, and office
- STRONG & VERSATILE: Command Adjustables Products hold strongly on a variety of indoor surfaces including painted walls, glass, varnished wood, and metal

- 【20MM Thickened Foam】The connecting rod is made of a 5mm thick steel tube + 20mm thick high-quality foam. Curved design fits the neck, which is non-slip and sweat-absorbing, soft and breathable, bringing a more comfortable exercise experience to you.
- 【Non-slip Dumbbell Bar】The surface of the dumbbell bar is made of ABS environmentally material and attached to a non-slip texture, which strengthens the friction of the hand and helps you control the dumbbell better during exercise.
- 【Safety Nuts】The sets contain four safety nuts. Nut thread thickening effectively keeps the dumbbell piece solid, to prevent movement shaking. Ensure your safety in use.
- 【More Weight Options】The dumbbell pieces feature a detachable design, and the adjustable weight range for the single dumbbell is 6lbs-22.5lbs, which meets your exercise intensity needs in different stages. Installation is easy.
- 【Brand Support】FEIERDUN always due to providing our customers with the best service. If our product could not meet your expectations, please feel free to contact us, we will respond within 12 hours.

- Quick Adjustment Feature: Effortlessly switch between weights ranging from 5 to 25 lbs with our smooth, easy-to-use slider mechanism. Perfect for dynamic adjustable dumbbell set workouts!
- Space-Saving Design: This versatile 25 lb dumbbells set of 2 is designed to be compact, seamlessly integrating into your home gym without taking up unnecessary space. Get the benefit of multiple weights dumbbells set in one easy-to-store solution!
- Enhanced Durability: Equipped with a non-slip grip, robust safety locks, and a sturdy metal handle to ensure your workouts with the adjustable dumbbells set of 2 are both safe and effective. Built to last through rigorous training sessions.
- Full-Body Training: From curls and presses to lunges, expand your exercise options with our adjustable weights set that adapt to your fitness needs, allowing for a comprehensive workout.
- Convenient Storage Rack Included: Keep your workout area neat and organized with the included rack, perfect for stowing your dumbbell sets with rack after your session.

- Outstanding Stability: This electric standing desk has a sturdy solid steel frame with aerospace-grade lifting column connectors (still stable & secure after testing 100,000 times). It's a firm foundation for work, even at full height
- Smooth Height Adjustment: Freely select electric standing desk height, from 28.35" to 46.46". Save your favorite three settings and smoothly switch between them
- Uprated Motor: Powerful lifting performance and reliable long-term operation (tested 50,000 times and still going strong)
- Safe Low-VOC Materials: Formaldehyde and other VOC emissions are sharply reduced, meeting US federal and state safe air standards
- Simplified Assembly: This electric standing desk has an easier assembly process with fewer steps and less lifting

- Alloy steel and heat treated, Black Oxide finish resists corrosion, Polished head and regular, non-slip grip handle
- Laser Etched Scale Provides a Quick and Convenient Way to Determine Fastener Size in Either SAE or Metric
- Wide Capacity Jaw Allows Each Tool to Work with More Fastener Sizes
- Wider Handle Provides More Comfort and Less Stress to the Hand
- Tension Spring Stabilizes Jaw and Knurl Adjusts Easily

- Secure, Steady, No Deform: FLYBIRD weight bench is sturdy and stable due to over 20 years of focus on quality; Every component of the FLYBIRD workout bench is made to strict standards, including high-ductility steel, high strength bolt, high sealing weld
- 800 LBS Rock-Solid Weight Capacity: FLYBIRD weight benches for home gym is made of high-strength steel and is designed with a balanced structural; Strict weight test ensures 800 LBS weight capacity and safety for workout; Sturdy and durable exercise bench
- Adjust In One Hand: Designed with 8 back and 3 seat positions for full-body workout; You can simply pull the self-resilient spring lock to quickly adjust the incline from 90° to -30° that suit you; Superior lock cylinder provides secure locking capability
- Strong Support & Better Forcing: 18.5 in Height of the adjustable weight bench offers good grip for feet, which is important to maintain the stability of the body; Padding of the cushion balances comfort and support; Hard-wearing leather provides friction
- Folded To Save 80% Space: FLYBIRD foldable workout bench is easy to carry and store; Simply adjust the lock to quickly fold, and put it in the corner or under the bed after you finish workout; Folded and stored upright, the occupied area is only 8.6*13 in

- ADJUSTABLE POSITIONS: Find your ultimate sleeping position; choose from the TV, Head-Tilt, and Zero Gravity preset positions, or add your own customized options; Note: King size variant comes with two adjustable platforms
- CUSTOMIZABLE REMOTE: Adjust massage and positions with the click of a button, use the remote flashlight, and take your relaxation further with wave, pulse, or constant massage modes; Note: King size variant comes with two remotes
- SEPARATE HEAD & FOOT INCLINE: Manage stress and find unmatched comfort when you take advantage of independent head and foot incline
- BEDSIDE CONVENIENCES: Charge your phone with a built-in bedside USB, use the side pocket to store your phone or remote, and turn on night lights underneath to easily find your slippers
- COMPATIBLE WITH VARIOUS MATTRESSES: Complete your optimal bed with the mattress of your choice, this base is compatible with memory foam, gel foam, latex foam, and hybrid mattresses; OVERALL DIMENSIONS: 75"(L) x 54"(W) x 14"(H); Weight Capacity: 750 lbs.
Imagine a ceiling dotted with small, flush-mounted lights that cast focused beams across your space. The lights can highlight your favorite reading nook, artwork (if you’re into decor), or simply brighten the entire room evenly. The minimalist look keeps the ceiling clean and modern, while adjustable fixtures allow you to direct light exactly where you want it. The glow from these spotlights creates a crisp, inviting atmosphere perfect for winding down.
Recessed spotlights come in different trims and brightness levels, allowing customization to your decor style. For a cozy feel, use warmer color temperatures; for a bright, energizing vibe, go cooler. You can also combine them with indirect cove lighting or wall-mounted fixtures for layered illumination. For a more dramatic effect, install dimmable controls to set the mood. This flexibility makes it suitable for both minimalist and luxe interiors.
Start by planning your lighting layout, considering focal points and functional zones. Use a laser level to mark the spots accurately. Choose fixtures compatible with your ceiling type—drywall, plaster, or drop ceiling—and ensure they are rated for your ceiling’s insulation if necessary. Use a hole saw to cut precise openings, then wire the fixtures according to electrical codes—consider hiring a professional if unsure. Install dimmer switches for maximum control, and test the system thoroughly before finishing. Keep safety front and center during the process.
Personalize by selecting fixtures with distinctive trims—brushed metal, matte black, or even colorful accents. Add decorative trim rings or adjustable hinges for directional lighting. Incorporate smart controls to change brightness and color temperature from your phone. Use the lighting to accentuate textured wall finishes or architectural details, making your bedroom both functional and stylish. Creating zones with different light intensities can make your space more dynamic.
Recessed spotlights turn a basic ceiling into a sleek, modern feature that elevates the entire room. They give you control over mood and function, which is perfect for relaxing or working. Installing them might seem daunting, but with proper planning, it’s straightforward—and totally worth the effort. Brighten your space with confidence and enjoy a more versatile, well-lit retreat anytime.
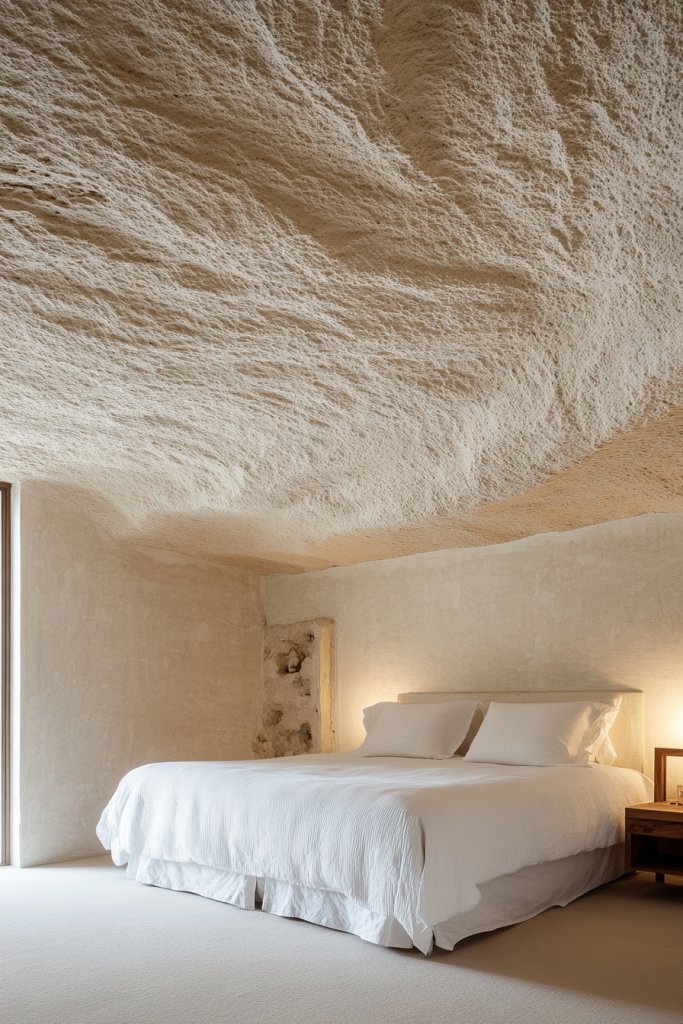
9. Textured Plaster or Stucco Ceilings for Subtle Dimension
Tired of flat, boring ceilings that do nothing for your decor? Textured plaster or stucco finishes add subtle depth and elegance without overwhelming your space. They hide imperfections and bring handcrafted character into your bedroom. If you crave a sophisticated look that feels timeless, this idea might be your new favorite upgrade.
- NATURAL LOOK WITH A MEDIUM HOLD - Our hair powder for men gives you that desired natural look while providing you with volume and texture.
- EASY TO APPLY - Our men's styling hair powder is very easy to apply and use. Simply sprinkle a small amount of powder and spread it through your hair.
- ENHANCES TEXTURE FOR DRY HAIR - Perfect to use for pompadours, quiffs, fauxhawks, and more.
- DELIVERS MATTE FINISH - The textured powder for men gives you the styling and volume you need, while also delivering a clean matte finish.
- ADDS VOLUME AND TEXTURE - Our powder for hair gives you that second-day hair feel on clean hair!
- LIGHTWEIGHT TEXTURE POWDER: Unlike heavy gels or pastes, our Texture Powder is lightweight, volumizing and easy to apply. We formulated our powder to instantly add volume with a clean matte finish by absorbing any excess oil.
- SHORT TO MEDIUM HAIR TYPE: To provide proper hold and volume, our texture powder is best for hair under 6 inches in length.
- HOW TO USE: With your hand at least 2 inches from your head, apply 3-4 pumps of powder to dry hair. Use your fingers to evenly distribute the powder throughout your hair. If you need more hold, add some more product.
- CONVENIENT SPRAY BOTTLE DESIGN: The spray bottle design allows you to get a consistent amount of powder every time. Simply take off the cap, pump, and style. No more making messes with shaker bottles.
- QUALITY INGREDIENTS: Our Hair Texturizing Powder is 100% vegan and cruelty free. Made in The United States with no Sulfates, Parabens, or Phthalates. We only use 5 ingredients: Silica Silylate, Oryza Sativa (Rice) Starch, Silica, Mica, & Maranta Arundinacea Root Extract so you know exactly what you’re putting in your hair.
- 【48 Unique Designs】Discover 48 stunning and exclusive designs encompassing 12 different themes, from adorable animals to space adventurers, abstract watercolors, van gogh's starry sky, serene ocean scenes, geometric shapes, calming words, and more, middle school classroom must haves, suitable for adults, children, and any occasion.
- 【2 Different Surface Patterns】Enjoy sensory stickers with two tactile surface designs - classic gravel touch and stronger diamond touch. mental health stickers can hlep relieving anxiety, Perfect for fidgets for classroom, We have also rounded off all corners to ensure greater safety for children.
- 【Waterproof and Multifunctional】 Our anxiety stickers are waterproof, tear-resistant, and stretch-resistant. They are versatile, reusable, and residue-free, making them ideal sensory items for students, children, and adult sensory items. you can stick them on phones, computers, notebooks, cups, steering wheels, desktops, classroom supplies for teachers middle school, etc.anywhere you like.
- 【Improves Concentration】Keep these stickers handy to enhance focus and relaxation. They offer help stress and anxiety relief, making them perfect for creating calm down corner kit. These stickers can also serve as award-winning items and aid students with anxiety/ADHD in staying focused.
- 【Packaged with Storage Box - Ideal Gift】with a convenient storage box, making it easy to carry and store, making it a thoughtful gift for students, family members, children, colleagues, friends, including autistic patients. Appreciated by people of all ages, the textured surface provides an extra pleasing experience, making it a great addition to craft projects.
- Sensory Fidget Toys for Adults: Harder than our colorful kids fidget worry stone, this hard version is more suitable for teens and adults to get stronger stimulation. Repeatedly rubbing these textured fidget toys through fingers up and down to replace unconscious repetitive behaviors. Roll these quiet fidget sensory stones in one hand, which helps adults with anxiety to lower the anxiety level and pressure in the brain during working or meeting
- Worry Stone Calming Toys: Perfect tactile fidget sensory set for students to avoid picking fingers, control most nervous habits and calm down. Autism children with special needs could also benefit from this sensory-based play. Meet all your older kids sensory needs through rubbing and touching these silent sensory stone stress toys
- Quiet Fidgets for Office and Classroom: it's small, non-noise and hidden, you can keep these mini sensory stones in your pocket and bring it with you when studying or working. These adult anti-anxiety toys are perfect to keeping hands moving in stressful and anxious moments as a distraction. Popular tactile fidget toy for adults with autism playing. Use it whenever, wherever, without bothering or distracting anyone around you
- Multi-functional Fidget Toys Sensory Stone: Bulk prize box toys and fidget party favors for classroom. These rubber worry stones are good non-noise fidget desk toys for students and staff to relax and refresh mind. Good as goodie bag stuffers, preschool classroom prizes, kids birthday gifts, fidget party favors, Christmas stocking stuffers, and carnival prizes. It also can provide silent entertainment for boys and girls in cars, airplanes, home, restaurants, libraries and more
- Durable and Washable: Made from customized material, these adults fidget item are sturdy and strong. All the edges of stress reliever sensory stones are made into smooth and rounded shapes for autistic boys and girls. You can provide these sensorial fidget toys to children with complete confidence. These autistic quiet fidget sets can also fit easily in a backpack or pocket when teens are outdoors with friends. Your premier choice for a delightful and soothing experience
- Increases texture & fullness
- Absorbs oils & impurities
- Ultra-lightweight, non-drying formulation
- Provides flexible hold with a matte finish
- ❤❤PRODUCT INCLUDES: You will receive 20 Anxiety sensory strip Calm Stickers in 10 styles, 1 of each style; approximately 2.5 x 10 cm / 0.98 x 3.94 inches in size; the styles are varied enough for everyday needs.
- ☀☀PREMIUM MATERIAL: Made of PEVA material, this calming sticker is lightweight yet strong, hard-wearing and won't wear out or fade easily; Plus, these fidget textured strips have a rough and tactile finish that's bright and refined for lounging around your time and distract your anxiety.
- ✔✔Easy to use: first clean and dry the surface of the object to be attached, then peel off the calming sticker, you can stick the sensory adhesive to any place you like, such as mobile phone, computer, desktop, etc., and then gently stick it where you need it. The place where it is pasted will not leave any traces and dirt after tearing off.
- ✿✿Anxiety Sensory Stickers: This anti-stress rough touch decompression strip can help people in need to relieve stress and anxiety, also suitable for youth with ADD or ADHD and with obsessive-compulsive disorder or high stress/anxiety, autistic stimuli.
- ►►EASY TO CARRY FOR EVERY OCCASION: These are highly portable, you can use them anywhere or take them anywhere, such as office, home, church, library, station, classroom, hiking; this relief bag is highly shareable and very Perfect as birthday party favors, classroom rewards, Easter basket gifts and Halloween prizes.
- MECHANICAL PENCIL TRANSFORMATION: Our gidgets slide effortlessly onto most mechanical pencils and pens, providing a comfortable, satisfying grip and sensory stress relief. *Does not fit on wooden pencils.
- FOCUS TOOL: Research shows that fidget tools may help manage ADHD, autism, SPD, anxiety, and dysgraphia. Unlike other fidgets that are noisy or distracting, this fidget provides tactile input for quiet and discreet stimming. Created for special education (SPED) students, but no 504 or IEP accommodations required for use!
- DURABLE SILICONE: Made from premium, food-grade silicone to ensure flexibility and durability. Super easy to clean and strong enough to endure daily use for the entire school year. *Not intended as a chew toy.
- TEACHER APPROVED: Perfect teacher gift to stock up your classroom for back-to-school. A favorite prize for rewards and treasure boxes.
- ADAPTIVE USES: Great writing tool for fine motor skill accommodations. Full-length, soft, compressible texture provides a cushion for small or stiff hands.
- VIRAL ON TIKTOK: Join thousands discovering the difference — search “BlackMask Hair” to see why this hair powder for men is taking over.
- INSTANT TEXTURE: This lightweight hair texture powder delivers fuller, thicker-looking hair in seconds with natural grip and definition.
- ALL NATURAL: Crafted with ingredients like Mica, Titanium Dioxide, and Silylated Silica — a texture powder for men that’s free from harsh chemicals.
- LONG-LASTING HOLD: Designed to hold your style all day without greasiness — no mess, just clean confidence.
- UV PROTECTION: Citric Acid helps guard against sun damage, keeping your hair healthy and vibrant.
- BUILD TACTILE AWARENESS: Scratchy, slippery, silky, or soft? Young learners build tactile awareness as well as fine motor & vocabulary skills with a variety of "hands-on" sensory play activities
- SENSORY ROOM MUST HAVES: Provide sensory-seeking kids with these tools for stimulation and emotional regulation at school and at home; add to a calm down corner or playroom, or try in therapy
- SPARK MORE CONFIDENCE! Boost confidence with core learning toys that build the skills kids need for school success
- INCLUDES: 20 texture squares (10 different pairs) in a drawstring carry bag and activity guide that covers matching, descriptors, communication, and tactile discrimination
- THE PERFECT GIFT: Have an upcoming birthday or holiday? Our toys & games make the perfect activity for the home or classroom, no matter the occasion
- Patented Design Fidgets Calming Toys for Kids: Repeatedly rubbing these textured fidget toys through fingers up and down to replace autistic children's unconscious repetitive behaviors. It’s quiet and easy to roll these fidget sensory stone toys in one hand, which helps to lower the anxiety level and pressure in your brain. Besides, it's perfect tactile fidget sensory set for kids to avoid picking fingers, control most nervous habits and calm down
- Fun and Bright Sensory Worry Stone: Each fidget stone toys comes in vibrant colors and features a unique texture, providing a satisfying tactile experience for kids, teens, and adults. Autism children with special needs could also benefit from this sensory-based play. Meet all your kids sensory needs through rubbing and touching these quiet sensory stone stress toys
- Silent Stress Toys for Anxiety: it's small, quiet and hidden, you can keep these mini sensory stones in your pocket and bring it with you when studying and working. Use it whenever, wherever, without bothering or distracting anyone around you. These worry-stone anti-anxiety toys are perfect to keep hands moving in stressful and anxious moments as a distraction. Popular tactile fidget stress toy for kids with autism playing in the school calming corner
- Multi-functional Fidget Toys Sensory Stone: These soft rubber worry stones are good non-noise fidget desk toys for students and staff to relax and refresh mind. It also can provide silent entertainment for boys and girls in cars, airplanes, home, restaurants, libraries and more. Good as goodie bag stuffers, preschool classroom prizes, kids birthday gifts, fidget party favors, carnival prizes, and Christmas stocking stuffers
- Soft, Durable and Washable: Made from customized material, these Patented Design worry stone fidget packs for kids are sturdy, soft and squishy. All the edges of stress reliever sensory stones are made into smooth and rounded shapes for autistic boys and girls. You can provide these sensorial fidget toys to children with complete confidence. These autistic quiet fidget sets can also fit easily in a backpack or pocket when kids are outdoors with friends. Your premier choice for a delightful and soothing experience

- REPAIR ANY STUCCO FINISH — The Ready-Mix Stucco Patch is highly versatile for patching and repairing spalls and large cracks in any stucco finish on any indoor or outdoor surface
- TOUGH & DURABLE — This stucco patch is acrylic-based and textured, so it dries to a tough, moisture-resistant but flexible finish. You don’t have to worry about it shrinking or cracking
- EASY TO USE — It comes in a 1-qt container that covers approximately 20 sq. ft. at 1/32 in. You can tool the patch to properly fill in damaged areas, paint it and simply clean it up with water
- VOC-COMPLIANT — This product meets all government regulations to maintain safety and health standards, including volatile organic compounds (VOCs), so the air you breathe is cleaner
- HOW TO APPLY — Clean and prepare the surface, apply the product with a trowel or putty knife, and allow it to dry completely for 24 hours before painting or exposing it to weather
- SUPER FIRM HAIR CREAM: AG Stucco defining paste gives you a strong hold and textured lift without making your hair crunchy, sticky, or stiff. This silicone-free matte styling product is lightweight and strong enough to last all day without residue.
- HIGH HOLD LOW SHINE: Are you looking for a shaping cream that will style your hair without shine or residue? Our extra-firm matte hair gel feels soft to the touch, doesn't add shine, and won't fall flat.
- VEGAN STYLING CLAY: AG Stucco is a hair texturizer for fine hair, medium, and thicker textures made with malleable, high-performance plant extracts. This matte molding paste has a light, soothing scent from wild cherry, rosemary, and hops.
- LONG-LASTING STYLE: Our plant-based extra firm styling balm provides high hold with a matte finish and keeps your hair right where you want it. This naturally derived hair wax is a thickening pomadethat secures your style all day long.
- NATURALLY DERIVED INGREDIENTS: AG Care texture clay combines science and nature to deliver beautiful results without sulfates, gluten, silicone, DEA, PABA, parabens, DMDMH, and more. Our products are sulfate-free, vegan, and cruelty-free

- TEXTURED FINISH: Blends seamlessly with stucco finish
- PAINTABLE WHEN CURED: Creates an invisible repair once painted
- WON'T SHRINK OR CRACK: Provides a long lasting, durable repair
- USE ANYWHERE A STUCCO FINISH HAS BEEN USED: Use on Stucco, EIFS, Cinder Block, Brick, Plaster & Wood
- WATER CLEAN UP: Cleans up easily with water

- EFFORTLESS REPAIRS: Fill holes, cracks, and dents in one easy application, saving time and effort on your DIY projects
- VERSATILE USE: Ideal for drywall, plaster, wood, and stucco surfaces, both indoors and outdoors, making it your go-to repair solution
- NO-SAND FORMULA: Achieve a smooth, professional finish without the mess and hassle of sanding, ready for immediate painting
- DURABLE RESULTS: Won't shrink, crack, or flake, ensuring long-lasting repairs that stand the test of time
- PAINTABLE IN MINUTES: Complete your project faster and with professional-quality results. Made in the USA

- Product is highly durable and very easy to use

- Size : 20 lb
- 20 - 30 Minutes working time
- Paint in 90 minutes
- Polymer modified for a superior bond
- Apply from a fine finish to full depth repairs


- Waterproof Coating: The stucco base coat provides a waterproof barrier for indoor and outdoor applications.
- Concrete Protection: The powder form coating adheres to concrete surfaces to prevent damage from moisture and chemicals.
- Easy Application: The 10 lb can contains enough product for a 100 sq ft area when applied at 10 mils thickness.
- Long Lasting: The durable grey color resists fading, cracking and peeling over time.
- Trusted Brand: Quikrete is a leading manufacturer of concrete repair and restoration products.
- The product is easy to use
- The product is highly durable and handle
- The product is manufactured in United States
- Professional quality for repairs in stucco and textured surfaces
- Durable and permanent
- Use for scratch and brown in a three coat stucco application or apply directly to masonry walls in a two coat stucco application
- Used for construction and repair of stucco walls
- A Portland cement based stucco
- Superior workability
- 10 pounds
Visualize a ceiling with a delicate, hand-applied texture that catches light in gentle waves or stipples. The surface adds a tactile quality that invites the eye and creates shadow play, especially with warm or directional lighting. Paired with soft wall tones and plush bedding, it forms a cozy, inviting atmosphere. The textured finish transforms a plain ceiling into an artful feature that complements vintage, rustic, or modern interiors alike.
Choose from various textures—rough, smooth, or patterned—to suit your style. Light-colored stucco can brighten a room, while darker shades add drama. You can also incorporate subtle metallic or pearl additives for a slight shimmer. This finish works well with both traditional and contemporary furniture, providing flexibility for seasonal updates or personal tweaks.
Begin with surface preparation—clean and prime the ceiling thoroughly. Mix the plaster or stucco compound following manufacturer instructions. Apply with a trowel, sponge, or brush to create your preferred texture, working in sections for consistency. Allow each layer to dry completely before applying additional coats or finishing touches. Seal the textured surface with a matte or satin clear coat for durability and ease of maintenance. Use indirect lighting to enhance the textured effect and add warmth.
Customize your textured ceiling with subtle metallic or iridescent finishes for a hint of shimmer. Pair with wall colors that highlight the texture—deep hues for contrast or light shades for a more subtle effect. Add decorative moldings or beams to frame the textured area, creating a layered look. Layering different textures or finishes can elevate the overall aesthetic.
Textured plaster ceilings add a handcrafted charm that elevates any bedroom design. They’re a smart way to infuse personality and hide imperfections—no need for perfect drywall. With patience and a bit of practice, you can achieve a stunning, artisanal finish. Ready to add some tactile elegance to your space? It’s easier than you think and richly rewarding.
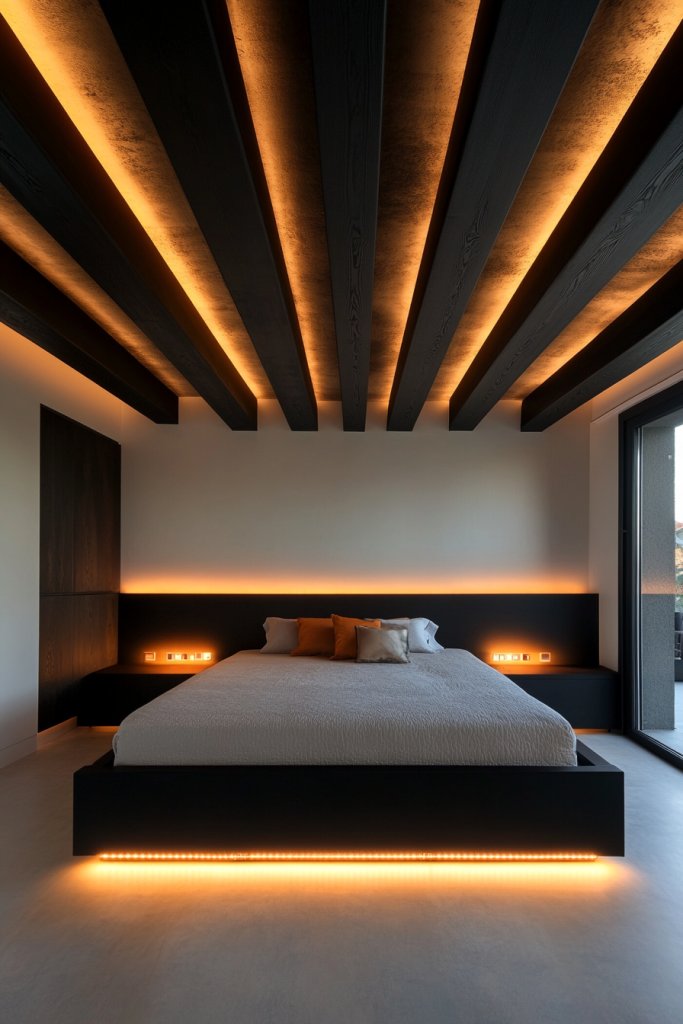
10. Ceiling Beams with Integrated LED Strip Lighting for Modern Warmth
Ever feel like your bedroom ceiling is just a flat, boring surface that does nothing to elevate your space? Maybe you crave a cozy yet modern vibe that makes you want to stay in bed longer. The idea of integrating beams with subtle lighting offers a way to add warmth and architectural interest without overwhelming the room. It’s all about creating a focal point that feels both stylish and inviting.
- Commercial standard - Class A fire-rated,low-emission, waterproof, washable, flexible and durable. No sag, rot, rust and breakage
- Stylish - Blank smooth solid ceiling panel is a universal fit to all kinds of interior decoration
- Easy DIY - Cut with a utility knife or a table saw, fit into a standard 15/16" T grid ceiling system
- Pack Size: Pack of 10 tiles with size of 2ftx4ft, cover 80 sq.ft.Be aware that white is incompatible with the other Art3d 3D ceiling tiles
- Exceptional Customer Service - We offer full service 24/7 for our customers for any product related issues
- LED Light Source and Memory Function: The LED energy-saving light has 120 voltage output and brightness from 10%-100% with 2200LM. 3 color temperature from warm(3000K) to white(6000K) and light memory function
- Remote and App Control: This small ceiling fan with light can be controlled by a smart app(Bluetooth) and remote. The fan and the light can be controlled separately. 6 speeds, LED Dimmable, 2H timer setting, customize the mode you need as you like
- Reversible DC Motor and Noiseless Fan: Our flush mount ceiling fan offers 2 airflow modes. It runs downdraft cool airflow during summer, updraft airflow in winter.The pure copper motor runs smoothly, provides strong wind power
- 6 Speeds and Quiet: Experience superior airflow with our 7-blade ceiling fan, offering 6 wind speeds. The pure copper motor runs smoothly, with strong wind and low noise. And canceled the beeping sound when the remote control transmission signal
- Easy Installation: The instructions we provide contain detailed installation guide video that are easy to follow and can be completed in a short time. We provide 2-year support. If you have any issues please tell us, we'll reply within 24 hours
- Complete Set: We offer a complete set of Drop Ceiling Grid Systems include 6pcs main beams TT00, 16pcs cross tee TT10, 6pcs wall molding TT20, 14pcs Installation Kit TA00. Tip: The package does not include PVC panels. If you need, we recommend purchasing it with our Muzata PVC ceiling tiles TBP0
- Safer and Lighter: Our galvanized steel drop ceiling grid system is lighter and safer than traditional wooden ceiling systems. Not prone to collapse and fire hazards, ensuring the safety of your family
- Durable and Long-Lasting: These ceiling tees are made of high-quality galvanized steel, which is durable and long-lasting. Add white premium paint texture on the bottom to provide a modern style to your home or office
- Versatile Applications: These white galvanized steel tees are compatible with a variety of ceiling tiles and grid systems. Whether for residential, commercial, or industrial use, our tees offer a reliable foundation for any type of ceiling installation
- Easy installation: Our ceiling system has a snap-in design that doesn't require too many screws. Saying goodbye to the trouble of the traditional ceiling system, the novice can also easily install
- [Wide application] Ceiling fans with lights adopts modern creative petal design, with a 6 gear fan suitable for 8-15 ㎡ living room, bedroom, dining room, study room,etc.
- [Creative design] A flower ceiling fan with light, you can get two functions of lighting and cool.Ceiling fan with lights can come in handy no matter the season, as lighting and cooling can be used simultaneously or separately.
- [Timing function] The ceiling fan has 6 gear speeds, and you can choose the 1-2 speed (slow wind), the 3-4 speed (medium speed wind), and the 5-6 speed (fast wind) according to your needs.If you feel that running a fan all night while you sleep is bad for your health, then our timer feature can help you with that problem. You can set the time through the remote control or mobile app, no matter how long the time is.
- [Performance specifications] 110v ceiling fan with light product size:69cm*69cm*13cm.Power consumption: 50w.Acrylic lampshade, uniform and transparent light; high-quality ABS fan blades, smoother rotation.
- [Service first]If you have any questions about the installation and quality, please contact us, we will provide you with the best solution within 24 hours.Due to the influence of light and display, the color of the item may be slightly different from the picture. Manual measurement may have an error of 1in. Please understand that.
- Perfect Size for Rooms: This 52-inch ceiling fan is ideal for cooling and illuminating spacious areas like living rooms, bedrooms, and kitchen, featuring an 20W 2000LM bright light and powerful 3057 Cubic Feet Per Minute airflow.
- High Configuration: The flush mount fan is equipped with APP & Remote Control, 10~100% Dimmable, Stepless Color Temperature (warm → neutral → cool white), Memory Function (the memory function retains your settings), Energy-efficient LED Light, Pure Copper High-performance DC Motor, High-Quality Tough Plywood.
- Quiet and Efficient Operation: Experience peaceful relaxation with the energy-efficient, quiet, high-RPM motor that provides strong airflow without the noise.
- Stylish and Functional: Enhance your home decor with this modern ceiling fan featuring a sleek design and a built-in light kit. Choose from a variety of finishes to match your style.
- Year-Round Comfort: Enjoy a cool breeze in the summer and improved air circulation in the winter with the reversible blade feature.
- Ceiling Fan with Light: Decorate your home with Amico ceiling fan! While bringing you coolness and comfort, it also becomes a beautiful decorative piece for your home. Our 42 inch small ceiling fan with light remote control has A energy efficiency rating, which can avoid 80% of electricity loss compared with traditional fans.
- Ceiling Fans with Remote: All operations can be controlled by the remote controller, adjust the fan speed with 6 levels, select light color temperature, and supports timing (1/2/4 hour) sleep shutdown, on/off. The fan and light can be turned on separately. (Tips: After fixed, the remote control can be used as a wall switch)
- Low Profile Flush Mount: We provide very detailed instructions and installation videos to help you complete the flush mount installation. Suitable for farmhouse, living room, bedroom, office, study, kitchen or other small indoor spaces. Besides, this is also a outdoor ceiling fan for patio, breezeways, gazebos, pergolas and other outdoor spaces. (Not to be exposed directly to rain)
- Noise-free Experience: This modern ceiling fan with light is designed for light sleepers, brings you comfortable sleeping with a quiet living environment. The volume is low to 35dB when the fan is running, like the sound of falling leaves, or like a butterfly flaps its wings(30dB). It is more suitable for families with babies or elders. Super quiet, only wind.
- Reversible DC Motor: The high-quality & high-speed motor brings a perfect wind experience. The wind speed can be adjusted in 6 gears, you can choose between comfortable wind, natural wind and strong wind. Reversible dual-direction fan improves air circulation to keep you warm in winter and cool in summer. Our fan blades are double sided in different colors, one side is black and the other side is walnut. Choose the fan blade color that best fits your home decor!
- Ceiling Fan with Light: Passky sleek ceiling fan with light, pass the breeze, light you sky. Our 52 inch modern classic ceiling fan with light remote control has A energy efficiency rating, which can avoid 80% of electricity loss compared with traditional fans. While bringing you coolness and comfort, we want to fit perfectly into your home decor!
- Ceiling Fan with Remote Control: Through the remote control, you can turn the fan on/off, adjust wind speeds, as well as realize the function of 1/2/4 hours timer off, at the same time, you can also realize the forward and reverse rotation control directly on the remote control. The fan and light can be turned on separately. (Tips: After fixed, the remote control can be used as a wall switch)
- Indoor & Outdoor Ceiling Fan: Try install it youself! We provide very detailed instructions and installation videos to help you complete the installation. Suitable for farmhouse, living room, bedroom, office, study, kitchen or other indoor spaces. Besides, this is also a outdoor ceiling fan for patio, breezeways, gazebos, pergolas and other outdoor spaces. (Not to be exposed directly to rain)
- Super Quiet Experience: Enjoy the wind, but keep the noise out! This ceiling fan is designed for light sleepers, brings you comfortable sleeping with a quiet living environment. The volume is low to 35dB when the fan is running, like the sound of falling leaves, or like a butterfly flaps its wings(30dB). It is more suitable for families with babies or elders.
- Reversible DC Motor: The high-quality & high-speed motor brings a perfect wind experience. The wind speed can be adjusted in 6 gears, you can choose between comfortable wind, natural wind and strong wind. Reversible dual-direction fan improves air circulation to keep you warm in winter and cool in summer. Our fan blades are double sided in different colors, one side is white and the other side is yellow wood grain. Choose the fan blade color that best fits your home decor!
- Ample Area Solution - With 12 well-packed PVC drop ceiling tiles, each of 2 x 4 feet size, this set provides 96 square feet coverage, perfect for sizable areas ceiling makeover
- Material - Made from high-quality PVC, these ceiling tiles are not only durable and sleek but also waterproof and flexible, ensuring a perfect blend of functionality, resilience and aesthetics
- Lightweight & Easy Installation - Art3d ceiling tiles seamlessly fit into a standard 15/16" T-bar grid system with lightweight design for easy installation. Ideal for both residential and commercial spaces, offering a modern and sleek appearance to any room
- User-Friendly Construction - Crafted to be thin and light, these tiles are not only paint-friendly but also simple to trim with tools like scissors, snips or a utility knife, ensuring a swift and straightforward installation process
- Wide Application - With modern and sleek 3D design, these tiles bring a refined flair to ceiling and wall decorations, making them a versatile choice for various decor needs
- Practical meets decorative - 52-inch ceiling fan with light and 5 double-sided fan blades. Acrylic cover with flicker-free LED light source for a softer light. The simple and modern design style makes your room more stylish and upscale. It is perfect for any indoor and covered dining room, kitchen, living room, bedroom and more.
- Adjustable Light & Color Temperature - The ceiling fan uses an energy-efficient and long-lasting LED light source that can be controlled remotely. You can easily adjust the brightness from 10% to 100%, and change the color temperature from warm white (3000K) to natural white (4000K) to cool white (6500K) to suit your mood and activities.
- Multifunctional Silent Ceiling Fans with Remote Control - With 6 air speed settings and 3 timer settings (1H/3H/6H), this fan works quietly without interrupting sleep or study. With the remote control, you can easily adjust all settings from anywhere in the room.
- Reversible DC Motors - The reversible control feature switches the air direction of the bedroom ceiling fan from downward airflow in summer to upward airflow in winter, thereby recovering heat lost from the ceiling and distributing it evenly throughout the room. Energy savings of up to 80% compared to conventional AC motors and noise levels of less than 35 dB.
- Easy To Install - We have already installed most of the parts, you don't need to do complicated assembly. The package comes with a detailed user manual where you can find solutions to all your problems.
- Multicolored Lighting: The main light of smart ceiling light is RGB+WW, while the back light is RGBIC. With 16 million background colors, the back light enriches the whole house atmosphere. Note: The WW of the main light and back light cannot be on simultaneously.
- Adjustable Brightness and Color Temperature: The color temperature of led ceiling light can be changed from 2200K to 6500K, making it easy to select warm lights for relaxation and cold light for work. Features 1% - 100% brightness up to 2400 lumens for any scenario.
- Smart Control: Control the ceiling light with Alexa or Govee Home App (not compatible with external dimmer switches and smart switches), which supports individual or group control. You can also set a timer to turn off the lights before sleeping.
- Multiple Scene Modes & Music Modes: Includes 71 scene modes, allowing you to DIY any light effect you want. With Govee Home App, you can set the ceiling light as the main device to sync the colors to other Govee lights for a one-of-a-kind light show.
- Rhythm Lighting: Create a custom circadian lighting scheme that can realize automatic dimming and color control, simulate the natural lighting environment for the whole house, and better adapt to your daily routine.
- APP and IR Remote Contorl: With a stable bluetooth connection,control your LED lights,freely change in 16 million colors,adjust brightness,customize modes (Flashing,Jump,Fade,etc) in different speeds.
- Music Sync: The built-in mic make the LED lights color-changing with the ambient music,easily create party atmosphere.
- Timing Setting: The Led strip will turn on/off automatically at the setting time, repeat this seting on date you set.
- Widely use: The led strip lights 100FT is long enough, perfect for decorating your bedroom, kitchen, ceiling, living room . Widely used on holidays and party (such as christmas, halloween,birthday,wedding .etc )
- Easily Setup: Tear off strong adhesive tape on light strips,stick the strip lights on a clean,dry surface,finish in minutes.
- Smart APP and IR remote control: The 130 feet led strip lights support both app DAYBETTER and 24 keys ir remote for control, Different modes can be chosen, like Flashing, Quick, Jump, Fade, etc. You can freely choose to control 16 million colors
- Music sync: Led lights strip color changing sync to music by smart phone with App, make your party up to the high peak, light up your life and makes life more colorful and wonderful
- Smart Timing Settings;With timer function,The led strip has color memory and setting the time function,so it can automatically turn on and off
- Room / Bedroom Decor:The 130FT bedroom decor aesthetic, is long enough for bedroom, ceiling, kitchen, living room, bar and party decoration
- Music Sync Mode: Let your LED light strips 100 foot dance to the beat in real-time.Perfect for birthday parties, Christmas, Easter, Halloween, carnival, prom, wedding or everyday use because these RGB LED light bars can bring you a visual feast.
- DIY Remote and APP Control:These LED strips are very easy to control via remote control or Bluetooth smart app, and 16 million colors with a large number of interesting modes can enhance the beauty of your room decor aesthetic.
- 100ft Extra Long Lighting: These RGB LED strip lights for bedroom 100 ft are long enough to decorate and colorize larger areas giving you more coverage and more design options. Suitable for bedrooms, kitchens, stairs, dining rooms, ceilings.
- Easy Installation: It's easy to install and you can use the adhesive to mount the RGB LED strip lights 100 feet to any dry, clean surface.
- Special Timer: The led lights for bedroom 100+ ft can be used as a light alarm clock, you can set the wake-up time and end time to turn it on/off automatically,Putting you in a good mood every day.
- 【Creating a perfect atmosphere】LED light strips come in 16 million colors and 22 dynamic scene modes, allowing you to explore your favorite or most suitable for your mood, bringing yourself a truly dreamy lighting experience
- 【Convenient control method】You can easily adjust the color, brightness, and lighting effects of LED light strips using intelligent applications or controllers
- 【Immersive music experience】Built in sensitive microphone that pulsates with ambient sound or the rhythm or melody of music on your phone, synchronizing with the rhythm of your favorite music, movies, or games, allowing lighting to enhance your audiovisual entertainment experience
- 【Intelligent timing function】Set the LED lights to automatically turn on or off at a fixed time through an intelligent application. After the scheduled time, the LED light strip will gradually wake you up with soft light in the morning, accompanying you to sleep in the dark and giving you a sense of security
- 【Easy to install and versatile】Stick the LED light strip onto a clean, dry surface without the need for any tools. Add exciting, expressive, and personalized lighting to your bedroom, living room, and game room decor
- Smart RGBIC Effects: RGBIC LED Strip lights for bedroom display multiple colors on one line at a time compared with traditional RGB lights. A colorful combination of LED strip lighting for bedroom brings a strong visual impact. (Not Support Alexa)
- Smart APP Control: You can unlock various features to personalize smart LED strip lighting via Govee Home App, getting rid of simple remote control. Adjust the colors and brightness to your preferences, turning a single light to vivid light shows.
- DIY with Inspiration: You can choose from a variety of lighting effects (16 million colors) and share your piece of art on the APP community. Also, we will regularly update AI-created themes on the APP to provide you with more options.
- Upgraded Music Sync Mode: Make your smart LED strip lighting for dance for an immersive home concert experience. Choose from 11 music modes and the integrated high-sensitivity mic will effortlessly sync with your favorite audio.
- 64+ Preset Scenes: Find the proper lighting effects that fit your emotions. You can choose from a selection of scenes to bring vivid colors, inspired by party, holidays, movie and more with a simple click on the Govee Home App.
- 【Super Bright & Even】Each LED backlight panels measures 19.3x9.6 inches, with 242 built-in high-quality LED lamp beads, and only 36W power consumption can release an astonishing brightness of up to 3600 lumens. The CRI 95 ensures true and natural colors in the light, perfectly reproducing the natural texture and texture of stone, jade or glass, providing professional-grade, dark-zone-free uniform lighting for your space.
- 【Flexible Cutting】 Our flexible LED light panels are designed with innovative circuits that support fine cutting as small as 0.87"x0.87", which can be freely cut horizontally, vertically, or diagonally, easily adapting to any irregular or complex shape of the installation area. At the same time, the light panel can be bent and spliced, allowing you to completely get rid of the constraints of size and achieve personalized lighting design in DIY or professional projects such as cabinets, bars, and background walls.
- 【Easy Installation】 The back of the backlight countertop comes with a strong 3M adhesive backing, which can be directly pasted on a smooth and clean surface for quick installation. The package includes: 4 LED light panels (total coverage area of about 5 square feet), 8 chip-to-chip cables, 8 input cables, 32 silicone posts and mounting screws, and a detailed graphic manual. (Note: 24V DC power supply is required to be purchased separately)
- 【Stable and Compatible】 The working voltage of the led countertop panel is 24V DC, which is compatible with all standard 24V LED power supplies/transformers on the market. The high-quality LED chip ensures an ultra-long service life of 36,000 hours, and the IP20 degree of protection is designed for indoor use.
- 【Ideal Choice】 Our led countertop sheet are the ideal solution for illuminating translucent countertops such as quartz, agate, jade, marble. Pro tip: For best results, it is recommended for natural stones that are more than 3/4 inch (19mm) thick. If you are using glass or thin quartz that is less than 1/4 inch (7 mm) thick, be aware of possible spot issues.
- 【Sync with Music】Built-in sensitive microphone, the led lights 50ft can change colors and speed by detecting the rhythm of the surrounding sound and music. It can also sync to music by a smartphone with the app. These ambient lights will let you enjoy the dynamic party atmosphere
- 【Smart App and Remote Control】You can use the remote and app to control the rgb led strips, freely choosing multicolour and different modes (like Flash, Jump, Fade, etc.), enhancing the beauty of your room decor aesthetic. Multiple identical rolls of led tape lights with remote can be controlled by the same remote control
- 【Timing Setting】With the timer function, it can automatically turn on and off, you can set the wake-up time and end time to turn it on/off automatically, putting you in a good mood every day
- 【Adjustable Brightness】The dimmable led strip lights brightness can be adjusted via the remote control to one of five levels: 20%, 40%, 60%, 80% or full brightness. Alternatively, the brightness can be adjusted between 1% and full brightness via the app, allowing users to meet their specific requirements
- 【Wide Use】These RGB LED lights can bring you a visual feast. They are perfect for birthday parties, Christmas, Easter, Halloween, carnival, prom, and weddings. The led lights for bedroom are suitable for house ornamentation, especially for festival needs
- 【APP and IR Remote Control】 Ledagic LED lights for bedroom 150 ft are very easy to control via remote control or smart app. There are 16 million colors available, along with a lot of interesting modes, which can enhance the beauty of your room decor aesthetic
- 【Music Sync】 The color of LED strip lights will sync with the beat of music or sound in real-time, creating a romantic, relaxing, magical, gorgeous, and interesting atmosphere for you
- 【Timing Mode】 The LED Light Strip can serve as your light alarm clock. You can pre-set the desired time and choose a suitable color for it to automatically turn on or off, putting you in a good mood for the day
- 【Applicable place】 The light strip has a lot of scene modes to create a festive atmosphere that matches your mood or activity, perfect for birthday parties, Christmas, Easter, Halloween, carnival, prom, wedding, or everyday use. It is a great gift for your children and friends
- 【Easy installation】 It's easy to install, just use the adhesive to mount the RGB LED strip lights 150 feet to any dry, smooth, clean surface
- Upgraded Light-emitting Base, Dynamic RGB+IC: our corner lamp has a patented design and invention, no shadow or dark area when it is lit.Built-in high-quality RGB+IC technology,the brightness is increased by 30% compared with traditional lamps beads. Let you unleash creativity and create a completely new space. Immerse yourself in a truly fantastic mood lighting color experience.
- Multiple Control Methods: The floor lamp for bedroom can be controlled via Bluetooth APP, remote control, and control buttons on the sunset lamp.There are 16 million colors, multiple dynamic and static modes on the Magic Lantern App. You can also adjust the brightness and light speed.
- Synchronized with Music: The floor lamps for living room can change color light synchronously with the rhythm of music or the changes of game sound effects. Create various atmospheres and bring you into a new realm of auditory and visual enjoyment.
- Easy Installation and Timing Function: This LED lamp is easy to operate, quick to install,With the detachable colorful light segments, plug and play, you can install the bar lamp at the right height according to your needs.Timing function, which allows you to set the on and off time as needed.It will match any room decor. Place it in your living room, bedroom, game room, or anywhere else you want to add a touch of style.
- Selected High-quality Materials: Our corner light is made of solid aluminum alloy shell, which is stable, durable and has good heat dissipation. Heavy-duty base prevents the tall lamp from tipping. Download the magic lantern APP to experience more cool room lighting and functions.
Picture thick wooden beams running across the ceiling, contrasting beautifully with crisp white paint. Embedded LED strips cast a soft, diffuse glow along the beams, creating a layered lighting effect. The warm tones of the wood combined with the gentle illumination lend a cozy, modern ambiance. The beams add depth and dimension, making the ceiling feel higher and more dynamic.
Choose darker or lighter wood finishes depending on your decor style—dark for industrial or rustic vibes, light for Scandinavian minimalism. You can also incorporate color-tinted LED strips for a pop of hue during seasonal updates or special occasions. For smaller rooms, keep the beams slim and subtle; larger spaces can handle more substantial, statement beams. Mixing materials like metal accents can also enhance the contemporary feel.
Start by planning where the beams will run, considering structural support if needed. Use lightweight wood or faux beams if you want to avoid heavy modifications. Install the beams securely into the ceiling, then wire the LED strips along the length, hiding the wiring for a clean look. Use a dimmer switch to control the lighting intensity. For DIYers, pre-assembled beam kits with integrated lighting make the process straightforward. Hiring a professional ensures safety and precision, especially with electrical work.
Customize the look by staining or painting the beams to match your furniture or wall colors. Add in some decorative elements like small pendant lights or spotlights on key areas beneath the beams. Incorporate textured materials such as reclaimed wood or distressed finishes for a rustic touch. The lighting can be synced with your smart home system for dynamic effects during movie nights or relaxing evenings.
This ceiling upgrade instantly adds architectural charm and a warm glow, transforming your bedroom into a cozy retreat. It’s a DIY-friendly project that combines style and function, perfect for modern design lovers. Once installed, you’ll wonder how you ever lived without that subtle, elegant warmth overhead.
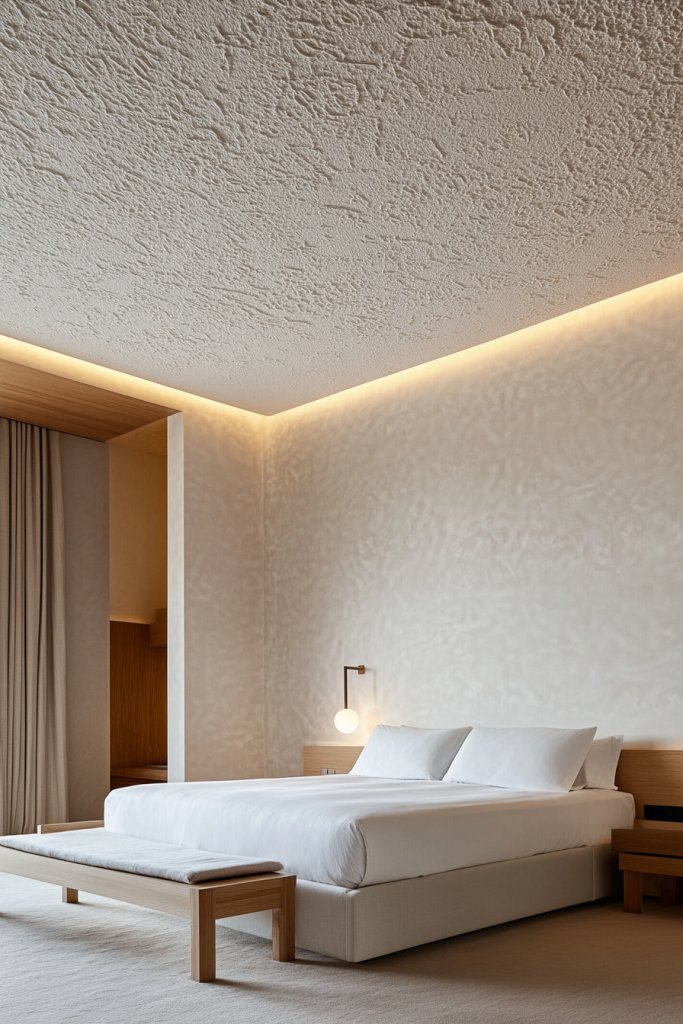
11. Minimalist White Ceilings with Subtle Textural Details
Feeling like your bedroom ceiling is just a blank, uninspiring surface? Want a clean look that stays timeless and versatile? A minimalist white ceiling with subtle textures offers a refined, understated elegance. It keeps the room feeling bright and open while adding just enough visual interest to avoid blandness.
- REPAIR ANY STUCCO FINISH — The Ready-Mix Stucco Patch is highly versatile for patching and repairing spalls and large cracks in any stucco finish on any indoor or outdoor surface
- TOUGH & DURABLE — This stucco patch is acrylic-based and textured, so it dries to a tough, moisture-resistant but flexible finish. You don’t have to worry about it shrinking or cracking
- EASY TO USE — It comes in a 1-qt container that covers approximately 20 sq. ft. at 1/32 in. You can tool the patch to properly fill in damaged areas, paint it and simply clean it up with water
- VOC-COMPLIANT — This product meets all government regulations to maintain safety and health standards, including volatile organic compounds (VOCs), so the air you breathe is cleaner
- HOW TO APPLY — Clean and prepare the surface, apply the product with a trowel or putty knife, and allow it to dry completely for 24 hours before painting or exposing it to weather
- TEXTURED FINISH: Blends seamlessly with stucco finish
- PAINTABLE WHEN CURED: Creates an invisible repair once painted
- WON'T SHRINK OR CRACK: Provides a long lasting, durable repair
- USE ANYWHERE A STUCCO FINISH HAS BEEN USED: Use on Stucco, EIFS, Cinder Block, Brick, Plaster & Wood
- WATER CLEAN UP: Cleans up easily with water
- Product is highly durable and very easy to use

- 30 day clean removal
- Heavy-duty poly stucco tape
- For use in traditional three-coat, hard-coat, one-coat stucco or EIFS processes
- UV resistant and conformable
- Water resistant poly backing
- SUPER FIRM HAIR CREAM: AG Stucco defining paste gives you a strong hold and textured lift without making your hair crunchy, sticky, or stiff. This silicone-free matte styling product is lightweight and strong enough to last all day without residue.
- HIGH HOLD LOW SHINE: Are you looking for a shaping cream that will style your hair without shine or residue? Our extra-firm matte hair gel feels soft to the touch, doesn't add shine, and won't fall flat.
- VEGAN STYLING CLAY: AG Stucco is a hair texturizer for fine hair, medium, and thicker textures made with malleable, high-performance plant extracts. This matte molding paste has a light, soothing scent from wild cherry, rosemary, and hops.
- LONG-LASTING STYLE: Our plant-based extra firm styling balm provides high hold with a matte finish and keeps your hair right where you want it. This naturally derived hair wax is a thickening pomadethat secures your style all day long.
- NATURALLY DERIVED INGREDIENTS: AG Care texture clay combines science and nature to deliver beautiful results without sulfates, gluten, silicone, DEA, PABA, parabens, DMDMH, and more. Our products are sulfate-free, vegan, and cruelty-free

- All purpose stucco patch is ideal for filling and concealing small holes, cracks, dents, and defects to a smooth finish
- Stucco patch in a ready to use formula makes fast and easy repairs, ideal for quick maintenance jobs
- Creates strong, long-lasting patches that are durable and permanent
- After full cure, it accepts paint well for a seamless, matched finish that blends
- Suitable for indoor and outdoor stucco repair projects

- VERSATILE: Great for minor cracks, holes, and surface defects in concrete or masonry
- HIGH STRENGTH: Superior adhesion for repairs indoor or outdoor, and vertical or horizontal
- EASY APPLICATION: No mixing required. Just mix and go!
- FAST DRYING: Dry in 7 days, paintable after full cure
- EFFICIENT: 1 gal. yields approximately 12 sq. ft (1.11m2) at ⅛ in. (3 mm)

- Tips for a good project:
- (1) Think ahead
- (2) Permits are important
- (3) Have a realistic budget
- (4) Expect the unexpected, and (5) Know the code

- A heavy body gel incorporating an acrylic polymer and fine gray organic particles
- Dries to a light gray matte stucco finish
- Excellent for producing thick 3-D effects, as well as thinly coating surface

- HIGH PROTEIN & NO ADDED SUGAR: 30g of protein and no added sugar per shake fuels your body so you can take on the day
- ON-THE-GO: Ready-to-drink and portable for mornings, workouts, afternoon snacks, or anytime you want a flavorful shake that fits into your lifestyle
- SMOOTH DELICIOUSNESS: Creamy, delightful flavors like Chocolate, Vanilla, Caramel, and Café Latte, so you can sweeten your day and savor the moments that fuel your lifestyle
- SWEETEN YOUR JOURNEY: Be part of a movement that makes everyday living flavorful and joyful. Premier Protein is about embracing life and feeling your best
- NUTRITION YOU CAN TRUST: Gluten-free and packed with 24 essential vitamins and minerals, so every sip supports your lifestyle and adds a boost of goodness to your daily routine

- Vibrant 6.1-inch Super Retina XDR display with OLED technology. Action mode for smooth, steady, handheld videos.

- Sweet and smooth, this vanilla flavored protein powder helps pack in the nutrition you rely on every day while delivering indulgent taste like a bowl of creamy vanilla ice cream
- 30g Protein per serving, with all the essential amino acids and 100% of protein from Whey to feed your muscles and curb your hunger
- Guilt free yum: 1g Sugar, 3g Carbs, 150 Calories and Low Fat; No Soy Ingredients, Gluten Free
- Each tub comes with 17 servings and a scoop – just add water for smooth, decadent but easy post-workout recovery
- Mix, Bake, Blend – recreate your favorites smoothie, pancakes, muffins, cookies, donuts, brownies, or protein bars
- Premium Saltine Crackers are topped with coarse sea salt.
- Enjoy premium Saltines dipped or crumbled into your favorite stews, soups or dips.
- Premium Saltine Crackers make a great light snack, especially when you add cheese or peanut butter.
- Premium crackers are kosher Dairy, contain no cholesterol, have 0 grams of trans fat per serving and no saturated fat (only 1.5g of total fat per serving).

- One 16 oz box of Premium Original Saltine Crackers
- Traditional saltine crackers have a light, versatile flavor with sea salt on top
- Square shaped soup crackers are a classic snack
- Light, crunchy texture makes these ideal entertainment crackers
- Salty snacks are tasty plain, with toppings, with soups, stews, chowders and salads

- One 13.6 oz package of Premium Original Fresh Stacks Saltine Crackers, 8 stacks (packaging may vary)
- Original saltine crackers with a light, versatile flavor and sea salt on top
- Traditional, square sea salt crackers have a crispy texture to satisfy your crunchy cravings
- Enjoy these salty crackers with soups, chilis and stews or top these soda crackers with cheese, dip or other favorite toppings
- Premium crackers in individually wrapped cracker stack snack packs are wonderful office snacks, after-work snacks, on the go snacks and lunch snacks

- Save up to 26% per year on heating and cooling costs. ENERGY STAR certified. Included SmartSensor (50 dollar value) adjusts the temperature in the rooms that matter most to reduce hot or cold spots to keep you comfortable. Compared to a hold of 72°F.
- Built-in air quality monitor alerts you to poor air quality, provides tips on how to improve it, and reminds you when it’s time to change your furnace’s air filter.
- Premium materials and advanced engineering mean a large, vibrant display with a cinematic interface, a timeless design, and next level occupancy sensing.
- ecobee Smart Thermostat Premium is a complete home monitoring hub that includes built-in smoke alarm detection and alerts to possible break-ins when your system is armed. Get notifications during sudden temperature drops that could cause damage. ecobee Smart Security plan required
- Comes with a smart speaker and your choice of Siri or Alexa Built-in. Control your home using the power of your voice and listen to your favorite Spotify playlists and podcast through your thermostat’s speaker. Apple home hub required to enable Siri on Smart Thermostat Premium

- 6.1" Super Retina XDR display. 5G Superfast downloads, high?quality streaming
- Cinematic mode in 1080p at 30 fps. Dolby Vision HDR video recording up to 4K at 60 fps. 2X Optical zoom range
- A15 Bionic chip. New 6-core CPU with 2 performance and 4 efficiency cores. New 4-core GPU. New 16-core Neural Engine
- Up to 19 hours video playback. Face ID. Ceramic Shield front. Aerospace-grade aluminum

- DISPOSABLE WASHCLOTHS FOR ADULTS WITH SOOTHING ALOE VERA AND VITAMIN E: Ideal for cleansing, bathing and incontinence care
- EACH OVERSIZED HYPOALLERGENIC WIPE IS 8 X 12 INCHES: Can be used as bath wipes for adults or for freshening up after gym
- A MUST FOR CAREGIVERS HELPING SENIORS: These moist wipes are latex free, alcohol free and PH balanced
- CONVENIENT DISPENSING PACK: Keeps these disposable washcloths ready to use
- ALOE WIPES FOR ADULTS KEEP SKIN CLEAN AND FRESH: Thick and strong incontinence and body wipes. 600 wipes total, 12 packs of 50.
Visualize a pure white ceiling with faint, tactile textures such as fine stucco, linear brush strokes, or gentle embossing. The textures catch light differently throughout the day, creating soft shadows and depth. The simplicity of the white backdrop makes other design elements pop, creating a balanced, calming environment. The overall effect is a serene, elegant space that feels both modern and cozy.
Choose textures that suit your style—subtle grain, linear grooves, or stippled effects. For a more dramatic look, combine matte and satin finishes to highlight the textures. This approach works well in bedrooms of any size, especially smaller spaces where minimalism maximizes openness. Seasonal accents or colored accents can easily be layered through bedding or decor to keep things fresh.
Start by selecting a high-quality primer and textured ceiling paint or plaster. Use rollers or spray equipment for even coverage, emphasizing the textured areas. Keep the application light to preserve the subtlety of the texture. Finish with a matte or low-sheen topcoat to maintain the understated aesthetic. No need for elaborate lighting—just ensure even, soft lighting that enhances the textures.
Add interest with layered textiles or decorative moldings around the perimeter. You can also paint a very thin border in a contrasting color for a subtle frame. Incorporate dimmable LEDs or indirect lighting to softly highlight the textures. Keep accessories minimal to let the ceiling’s texture be the star.
A minimalist white ceiling with subtle textures keeps your space feeling fresh, timeless, and adaptable. It’s a great choice for those who want a sophisticated, low-maintenance look. Once installed, you’ll appreciate the calm, open feel this design brings to your bedroom daily.
Conclusion
By exploring these diverse ceiling design ideas, you now have a treasure trove of inspiration to elevate your bedroom’s ambiance. From textured finishes and statement lighting to painted patterns and architectural details, there’s a perfect idea waiting for your unique space. Don’t hesitate to try out these concepts and make your dream bedroom a reality—your perfect sanctuary is just a ceiling away! Embrace the creativity and let your ceiling become the masterpiece of your room.
Last update on 2025-09-21 / Affiliate links / Images from Amazon Product Advertising API
Leave a Reply