I have been, or can be if you click on a link and make a purchase, compensated via a cash payment, gift, or something else of value for writing this post. As an Amazon Associate, I earn from qualifying purchases. Please read my full Affiliate Disclosure for more information.
Looking up at your bedroom ceiling should be just as inspiring as what’s beyond it, and modern design ideas are doing just that! Sleek, innovative, and full of personality, contemporary ceiling designs are gaining popularity for transforming ordinary spaces into stunning retreats. From bold geometric patterns to subtle textured finishes, these ideas add architectural interest and a touch of luxury that elevates the entire room.
In this article, you’ll discover a variety of innovative ceiling design ideas that cater to different styles and preferences. Whether you love minimalist elegance or crave something more striking, there’s a modern concept here to spark your creativity. Get ready to reimagine your bedroom ceiling and turn it into a captivating focal point that truly reflects your personality!
1. Coffered Ceiling with Recessed Lighting for Elegant Depth
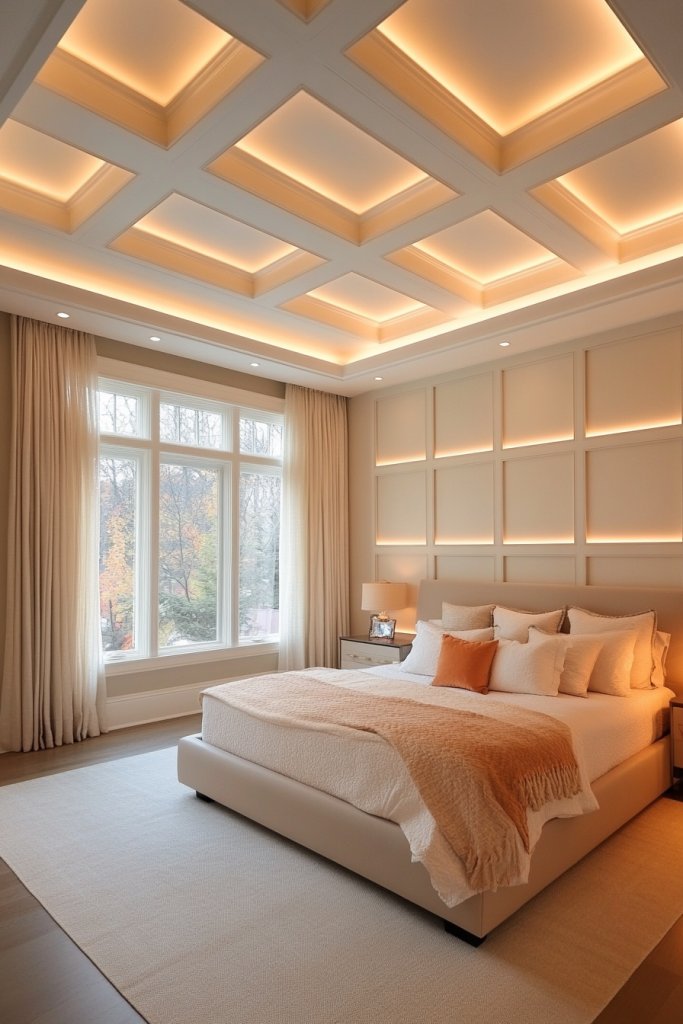
Ever wish your bedroom felt more luxurious without a total overhaul? A coffered ceiling with recessed lighting can give your space a high-end vibe that’s surprisingly simple to achieve. It adds depth and character, making your ceiling a true focal point. Plus, it creates a sense of spaciousness that’s perfect for those who crave a bit of grandeur in their daily retreat.
Recommended Products to replicate this idea
| # | Preview | Product | |
|---|---|---|---|
| 1 |

|
Art3d Drop Ceiling Tiles, 24x48in. White (12-Pack), Polyvinyl Chloride (PVC), Glue Down | Check Latest Price |
| # | Preview | Product | |
|---|---|---|---|
| 1 |

|
10-Pack 6.6ft/2Meter Silver Recessed LED Aluminum Channel for LED Strip Lights Diffuser Channel... | Check Latest Price |
Imagine walking into a room with a beautifully paneled ceiling featuring perfectly aligned square or rectangular coffers. Soft LED lights are tucked into the recessed sections, casting a gentle glow that highlights the architectural detail. The contrast between the darkened coffers and light surrounds adds depth, while the clean lines keep it modern. It’s like a subtle work of art overhead that elevates the entire room.
You can soften the look with lighter wood finishes for a cozy feel or go bold with dark stains for dramatic contrast. For a contemporary vibe, keep the coffers shallow and uniform, or vary their sizes for visual interest. This style works well with neutral color palettes but can also be customized with bold paint colors to match seasonal decor or personal taste. It adapts easily to different ceiling heights and room sizes.
Start by planning the layout and measuring your ceiling to determine the size and number of coffers. Use lightweight MDF or wood panels for ease of installation. Install a grid framework using metal or wooden supports, then attach the panels securely. For lighting, embed LED strips into the recesses before sealing everything up. Finish with paint or stain to match your decor. This project requires some carpentry skills but can be DIYed with patience and precision.
Add decorative moldings or trim within each coffer to create a more detailed look. Incorporate dimmable LED lighting to adjust ambiance according to mood or time of day. You could even paint each coffer a different shade for a playful, modern twist. For a minimalist approach, keep the coffers simple and focus on sleek finishes. Personal touches like metallic accents or textured paint can also elevate the design.
A coffered ceiling transforms a basic bedroom into a sophisticated retreat. It’s a project that’s manageable with some planning and adds incredible value and style. Once completed, you’ll enjoy a space that’s both timeless and trendy, perfect for relaxing or entertaining. Ready to give your ceiling the architectural interest it deserves?
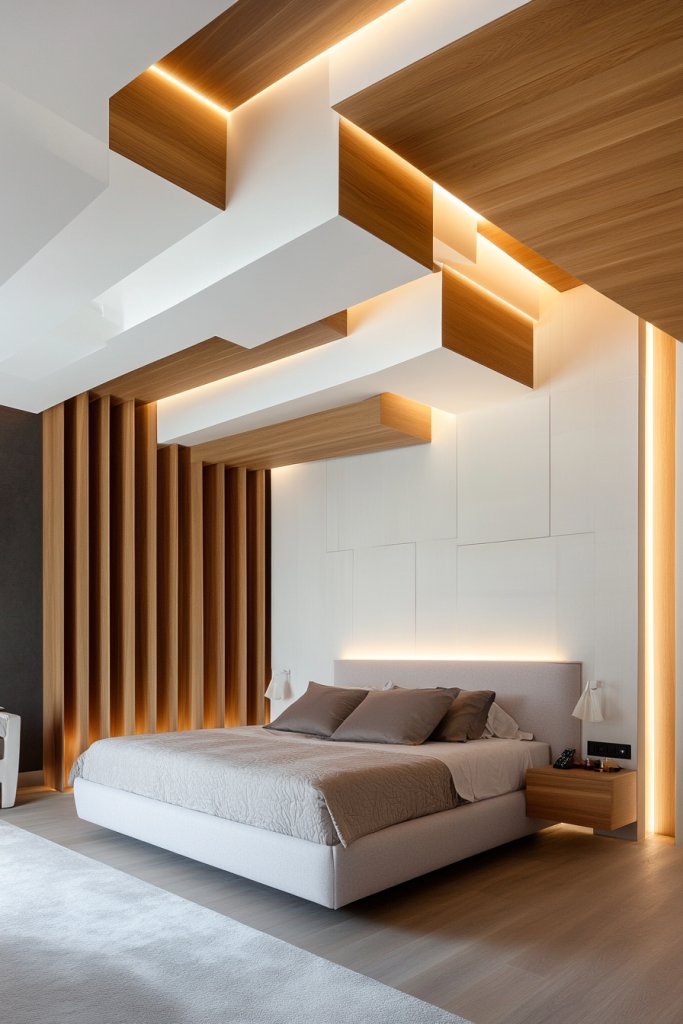
2. Floating Ceiling Panels with Contrasting Colors
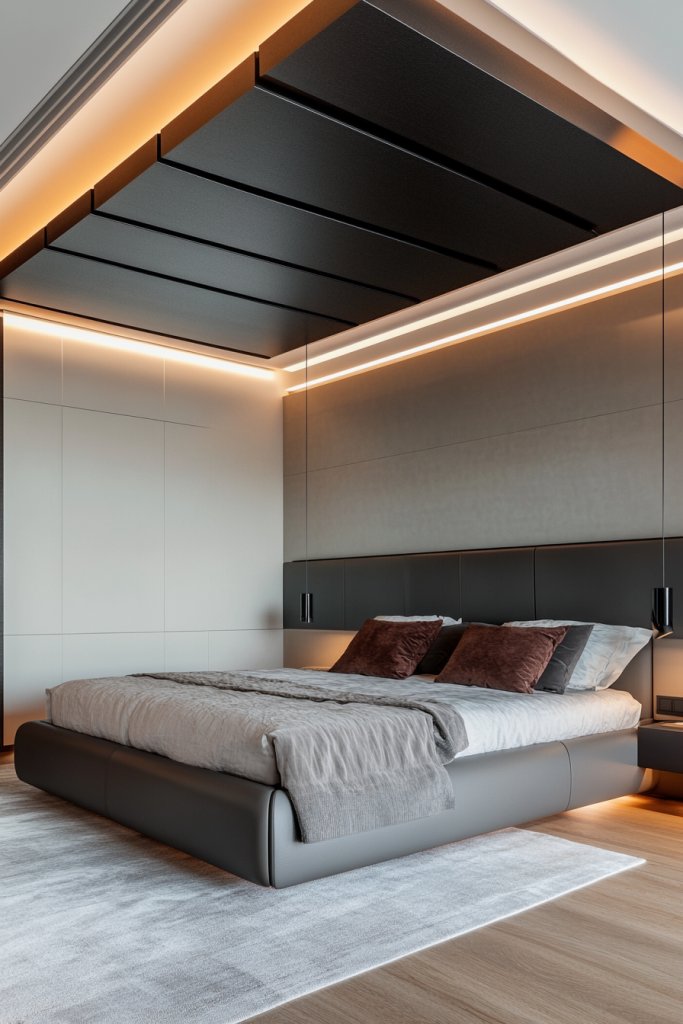
Feeling like your ceiling is just a flat, boring surface? Floating ceiling panels are the sleek fix to add modern flair and visual interest. They create a layered, dimensional effect that’s both eye-catching and stylish. Plus, contrasting colors make the panels pop, turning your ceiling into a statement piece rather than an afterthought.
Recommended Products to replicate this idea
| # | Preview | Product | |
|---|---|---|---|
| 1 |

|
Fan Mounting Box, FB900-1 Ceiling Fan Fixture Mounting Box Supports Fans to 70 LBS and Fixtures... | Check Latest Price |
| # | Preview | Product | |
|---|---|---|---|
| 1 |

|
KSIPZE 100ft Led Strip Lights RGB Music Sync Color Changing Bluetooth Led Lights with Smart App... | Check Latest Price |
Picture panels that appear to hover slightly below the main ceiling, painted in bold hues like deep navy or vibrant white for contrast. The edges are clean and sharp, with hidden supports giving the illusion of floating. Soft lighting around the perimeter emphasizes the layered effect, casting gentle shadows that enhance the depth. It’s a minimalist yet dramatic upgrade that transforms the space.
Choose monochrome panels for a subtle, sophisticated look, or mix contrasting shades for a more playful vibe. Material options include lightweight MDF, PVC, or even textured laminates for added dimension. These panels work well in both small and large rooms, and their placement can be customized to suit your style—horizontal, vertical, or geometric patterns. They’re also perfect for hiding imperfections or wiring.
Begin by measuring your ceiling and designing your panel layout. Use a level and laser line to ensure precise placement. Attach support frames securely to the ceiling, then fix the panels using screws or adhesive suitable for your chosen material. For a seamless look, paint or finish the panels beforehand. Add LED strip lighting around the edges to enhance the floating illusion and create ambient glow. This project is straightforward but requires patience and careful measurement.
Incorporate metallic or textured finishes for added visual interest. Play with color blocking by using different shades on each panel. You can also add subtle patterns or embossing for texture, making the ceiling a true conversation starter. For a cozy feel, opt for warm tones or matte finishes. Integrating dimmable lighting allows you to change the mood effortlessly.
Floating panels redefine modern bedroom ceilings by adding depth without clutter. The installation is accessible for DIY enthusiasts with basic carpentry skills and tools. Once finished, your space will look professionally designed, boosting your confidence in tackling other home upgrades. It’s a smart, stylish move toward a more dynamic and personalized bedroom environment.
3. Geometric Patterned Ceiling with 3D Wall Panels

Bored of plain ceilings? Geometric patterns with 3D wall panels bring texture and modern artistry right overhead. They create visual excitement and add a sculptural element that elevates your bedroom’s style. It’s a way to make your space stand out without overwhelming the overall aesthetic.
Imagine a ceiling covered in bold, angular shapes that pop out in three dimensions, painted in sleek monochromes or metallic finishes. The textured surfaces cast subtle shadows, adding depth and intrigue. The panels are arranged in a repeating geometric pattern for a cohesive look or randomly for a more eclectic vibe. Integrated lighting accentuates the 3D effects, making the design come alive in different lighting conditions.
Opt for subtle textures in neutral shades for a minimalist approach, or go wild with vibrant colors and metallic accents for a statement look. Choose from materials like PVC, MDF, or foam for easy installation and modification. This pattern can be scaled to fit any room size, from small cozy bedrooms to large suites, and can complement various decor styles, from modern to industrial.
Start by selecting your pattern and measuring the ceiling area. Use a template or grid for precise placement. Attach the panels securely using adhesive or mounting clips designed for your material. For a seamless appearance, paint or finish the panels beforehand. Use directional lighting to cast shadows that enhance the 3D effect. This project demands patience but offers a striking upgrade that feels both artistic and contemporary.
Add metallic or gloss finishes for a luxe feel or textured paints for more tactile interest. Layer multiple patterns or incorporate LED strip lighting along the edges for a dramatic glow. You can also embed subtle patterns within the panels to create a more intricate visual effect. Personal touches like custom colors or finishes make this a one-of-a-kind feature.
Geometric 3D panels turn a simple ceiling into an eye-catching art installation that reflects your style. It’s a DIY-friendly project with a big impact, boosting your confidence in creating high-end looks. Once complete, your bedroom will radiate modern sophistication and artistic flair, inspiring you to explore more creative upgrades.
4. Wooden Beamed Ceiling with Natural Finish
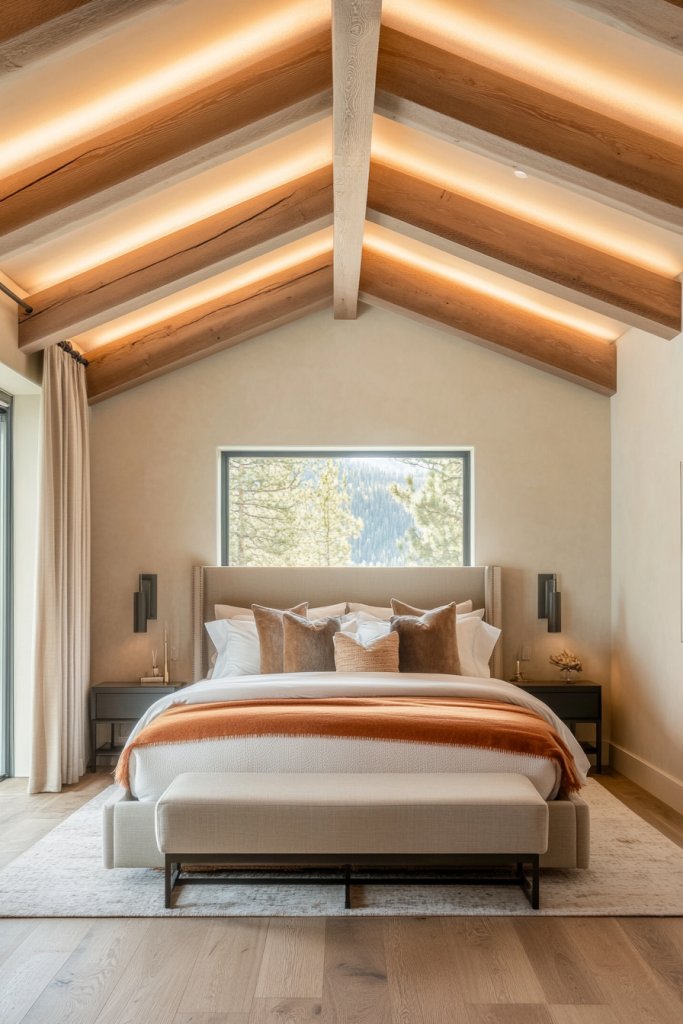
Craving warmth and texture in your bedroom? Wooden beams instantly add rustic charm and a cozy feel. Modern interpretations of beams keep things sleek and minimalist while still offering that natural touch. They’re perfect for creating a balanced blend of contemporary style and natural comfort.
Recommended Products to replicate this idea
| # | Preview | Product | |
|---|---|---|---|
| 1 |

|
Two Wooden Beams | Check Latest Price |
| # | Preview | Product | |
|---|---|---|---|
| 1 |

|
Amico 12 Pack 6 Inch 5CCT Ultra-Thin LED Recessed Ceiling Light with Junction Box, 1050LM... | Check Latest Price |
Imagine smooth, wide wooden beams spanning across a high ceiling, their warm honey tones contrasting beautifully with crisp white walls. The natural grain adds texture and a tactile element that invites touch. Soft lighting installed along the beams highlights their natural beauty while casting gentle shadows that enhance the architectural detail. It feels like a cabin retreat but with a fresh, modern twist.
Choose lighter woods like maple or birch for a Scandinavian-inspired look, or darker woods such as walnut for a richer, more luxurious feel. Keep the beams slim and spaced out for a minimalist aesthetic, or go bold with thicker, more prominent elements. This style pairs well with neutral palettes but can also be jazzed up with painted accents or stained finishes to match seasonal decor.
Begin by measuring your ceiling height and planning your beam layout. Use steel or wooden supports to secure the beams in place, ensuring they’re level and evenly spaced. Attach the beams using lag bolts or brackets, then sand and finish them with natural oils or stains. Install recessed lighting or LED strips along the beams for subtle illumination. This project requires basic carpentry skills but produces a timeless result that elevates your bedroom.
Add decorative touches like wrought iron brackets or painted accents for a personalized look. Incorporate textured textiles like a soft cream throw blanket or a chunky woven rug to complement the wood’s warmth. Consider adding a skylight or small windows between beams for natural light and outdoor connection. These details make your space uniquely yours.
A wooden beam ceiling bridges rustic charm with modern minimalism, transforming your bedroom into a cozy sanctuary. It’s a classic upgrade that’s surprisingly straightforward to install and customize. Once done, you’ll feel confident tackling more architectural projects and enjoy a space that feels both warm and stylish.
5. Circular or Oval Ceiling Medallion with LED Strip Lighting
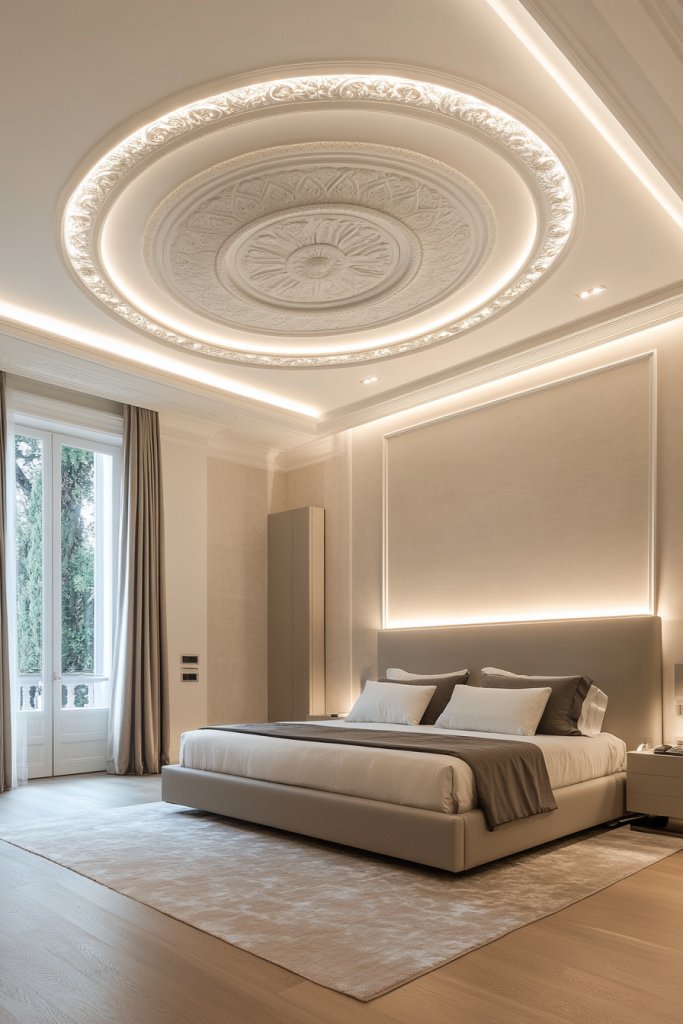
Want a dramatic focal point that’s elegant yet modern? A circular or oval ceiling medallion with hidden LED strips can do just that. It adds architectural interest and a soft glow, making your bedroom feel special without overwhelming the space. It’s perfect for those who love a touch of classic style with a contemporary twist.
Recommended Products to replicate this idea
| # | Preview | Product | |
|---|---|---|---|
| 1 |

|
13"OD x 3 1/2"ID x 1 1/4"P Traditional Thermoformed PVC Ceiling Medallion (Fits Canopies up to 7... | Check Latest Price |
| # | Preview | Product | |
|---|---|---|---|
| 1 |
|
KSIPZE 100ft Led Strip Lights RGB Music Sync Color Changing Bluetooth Led Lights with Smart App... | Check Latest Price |
Visualize a sleek, rounded medallion centered overhead, painted in a contrasting color or metallic finish. Concealed LED strips run along its inner edge, emitting a warm or cool glow that softly illuminates the ceiling and creates a sense of depth. The smooth, curved lines add a graceful touch, while the indirect lighting enhances the room’s ambiance. It’s a subtle luxury that elevates the entire aesthetic.
Choose classic white or metallic finishes for a timeless appeal, or opt for bold colors to make a statement. The medallion’s size can vary from modest to oversized, depending on room proportions. Pair it with minimalist decor for a chic look or ornate furnishings for a more opulent vibe. It adapts easily to different ceiling heights and decor themes.
Select a medallion that fits your ceiling’s dimensions. Secure it using brackets or adhesive, making sure it’s perfectly centered. Install LED strips along the inner perimeter before attaching the medallion, then hide the wiring for a clean look. Finish with paint or finish to match your ceiling color. This project is straightforward but requires precision to ensure symmetry and proper lighting.
Customize the glow with dimmable LEDs or color-changing strips for different moods. Add decorative trim or molding around the medallion to enhance its visual impact. You could also embed subtle patterns or textures into the medallion for extra detail. Personal touches make it a true centerpiece.
A ceiling medallion with LED lighting turns a simple ceiling into a captivating feature. It’s an easy upgrade that feels luxurious and refined. Once installed, you’ll love how it transforms your bedroom into an elegant retreat, inspiring you to explore more creative lighting solutions.
6. Metal Grid Ceiling for an Industrial Modern Look
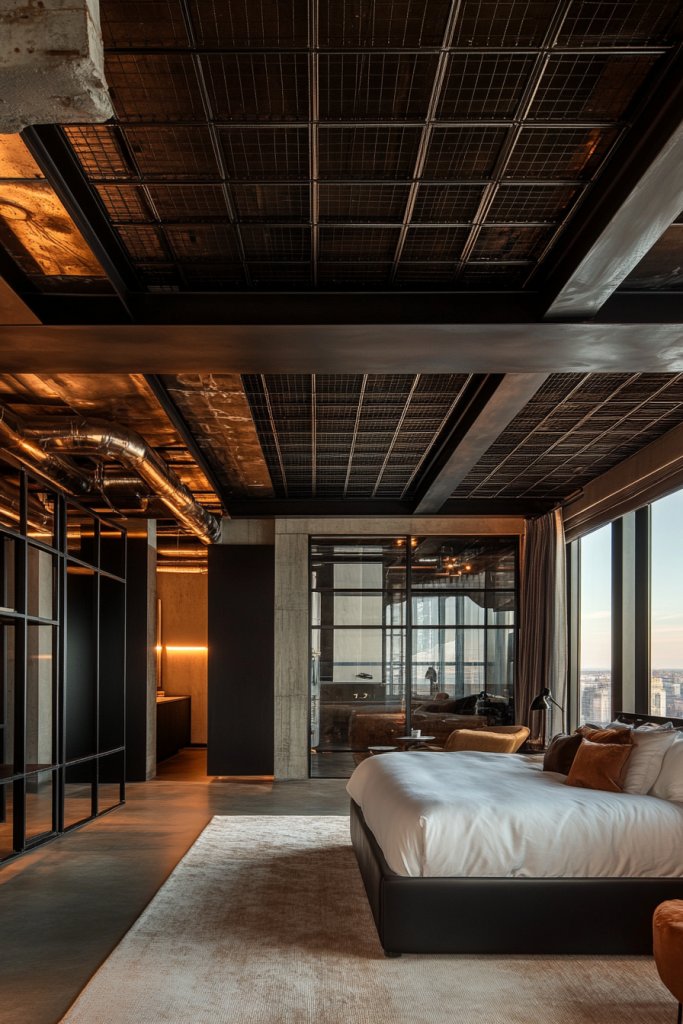
Looking for a bold, edgy ceiling upgrade? A metal grid pattern offers an industrial vibe that’s both modern and functional. It’s a statement piece that can make even the simplest bedroom look like a design magazine cover. Plus, it’s surprisingly versatile for various decor styles.
Recommended Products to replicate this idea
| # | Preview | Product | |
|---|---|---|---|
| 1 |

|
GridMAX 100 sq. ft. Black Ceiling Grid Cover Kit | Check Latest Price |
| # | Preview | Product | |
|---|---|---|---|
| 1 |

|
OTTFF 8 Pack 3.2 ft Ceiling Light Suspension Cables Kit, Adjustable Length Steel for Hexagon... | Check Latest Price |
Picture a sleek metal grid suspended just below the main ceiling, forming a geometric lattice. The grid’s dark finish contrasts with bright walls, creating a striking look. Behind or within the grid, install LED or filament bulbs for an exposed bulb effect, or add industrial-style fixtures. The open design allows glimpses of the ceiling or lighting features, adding depth and character.
Opt for matte black or brushed metal finishes for a true industrial look, or choose galvanized or copper tones for warmth. The grid can be arranged in squares, rectangles, or even hexagons, depending on your style preference. Combine with raw materials like brick or concrete walls for an authentic industrial aesthetic. It works well with minimalist, modern, or eclectic decor.
Start by measuring your ceiling and planning the grid layout. Use metal supports and connectors to assemble the grid on the ground, then suspend it from the ceiling using sturdy cables or chains. Secure the grid firmly and ensure it’s level. Incorporate lighting fixtures into the grid for added effect. Finish with paint or protective coating if necessary. This project is moderately challenging but yields a striking feature.
Add vintage-style filament bulbs or modern LED fixtures to customize the look. Incorporate shelving or decorative elements within the grid for added functionality. Play with different metal finishes or paint for contrasting textures. The grid can also serve as a framework for hanging textiles, artwork, or other decorative accents.
An industrial metal grid ceiling makes a strong style statement that’s both trendy and timeless. It’s a DIY project that, with some planning, can turn your bedroom into a bold showcase. Once finished, you’ll feel proud of your edgy, modern upgrade that’s sure to impress.
7. Layered Drop Ceiling with Hidden Cove Lighting
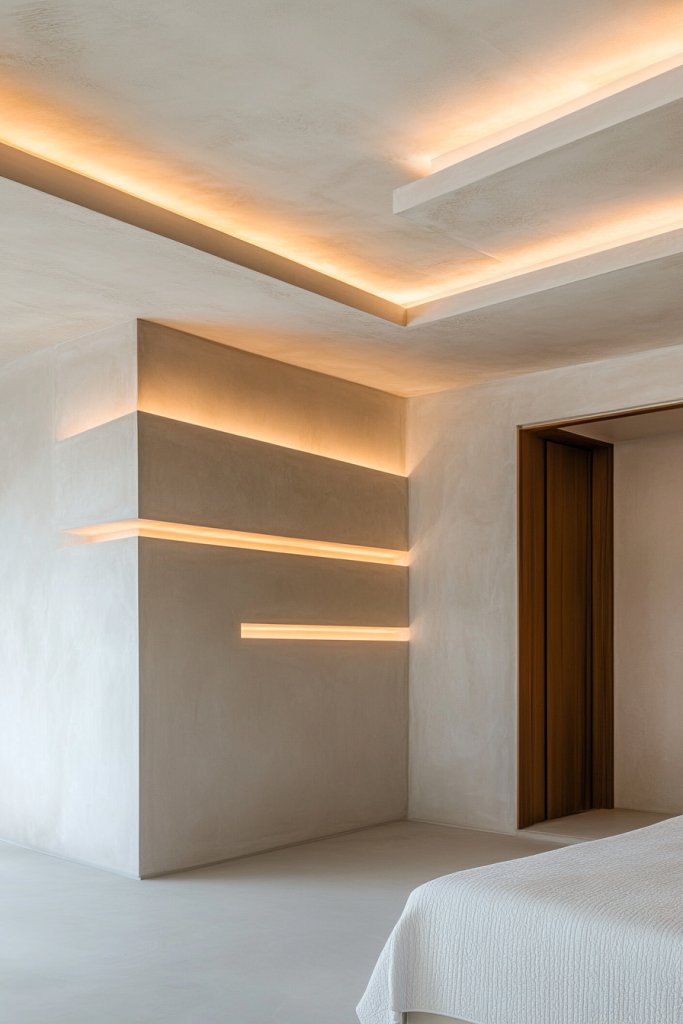
Want to add depth and sophistication without a full remodel? A layered drop ceiling with hidden cove lighting creates a multi-dimensional effect that’s both subtle and stylish. It’s perfect for elevating your bedroom’s architecture while keeping things sleek and modern. Who says lighting can’t be part of the design?
Recommended Products to replicate this idea
| # | Preview | Product | |
|---|---|---|---|
| 1 |

|
Luma Cove The 16.4FT/5M Modular Channel Assembly Kit for The Concealment of LED Strip Lighting... | Check Latest Price |
| # | Preview | Product | |
|---|---|---|---|
| 1 |
|
Art3d Drop Ceiling Tiles, 24x48in. White (12-Pack), Polyvinyl Chloride (PVC), Glue Down | Check Latest Price |
Visualize a ceiling with multiple levels, each slightly recessed or lowered compared to the one above. The edges are softly illuminated by concealed LED strips, casting a gentle glow that emphasizes the layered effect. The interplay of shadows and light adds a luxurious depth, making the ceiling look like a custom architectural feature. The layered design also helps define different zones or areas within the room.
Keep the layers simple with clean lines for a contemporary look, or add decorative molding or textured finishes for a more ornate feel. The height of each layer can vary based on ceiling height and room size. Use warm or cool lighting tones to match your mood or decor theme. This style adapts well to both small and large spaces, creating a dramatic focal point.
Begin by designing your layered layout and marking the levels on the ceiling. Support frames or drywall can be used to create the different layers. Attach the panels or drywall sheets securely and finish with paint or wallpaper. Install LED cove lighting strips along the edges before sealing everything up. Test the lighting and adjust for the desired ambiance. This project demands careful planning but offers a high-end look.
Incorporate dimmable lighting for adjustable mood settings. Use textured or painted finishes on the layers for extra visual interest. Add decorative elements like crown molding or metallic accents to elevate the style further. Personal touches like color-changing LEDs can make your room feel dynamic and personalized.
A layered drop ceiling transforms a flat surface into a sophisticated architectural feature. It’s a creative project that combines lighting and structure, boosting your confidence in home upgrades. Once complete, your bedroom will exude elegance and depth, inspiring you to experiment with more lighting and architectural details.
8. Mirrored Ceiling to Expand Space and Reflect Light
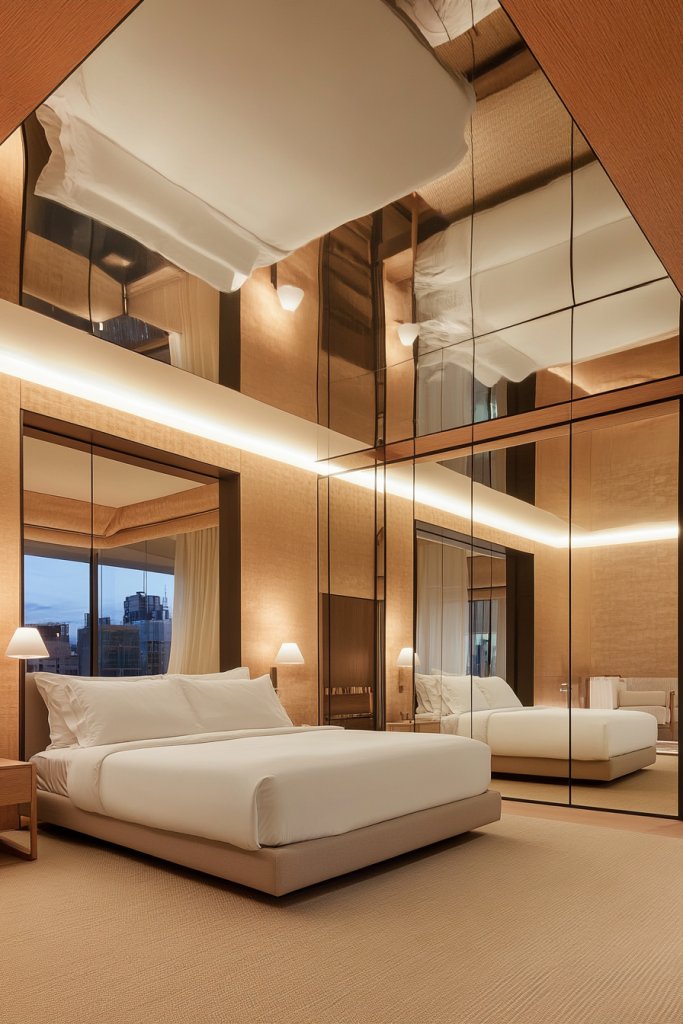
Ever wish your room felt bigger or brighter? Mirrored ceilings instantly double the visual space and reflect light, making any bedroom feel more open and luminous. It’s a bold choice that adds a touch of glamour and sophistication—perfect for those who love a luxe vibe.
Recommended Products to replicate this idea
| # | Preview | Product | |
|---|---|---|---|
| 1 |

|
Art3dwallpanels 12 Pack Drop Ceiling Tiles, 2x4 Ft PVC Decorative 3D Wall Panel, Glue Up Ceiling... | Check Latest Price |
| # | Preview | Product | |
|---|---|---|---|
| 1 |
|
KSIPZE 100ft Led Strip Lights RGB Music Sync Color Changing Bluetooth Led Lights with Smart App... | Check Latest Price |
Imagine a seamless mirror covering the entire ceiling, reflecting the room’s decor and windows below. The glossy surface captures ambient and natural light, bouncing it around the space and creating an illusion of height. When paired with subtle lighting fixtures, it can produce a mesmerizing, almost surreal effect. The reflection also adds depth, transforming a modest room into a spacious retreat.
Opt for full ceiling mirrors for maximum impact, or use mirrored panels in a geometric pattern for a modern twist. Frame the mirrors with sleek trim or keep them frameless for a minimalist look. This style pairs well with contemporary, glamorous, or eclectic decor themes and works in rooms with high ceilings or limited natural light.
Begin by choosing high-quality, shatterproof mirror panels suitable for ceilings. Ensure the ceiling surface is smooth and clean. Attach the mirrors securely with specialized adhesive or mounting brackets designed for glass. Seal the edges with reflective trim if needed, to prevent dust accumulation. Install lighting fixtures to enhance the reflective quality and create a bright, airy atmosphere. Be cautious during installation—mirrors can be heavy.
Add LED strip lighting around the perimeter for a soft backlit glow. Incorporate decorative elements like crystal or metallic accents that complement the reflective surface. Use textured paint or wallpaper on the walls to contrast with the mirrored ceiling, creating a layered look. Personal touches like colored lighting can also shift the mood dramatically.
A mirrored ceiling makes a bold statement that instantly upgrades your bedroom’s style. It’s a project that combines functionality with glamour, boosting your confidence in tackling reflective surfaces. Once finished, your room will feel brighter, larger, and more luxurious, inspiring you to explore other daring decor ideas.
9. Textured Plaster or Stucco Ceiling for Subtle Architectural Interest
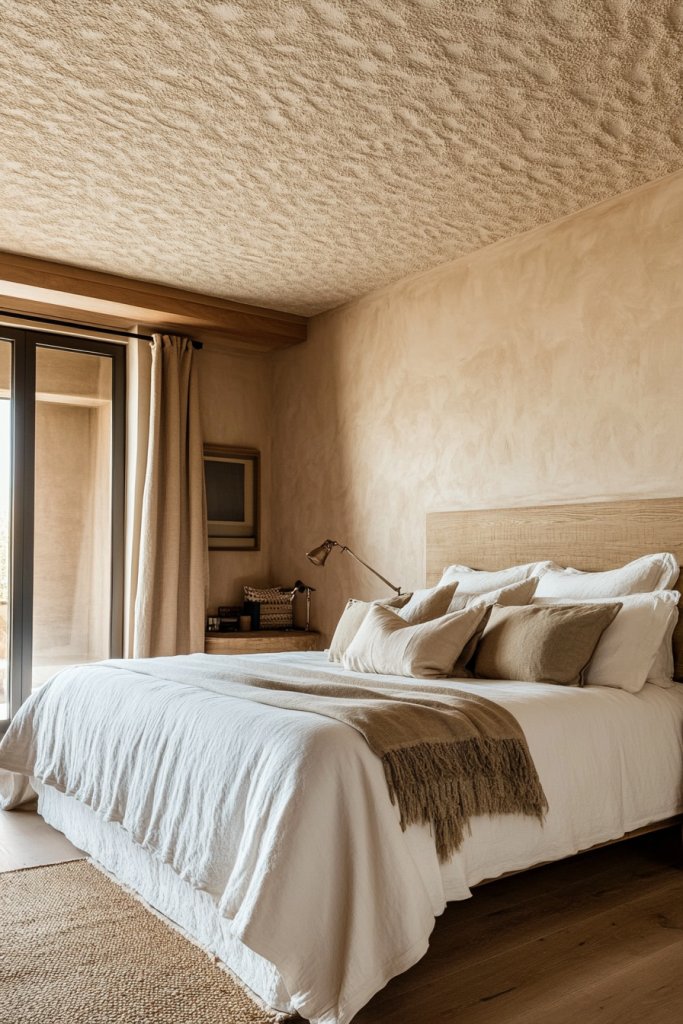
Tired of smooth, boring ceilings? Textured plaster or stucco finishes add a tactile element that subtly enhances your bedroom’s architecture. They create visual depth without overwhelming the space, offering a refined, understated elegance. Perfect for those who want a unique touch without going overboard.
Imagine a ceiling coated in a soft, granular stucco or a subtle swirl pattern, painted in a neutral tone. The textured surface catches light at different angles, creating delicate shadows that add depth and interest. It’s like a piece of art overhead that invites a closer look and complements both modern and classic decor styles. The texture adds warmth and character, making the room feel more inviting.
Choose from various textures—knockdown, slap brush, or swirl—for different visual effects. Keep the color palette simple to emphasize the texture or add a hint of metallic or pearl sheen for a more luxe appearance. This finish works well with minimalist furniture and can be paired with decorative molding or crown trims for a layered look. It’s adaptable to any ceiling height or room size.
Start by preparing the ceiling surface, ensuring it’s smooth and clean. Apply a primer if needed. Mix your textured plaster or stucco according to manufacturer instructions. Use a trowel or roller to apply the material in a consistent layer, creating the desired pattern. Once dry, paint in your chosen color, possibly adding a clear topcoat for durability. This technique is forgiving for DIYers and results in a subtle yet impactful feature.
Highlight the texture with contrasting paint shades or metallic finishes. Incorporate indirect lighting or small spotlights to enhance shadows and bring out the tactile quality. Personalize by adding decorative trims or framing elements that complement the textured surface. It’s a versatile option that can be tailored to your style and mood.
A textured plaster ceiling introduces an artisanal, handcrafted feel to your bedroom. It’s a DIY-friendly project that offers a sophisticated upgrade with minimal fuss. Once complete, you’ll have a refined, warm space that reflects your personal taste and craftsmanship, inspiring further creative home projects.
10. Patterned Wallpapered Ceiling for Visual Contrast

Looking for a quick way to add visual punch? Patterned wallpaper on the ceiling creates instant contrast and character. It’s an easy upgrade that surprises and delights, turning a blank surface into a stylish feature. Plus, it’s perfect for those who want bold decor without complicated construction.
Recommended Products to replicate this idea
| # | Preview | Product | |
|---|---|---|---|
| 1 |

|
Roman Ultra Clear Strippable Wallpaper Adhesive, Clear Glue, Zero VOC, PRO-880 (32 Ounce - 80 sq.... | Check Latest Price |
| # | Preview | Product | |
|---|---|---|---|
| 1 |
|
Art3d Smoothing Tool Kit for Applying Peel and Stick Wallpaper, Vinyl Backsplash Tile | Check Latest Price |
Imagine a ceiling covered in modern geometric patterns or floral motifs in bold colors. The wallpaper’s intricate design draws the eye upward, creating a dynamic visual element. The contrast between the wallpaper and the ceiling walls adds depth and personality. Soft lighting enhances the pattern, making the ceiling a striking focal point in your bedroom.
Opt for large-scale patterns for maximum impact or subtle motifs for a more understated look. Use textured wallpapers for added tactile interest, or metallic finishes for a luxe vibe. Coordinate the wallpaper pattern with bedding, curtains, or rugs for a cohesive aesthetic. This approach works well in various decor styles from modern to eclectic.
Start with a clean, smooth ceiling surface. Measure and cut wallpaper strips to match the ceiling dimensions. Apply a wallpaper adhesive suitable for ceilings, starting from the center outward to prevent bubbles. Smooth out air pockets with a squeegee or brush. Seal with a clear protective topcoat if desired. This DIY-friendly project instantly updates your space with minimal effort.
Add metallic or textured accents to the wallpaper for extra flair. Use LED lighting to highlight the pattern or add decorative trims around the edges for a finished look. Change up the look seasonally by switching wallpaper patterns or colors. Personal touches like custom motifs make your ceiling uniquely yours.
Patterned ceiling wallpaper makes a bold style statement with minimal fuss. It’s a quick, affordable way to refresh your room’s character and showcase your personality. Once done, you’ll have a space that feels both fresh and uniquely styled, inspiring confidence in your decorating skills.
11. Layered Ceilings with Varying Heights and Finishes
Want to add complexity and depth without clutter? Layered ceilings with varying heights and finishes create a dynamic, sculptural look that transforms your bedroom. It’s perfect for those craving a modern, architectural statement that’s still refined and elegant. Ready to turn your ceiling into a work of art?
Recommended Products to replicate this idea
| # | Preview | Product | |
|---|---|---|---|
| 1 |

|
Chris.W 2Pack Art Gallery Ceiling Wall Mount Picture Hanging System Kit with Adjustable Hooks and... | Check Latest Price |
| # | Preview | Product | |
|---|---|---|---|
| 1 |
|
Barrina (6 Pack LED T5 Integrated Single Fixture, 4FT, 2200lm, 6500K Super Bright White, 20W... | Check Latest Price |
Imagine sections of the ceiling at different heights, finished in contrasting textures like matte paint, glossy lacquer, or textured plaster. The layers cascade or intersect, creating shadows and visual interest as you move through the room. Soft indirect lighting highlights these differences, making the ceiling feel alive and multidimensional. It’s like an architectural sculpture overhead.
Keep the layers subtle with gentle height differences for a more understated look, or go bold with dramatic elevation changes and contrasting finishes. Use materials like drywall, wood, or decorative panels to define each layer. Incorporate color or texture shifts to enhance the layered effect, harmonizing with your overall decor. It’s adaptable to high or standard ceilings.
Design your layout carefully, marking different levels on the ceiling. Support each layer with framing or drywall, then finish each section with paint, wallpaper, or textured finishes. Use lighting to accentuate the layers—LED strips, spotlights, or indirect cove lighting work well. Ensure transitions between levels are smooth and precise. This project requires planning but offers a striking architectural upgrade.
Mix finishes and colors for a personalized touch—matte with gloss, neutral tones with bold accents. Add decorative moldings or trim to define edges and transitions. Use lighting creatively to emphasize different layers or create focal points. Custom finishes or textures allow you to craft a ceiling that’s as unique as your style.
Layered ceilings push your design boundaries and showcase your architectural flair. It’s a project that results in a sophisticated, gallery-like space. Once your ceiling is complete, you’ll feel empowered to experiment with more dramatic interior features, knowing you can pull off complex, high-impact designs.
12. Exposed Beam Ceiling with Contemporary Metal Accents
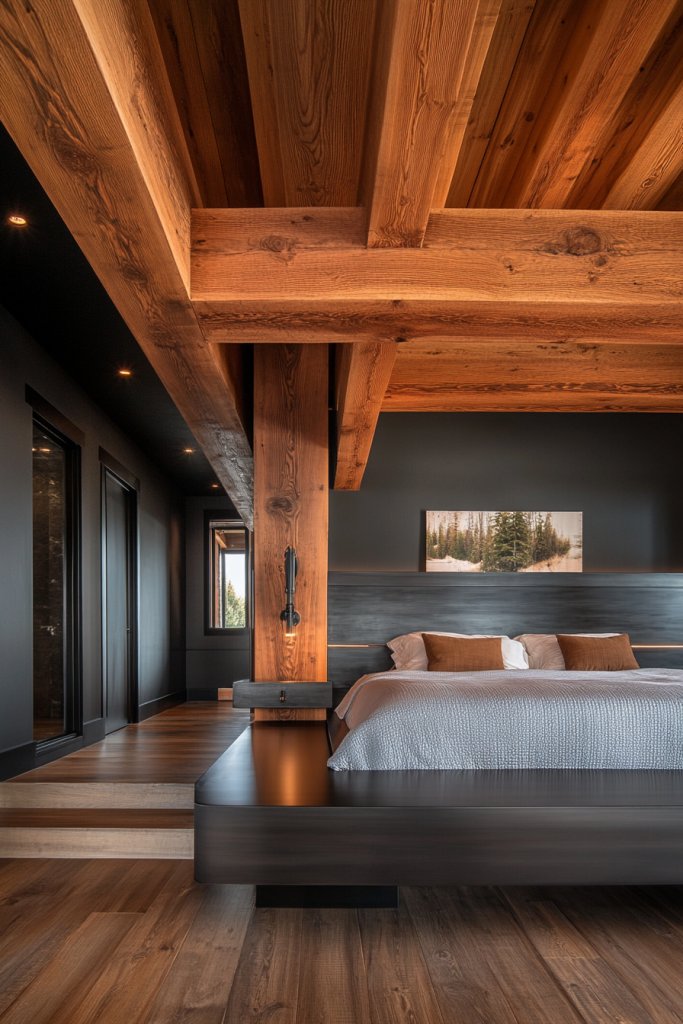
Craving a blend of rustic charm and modern edge? Exposed beams with sleek metal accents create a striking contrast that’s both warm and industrial. It’s a bold statement that adds character and architectural interest. Perfect for those who love a mix of old and new, or want a unique focal point overhead.
Recommended Products to replicate this idea
| # | Preview | Product | |
|---|---|---|---|
| 1 |
|
Two Wooden Beams | Check Latest Price |
| # | Preview | Product | |
|---|---|---|---|
| 1 |

|
Starunder 6 Pack Floating Shelf Brackets, 6 Inch Heavy Duty Industrial Shelf Bracket, Black Metal... | Check Latest Price |
Picture wide wooden beams running across the ceiling, their natural grain and texture contrasting with shiny metal brackets or accents. The beams can be stained or painted to suit your style, from rustic to contemporary. Metallic fixtures or hardware add a modern twist, catching the light and creating visual interest. Soft lighting highlights the textures, making the beams feel both sturdy and stylish.
Choose lighter woods like pine or oak for a Scandinavian vibe, or dark woods such as walnut for richness. Metal accents can be matte black, brushed nickel, or copper, depending on your decor. Keep the beams slim for a minimalist look, or go oversized for more drama. This style pairs well with brick walls, concrete floors, or industrial furniture.
Begin by measuring your ceiling and planning your beam placement. Secure beams with steel supports or brackets, ensuring they’re level and well-supported. Attach metal accents using appropriate fasteners, then sand and finish the wood as desired. Add lighting fixtures—recessed or pendant—around the beams to enhance the aesthetic. This project combines carpentry and metalwork, but with patience, it’s a DIY dream.
Decorate with metallic or painted accents for a personalized touch. Incorporate decorative lighting like Edison bulbs or modern pendants. Use textiles, rugs, or bedding in complementary colors to tie the room together. Personal touches like vintage hardware or custom stains make the space uniquely yours.
Exposed beams with metal accents blend rustic warmth with modern sophistication. It’s a signature look that commands attention and showcases your style. Successfully completing this project will boost your confidence to explore more architectural and design features, transforming your space into a true masterpiece.
13. Suspended Ceiling with Integrated Sound-Absorbing Panels

Want a quieter, more peaceful bedroom? Suspended ceilings with sound-absorbing panels tackle noise while adding a sleek, modern look. They improve acoustic comfort and bring a sophisticated architectural element. Perfect for those who value tranquility and style in their personal retreat.
Recommended Products to replicate this idea
| # | Preview | Product | |
|---|---|---|---|
| 1 |
|
24 Pack-12 x 12 x 2 Inches Pyramid Designed Acoustic Foam Panels, Sound Proof Foam Panels Black,... | Check Latest Price |
| # | Preview | Product | |
|---|---|---|---|
| 1 |

|
Muzata 64 Sq Ft Drop Ceiling Gird System White Complete Set Galvanized Steel Grid Kit Easy... | Check Latest Price |
Imagine a ceiling with a grid of panels suspended just below the main ceiling plane. The panels are in muted tones—gray, white, or textured finishes—that blend seamlessly into the room. Sound-absorbing materials like mineral fiber or fabric-covered panels are incorporated, reducing echo and noise. The grid creates a subtle geometric pattern that’s both functional and decorative.
Choose panels with different textures or finishes—smooth, perforated, or fabric-covered—to match your decor. The grid layout can be uniform or varied for visual interest. This system works well in bedrooms with high ceilings or open layouts, where acoustics matter. It’s also adaptable to retrofit into existing ceilings.
Start by designing your grid layout, marking support points on the ceiling. Install suspension wires and supports, then attach the panels securely within the grid. Seal seams and finish edges for a clean look. Integrate lighting fixtures or diffusers within the panels for added functionality. Testing for sound absorption effectiveness is recommended after installation.
Select panels with decorative textures or subtle colors to complement your decor. Incorporate lighting behind or within the panels for mood control. Use framing or decorative trim around the edges for a polished appearance. Personal touches like custom fabric covers or patterns can further enhance the aesthetic.
A suspended, sound-absorbing ceiling combines form and function, transforming your bedroom into a peaceful haven. It’s a professional-looking upgrade you can DIY with careful planning. Once installed, you’ll enjoy a more serene space and gain confidence in tackling advanced architectural features.
14. LED Starry Sky Ceiling Simulation
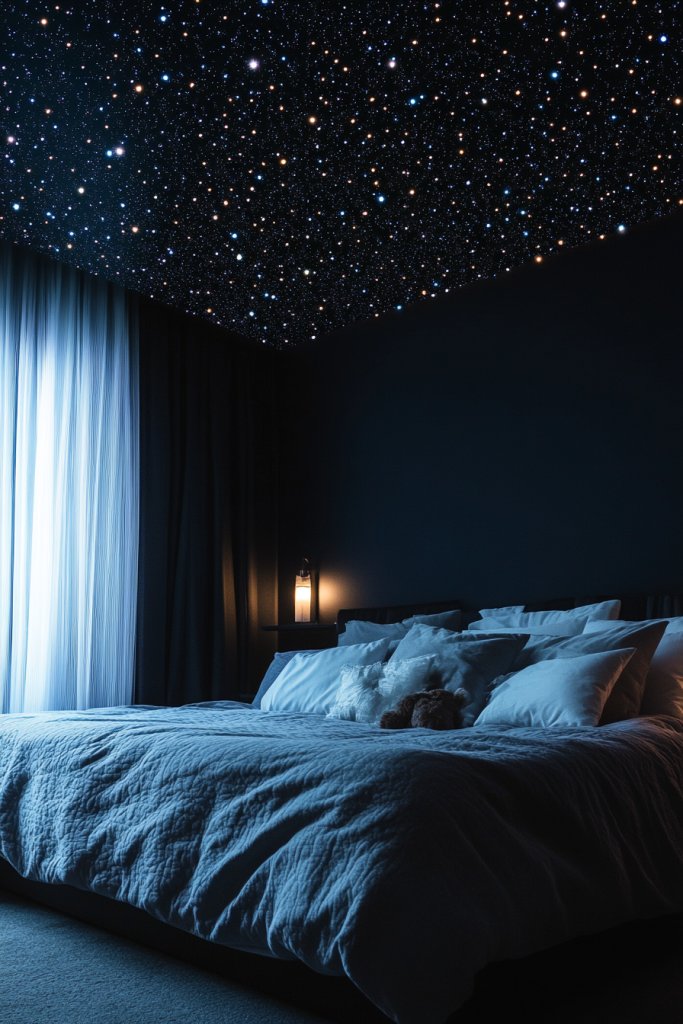
Ever dreamed of sleeping under the stars? An LED starry sky ceiling simulation brings that magic indoors. It creates a dreamy, calming atmosphere perfect for relaxation and sleep. It’s a fun, modern way to add a touch of wonder to your bedroom’s design.
Imagine tiny LED fibers or small pinpoint lights embedded in the ceiling, twinkling like a night sky. Fiber optic strands can be arranged randomly or in constellations, with adjustable color options. Soft, dimmable lighting can mimic the subtle glow of stars, creating a tranquil, immersive environment. The effect is mesmerizing and can be tailored to your mood.
Use fiber optic kits with different star densities or arrange them in specific patterns for a personalized sky. Combine with a dark ceiling or textured finish to enhance the illusion. Add a nebula or galaxy backdrop with painted or wallpapered murals for extra depth. It’s suitable for high ceilings to maximize the effect.
Install fiber optic strands into the ceiling using a template or freehand design. Attach the light source and controller, then run wiring discreetly behind the ceiling. Test the twinkle effect and adjust the timing or color settings. Seal and finish the ceiling with paint or textured finishes. This project is relatively easy with the right kit and provides a magical night-time ambiance.
Add color-changing LEDs for dynamic effects, or sync the lights with music for a more immersive experience. Incorporate a remote or app control for easy adjustments. Complement the starry sky with minimalistic furniture and soft textiles to keep the focus on the celestial display. It’s all about creating a relaxing, dreamy environment.
A starry sky ceiling makes your bedroom uniquely enchanting. It’s a fun project that feels special and personal, boosting your confidence in home tech upgrades. Once finished, you’ll love the magical atmosphere it creates, inspiring more creative lighting ideas.
15. Curved or Wave-Design Ceiling for Fluid Architectural Motion
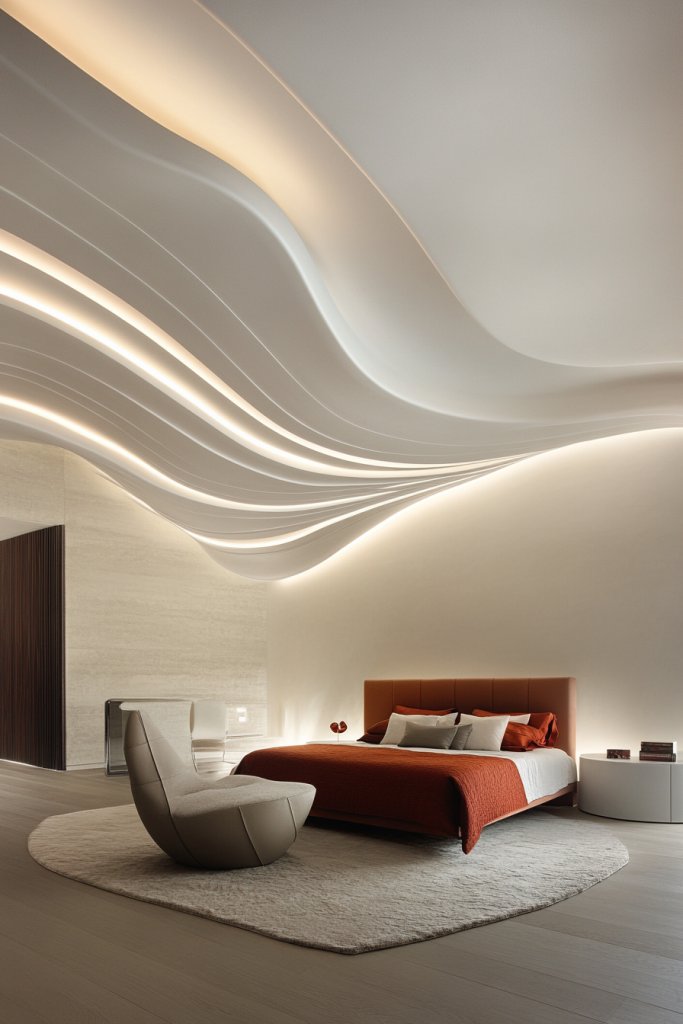
Looking for a ceiling that breaks free from rigidity? Curved or wave-shaped ceilings introduce a sense of flow and movement, transforming your bedroom into a modern sculpture. They add architectural interest and a calming, organic feel. Ready for a design that’s truly eye-catching and unique?
Recommended Products to replicate this idea
| # | Preview | Product | |
|---|---|---|---|
| 1 |

|
JIHXYER Flexible Bendable Ceiling Curtain Track, 9.8ft (3m) Curved, PVC, Metal, Plastic &... | Check Latest Price |
| # | Preview | Product | |
|---|---|---|---|
| 1 |
|
KSIPZE 100ft Led Strip Lights RGB Music Sync Color Changing Bluetooth Led Lights with Smart App... | Check Latest Price |
Picture a ceiling with sweeping curves that mimic gentle waves or flowing fabric. The smooth, continuous lines create a sense of motion, leading the eye across the space. Soft indirect lighting accentuates the curves, casting subtle shadows and enhancing the fluidity. It’s like a piece of modern art overhead that energizes and relaxes simultaneously.
Choose subtle, gentle curves for a soothing effect, or dramatic waves for a bold statement. Finish with matte or textured paints to emphasize the shape, or incorporate lighting along the edges to highlight the contours. This style works well with minimalist, contemporary, or even organic decor themes, and can be customized to fit various room sizes.
Start by designing your curved or wave pattern and marking the ceiling with a flexible template or string. Use specialized drywall or curved panels to shape the ceiling structure. Attach the panels securely and finish with paint or textured coating. Install LED strip lighting along the curves to emphasize the motion. This project is more complex but highly rewarding.
Add colored lighting or dimmable LEDs to enhance the mood. Incorporate natural materials like wood or textured finishes for a tactile element. Embedding indirect lighting along the curves can create a glowing, dynamic effect. Personal touches like custom shapes or color schemes make your ceiling a true centerpiece.
A curved or wave ceiling injects a sense of fluidity and artistry into your space. It’s a bold project that pushes your architectural confidence and results in a room that feels alive. Once finished, it’ll be a conversation starter and a source of pride in your creative home design.
Conclusion
From sleek geometric patterns to textured finishes, the variety of modern bedroom ceiling ideas showcased offers endless possibilities to enhance your space. Implementing these innovative designs can instantly add architectural interest and elevate your bedroom’s style. Don’t hesitate to experiment and personalize these ideas—your dream bedroom is just a ceiling away! Embrace these creative concepts and transform your ceiling into a stunning statement piece that inspires every day.
Last update on 2025-09-21 / Affiliate links / Images from Amazon Product Advertising API
Leave a Reply