I have been, or can be if you click on a link and make a purchase, compensated via a cash payment, gift, or something else of value for writing this post. As an Amazon Associate, I earn from qualifying purchases. Please read my full Affiliate Disclosure for more information.
The back wall of your bedroom is more than just the surface your bed rests against—it’s a natural focal point that can set the tone for your entire space. With the right design choices, this wall can transform from a blank backdrop into a bold statement, adding depth, personality, and visual intrigue to your room.
From dramatic accent colors to textural wall treatments, the possibilities are endless for creating a headboard wall that feels both stylish and cohesive. The key is to balance aesthetics with harmony, ensuring the design elevates your bedroom’s atmosphere without overwhelming it.
In this guide, we’ll explore twelve inspiring bedroom back wall ideas that range from subtle elegance to striking drama. Whether you prefer rich wood paneling, oversized artwork, or patterned wallpaper, these ideas will help you craft a space that draws the eye and invites you to linger.
1. Statement Wall with Textured Wall Panels for Instant Depth
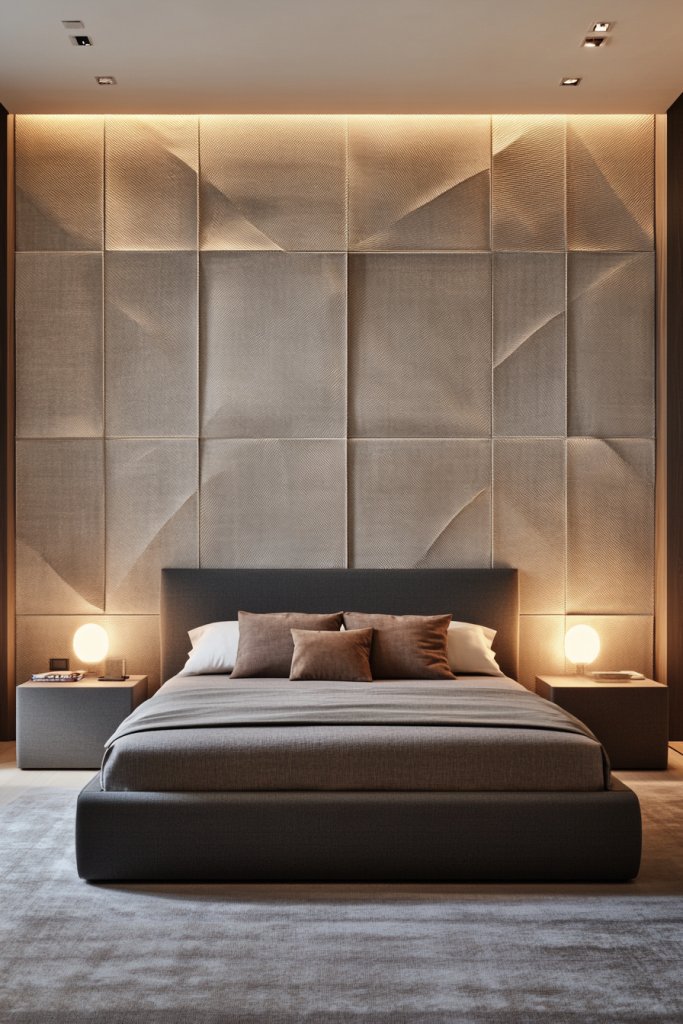
Ever feel like your bedroom lacks that wow factor? Sometimes, all it takes is a statement wall to transform the entire space. A flat, boring back wall can make the room feel flat and uninspired. Everyone wants a focal point that draws the eye and adds personality. Luckily, textured wall panels can do exactly that without a huge overhaul.
Imagine running your hand along a wall covered in layered wood panels or molded plaster with intricate patterns. The textures catch the light differently throughout the day, creating shadows and depth. In a soft, neutral palette, these panels add tactile interest and sophistication. The visual contrast makes the room feel richer and more dimensional, almost like an art installation.
You can opt for natural wood for a warm, rustic vibe or go for sleek, molded acrylic for a modern look. For a cozy feel, combine textured panels with plush bedding and soft textiles. In smaller rooms, vertical panels can elongate the space, while horizontal arrangements add width. Seasonal changes can be integrated with paint or lighting to keep the look fresh.
Start by choosing the material—wood, plaster, or acrylic—based on your style and budget. Measure your wall carefully to order the right size panels, or consider customizable options. Prepare the wall surface, ensuring it’s clean and smooth. Use adhesive or mounting hardware suitable for your chosen panels, following manufacturer instructions. Finish with trim or molding for a seamless look, and add lighting accents like sconces or LED strips to enhance texture.
Customize your textured panels with paint or stain to match your decor theme. Incorporate metallic accents or gloss finishes for a luxe touch. You could also add decorative molding or inlays to personalize the design further. Mixing materials, like combining wood and plaster, creates unique visual interest tailored to your taste. Let your personality shine through with subtle color variations or patterns.
A textured statement wall elevates your bedroom instantly, making it feel curated and stylish. It’s a relatively simple upgrade with a big impact, perfect for DIYers or those with a bit of crafting spirit. When you see how a textured wall transforms the space, you’ll feel confident experimenting with other decor elements. Ready to make your bedroom the envy of all your friends?
2. Bold Accent Paint with Geometric Patterns for Modern Impact
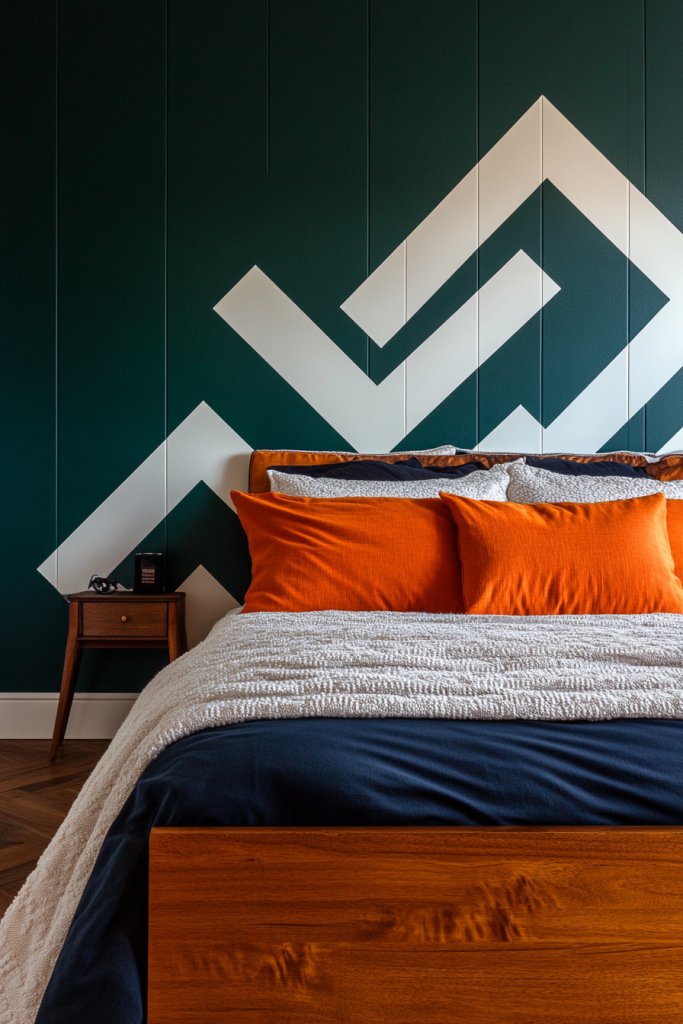
Does your bedroom feel a little dull despite your best decor efforts? Sometimes, a splash of bold color or a striking pattern is all you need to energize the space. Creating a modern, eye-catching backdrop with accent paint can instantly refresh your room’s vibe. It’s a quick fix that packs a punch and sets the tone for the entire space.
Recommended Products to replicate this idea
| # | Preview | Product | |
|---|---|---|---|
| 1 |

|
Duck Clean Release Blue Painter's Tape, 2-Inch (1.88-Inch x 60-Yard), Single Roll, 240195 | Check Latest Price |
| # | Preview | Product | |
|---|---|---|---|
| 1 |

|
LM-Kreativ Metallic Wall Paint 67.62 fl oz - White - Stunning Metallic Shine for Stylish... | Check Latest Price |
Picture a wall painted in a deep jewel tone like emerald or sapphire, with crisp geometric tape lines creating triangles or chevrons. The contrast of matte paint with a glossy finish can add depth and dimension. Sharp lines and bold shapes make the wall pop, providing a modern, graphic element that draws the eye. When balanced with neutral bedding and minimal accessories, it becomes a stunning focal point.
Choose contrasting colors for a vibrant feel or stick to monochrome shades for subtle sophistication. You can also experiment with metallic paints or iridescent finishes for added glamour. For smaller rooms, using vertical stripes can create the illusion of height. In boho or eclectic styles, incorporate layered patterns or softer pastel shades for a more relaxed look.
Start by selecting your color palette—consider your existing decor and lighting. Use painter’s tape to create clean geometric shapes, planning your design on paper first. Apply a primer if needed, then paint the base color first. Once dry, carefully tape off areas to create your pattern, then fill in with contrasting hues. Remove tape promptly to keep lines sharp. Finish with a clear matte or gloss sealer for durability.
Add personalized touches by incorporating metallic or textured paints into your geometric design. Use different shades within a color family to create subtle variations. You can also add stenciled accents or metallic foil for extra flair. To keep things fresh, refresh the pattern seasonally or for special occasions—think metallic gold for festive vibes.
This bold approach proves that a simple paint job can dramatically change a room’s personality. Once you master the tape technique, your confidence will grow to try more complex patterns or even mural-style art. It’s a cost-effective way to showcase your style and make a statement. Get ready for compliments and envious looks!
3. Layered Wallpaper with Subtle Patterns for Elegant Depth

Tired of plain walls and want a touch of elegance? Wallpaper offers a quick way to add sophistication, but choosing the right pattern and layering approach is key. Layered wallpaper can create visual depth without overwhelming the space. It’s perfect for those who want subtlety with a luxurious feel.
Recommended Products to replicate this idea
| # | Preview | Product | |
|---|---|---|---|
| 1 |
|
Art3d Smoothing Tool Kit for Applying Peel and Stick Wallpaper, Vinyl Backsplash Tile | Check Latest Price |
| # | Preview | Product | |
|---|---|---|---|
| 1 |

|
Art3d 10 Ft Peel and Stick Flexible Vinyl Molding Trim for Wall Tile Edges, Kitchen backsplash,... | Check Latest Price |
Imagine a soft, neutral-toned wallpaper with a delicate damask or floral pattern. Overlapping textured wallpapers with different sheens—matte over satin, for instance—adds depth and richness. The layered effect can be achieved by mixing patterns or installing wallpaper in overlapping sections, creating a subtle 3D look. When lit softly, the layers cast gentle shadows, enhancing the room’s elegance.
Opt for neutral palettes for timeless sophistication or gentle metallic accents for a modern twist. Layer different textures, like a damask over a woven or grasscloth wallpaper, for a tactile experience. Use lighter shades in smaller rooms to keep the space feeling open, or darker hues in larger bedrooms for coziness. Seasonal changes can be made with removable wallpaper panels.
Begin by selecting complementary wallpaper styles and patterns. Measure your wall carefully and plan the overlapping sections or layering effects beforehand. Prepare the wall surface by cleaning and smoothing it out. Apply wallpaper paste or adhesive, carefully aligning each panel to avoid bubbles. For layering, cut overlapping sections with clean edges, then press firmly to set. Use a smoothing tool to eliminate wrinkles and ensure adhesion.
Add personal touches by incorporating metallic or textured wallpapers in the layers. Consider custom wallpapers with subtle patterns tailored to your style. You can also frame sections of layered wallpaper with decorative molding or trim for a bespoke look. Incorporate gentle lighting to highlight the layered textures, making the room feel even more refined.
Layered wallpaper creates a timeless, elegant ambiance that sets your bedroom apart. It’s a simple update with a big impact, perfect for DIY enthusiasts who want a refined look without complicated techniques. Seeing how layered textures enhance depth will boost your confidence to experiment with other wall treatments. Your space will feel instantly more luxurious.
4. Vertical Wooden Slats for a Sleek, Contemporary Look
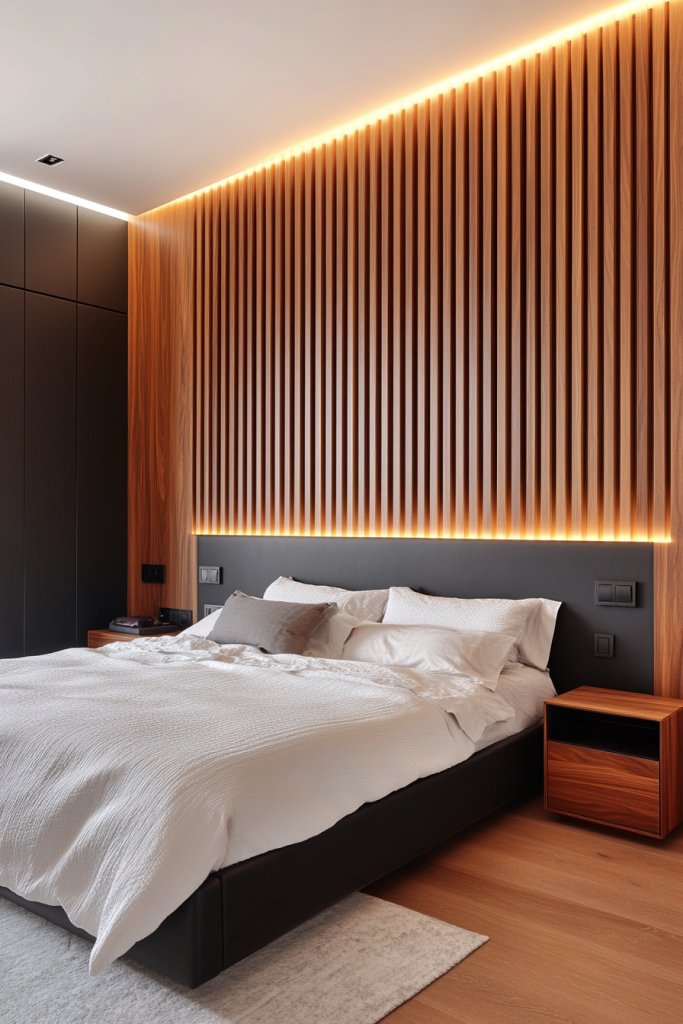
Feeling like your bedroom is missing that sleek, modern edge? Vertical wooden slats are an easy way to add a contemporary vibe that’s both stylish and warm. They break up plain walls and introduce a sense of height and structure. Plus, they’re surprisingly versatile and easy to customize to your taste.
Recommended Products to replicate this idea
| # | Preview | Product | |
|---|---|---|---|
| 1 |

|
NeatiEase Wood Panels for Wall, 4-Piece 96" x 12.6" Soundproof Wood Slat Wall Panel for Interior... | Check Latest Price |
| # | Preview | Product | |
|---|---|---|---|
| 1 |

|
HOUYITOU 20PCS 1.69 x 0.75 inch Black Flush Mount Bracket Stainless Steel Interlock Hanging Buckle... | Check Latest Price |
Picture narrow, evenly spaced wood panels running from floor to ceiling, creating a rhythmic, clean-lined backdrop. The natural grain of the wood adds warmth, while the vertical orientation draws the eye upward, making the room feel taller. When paired with soft lighting and minimalist furniture, the slats create a sophisticated, gallery-like ambiance. It’s a look that’s both polished and inviting.
Opt for light-colored woods like oak or maple for a bright, airy feel or darker woods like walnut for rich contrast. You can also paint the slats in bold colors for a more playful or eclectic look. For a softer aesthetic, space the slats wider apart; for a more dramatic effect, make them very close. Consider combining with textured textiles or matte paint for different effects.
Measure your wall carefully to determine slat spacing and length. Choose high-quality wood or MDF slats, ensuring they’re sanded smooth. Attach the slats using concealed mounting brackets or adhesive, starting from the bottom and working upward for a seamless look. Use spacers to maintain even gaps. Finish with protective sealant or paint, and add integrated LED lighting for extra flair. Regular cleaning keeps the wood looking fresh.
Customize with colored stains, paints, or varnishes to match your decor. Incorporate decorative LED strips behind the slats for a subtle glow. You can also add small shelves or hooks for functional decor. Mixing different wood tones or combining with textured panels creates a layered, personalized effect. Seasonal changes in textiles or lighting keep the look dynamic.
Vertical wooden slats are a modern classic that instantly upgrades your bedroom’s style. They’re straightforward to install and highly customizable, so you’ll feel empowered to experiment. When you see how they add height and warmth, your confidence to try other architectural features will grow. It’s a simple change with a big visual payoff.
5. Built-In Shelving with Decorative Storage for Functionality
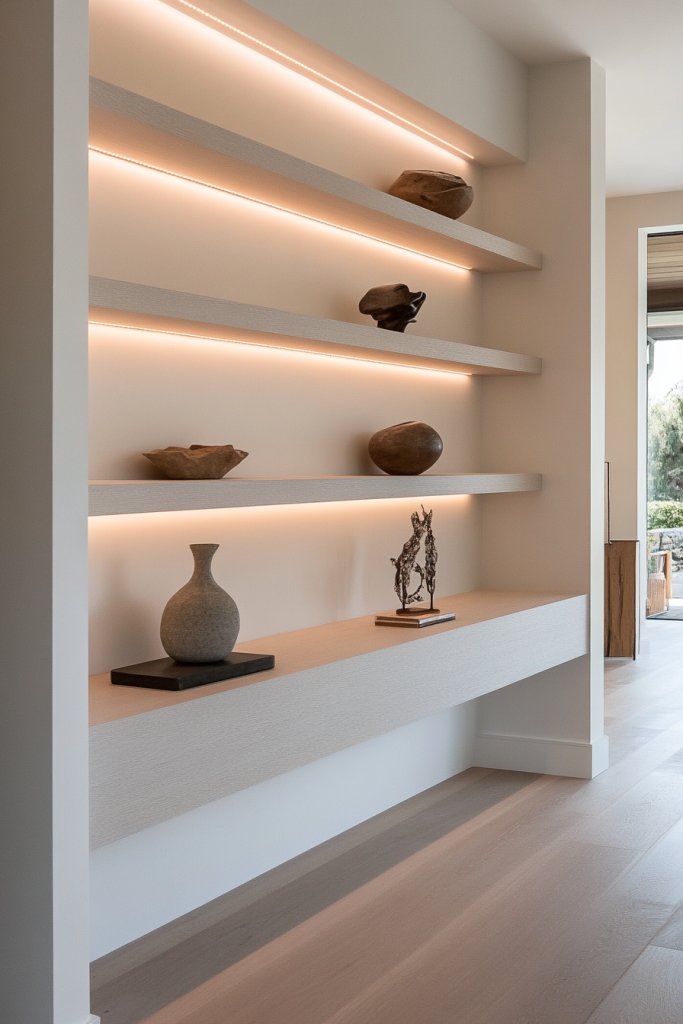
Is clutter taking over your bedroom? Built-in shelving offers a practical solution that keeps things organized while adding style. It turns your back wall into a functional focal point, blending storage with design. Plus, it’s a smart way to personalize your space without sacrificing aesthetics.
Recommended Products to replicate this idea
| # | Preview | Product | |
|---|---|---|---|
| 1 |
|
Sorbus LED Light Display Shelf - Vertical 5 Tier Wall Shelf Unit with 2 Hooks, Column Utility... | Check Latest Price |
| # | Preview | Product | |
|---|---|---|---|
| 1 |

|
Amico 12 Pack 6 Inch 5CCT Ultra-Thin LED Recessed Ceiling Light with Junction Box, 1050LM... | Check Latest Price |
Visualize sleek, recessed shelves with open cubbies or closed cabinets, painted to match or contrast your wall color. They can hold books, decorative boxes, or display cherished items. When arranged symmetrically or asymmetrically, the shelves create an eye-catching pattern that adds architectural interest. Soft lighting inside the shelves highlights your favorite decor pieces, making the wall both practical and beautiful.
Use open shelving for a casual, accessible look, or opt for closed cabinets for a clean, minimalist vibe. Mix materials like wood, metal, or glass for a personalized touch. Incorporate baskets or decorative boxes for hidden storage and tidy appearance. Adjust the depth of shelves based on what you plan to store or display, balancing functionality with style.
Plan your storage needs and measure your wall carefully. Choose modular or custom-built shelving units that fit your space and style. Install sturdy brackets or recessed mounting hardware, ensuring they are level. For a seamless look, hide mounting hardware behind decorative panels or molding. Paint or finish the shelves to match your decor, and add lighting fixtures if desired for an extra glow. Regularly declutter to maintain a neat, functional setup.
Personalize your shelves with decorative boxes, sculptures, or seasonal items. Use color-coordinated storage to create a cohesive look. Incorporate small LED strip lights for ambiance or task lighting. Change out decor seasonally to keep your space feeling fresh and inviting. Functional accessories like hooks or racks can add further utility.
Built-in shelving turns your back wall into a showcase of your personality and style. It’s a smart, space-saving solution that makes your bedroom more organized and attractive. Seeing your space transform into a curated display boosts your confidence in DIY and home decor projects. Your room will feel more personalized and effortlessly stylish.
6. Layered Neutral Textures with Fabric Panels or Tapestries
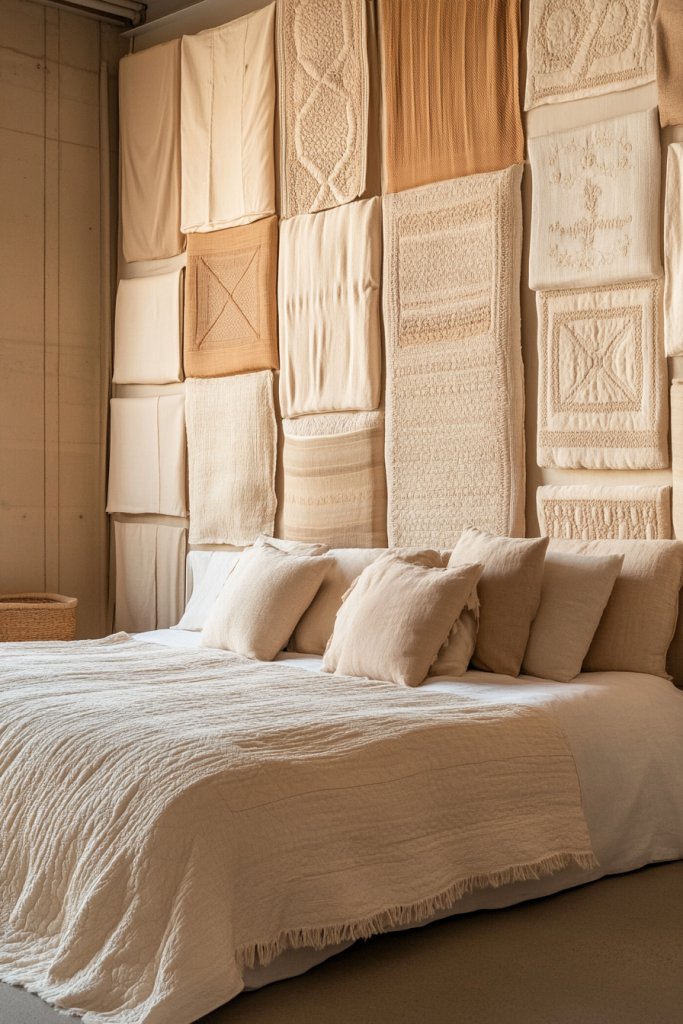
Looking to add softness and warmth to your bedroom without overwhelming it? Layered textures in neutral tones create a calming, sophisticated environment. Fabric panels and tapestries can soften walls and introduce visual depth, making your space feel cozy and inviting. It’s an easy way to upgrade plain walls with minimal effort.
Recommended Products to replicate this idea
| # | Preview | Product | |
|---|---|---|---|
| 1 |

|
IFNOW Upholstered Wall Mounted Headboard, 3D Soundproof Wall Panels Peel and Stick Headboard for... | Check Latest Price |
| # | Preview | Product | |
|---|---|---|---|
| 1 |

|
Apdidl Boho Tapestry Wall Hanging for Bedroom Aesthetic, Bohemian Vintage 70s Rainbow Sun... | Check Latest Price |
Picture a wall draped with a plush, woven tapestry or upholstered fabric panels in subtle shades like cream, taupe, or gray. The different textures—knits, velvets, or embroidered fabrics—add tactile richness. When layered with other textiles like bed throws or cushions, the wall becomes a soft backdrop that exudes comfort. The gentle interplay of textures creates a serene, harmonious atmosphere.
Use upholstered panels for a plush, luxurious feel or lightweight fabric tapestries for a boho or eclectic look. Combine different textures—knitted, woven, or embroidered—for visual interest. Choose neutral shades for timeless elegance or introduce subtle metallic accents for a modern twist. Layer textiles seasonally or switch out covers for a fresh look.
Start by selecting fabrics that complement your decor palette. Mount fabric panels on a sturdy backing or frame them for a polished look. Use fabric adhesive, hooks, or rod systems for easy installation. Arrange the panels in a symmetrical or asymmetrical pattern, depending on your style. Finish with decorative trim or piping if desired. Regular dusting and gentle cleaning keep textiles looking fresh.
Personalize with embroidered initials, decorative stitches, or textured trims. Layer different fabrics for a rich, tactile experience. Incorporate seasonal textiles or add decorative tassels and fringes for extra flair. You can also combine with string lighting or subtle wall sconces for a cozy glow. Keep the look minimal or maximal—your choice.
Layered textiles add a luxurious touch that transforms your bedroom into a retreat. They’re practical and easy to modify, giving you confidence to experiment with textures and styles. Once you see how textiles soften and warm your space, you’ll be motivated to explore more creative decor ideas. Your room will feel like a personal sanctuary.
7. Backlit Wall with LED Strip Lights for Ambient Drama
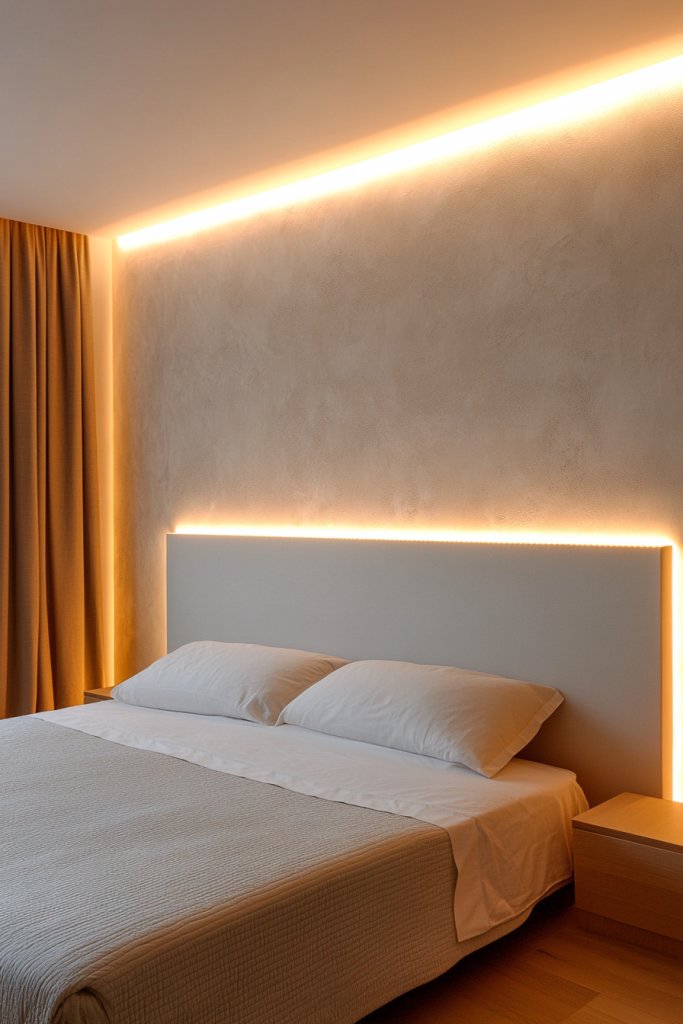
Want to add a touch of magic and mood to your bedroom? Backlighting with LED strips is a game-changer for creating ambient drama. It’s a simple upgrade that transforms plain walls into luminous focal points. Plus, it’s energy-efficient and adjustable, giving you total control over your space’s vibe.
Imagine a wall softly glowing in warm white or color-changing LED strips hidden behind textured panels or a sleek molding. The indirect lighting adds depth and dimension, highlighting architectural details and casting gentle shadows. It makes the room feel cozy and cinematic, perfect for unwinding after a long day. When dimmed, it creates a tranquil sanctuary; when bright, it energizes the space.
Choose warm tones for a relaxing atmosphere or vibrant colors for a lively, playful mood. Install LED strips behind wood slats, textured panels, or even within ceiling coves for a layered effect. Sync the lighting with music or use smart controls to change colors and brightness easily. For a minimalist look, conceal the strips behind simple molding or trim.
Measure your wall and select LED strips compatible with your power source and control system. Attach the strips using adhesive backing or mounting channels, ensuring even placement for consistent lighting. Conceal wiring behind molding or within wall cavities. Connect to a smart hub or remote for easy adjustments. Test the lighting before final installation to avoid uneven brightness or flickering.
Create custom lighting scenes to match your mood—romantic, energetic, or relaxing. Incorporate color-changing options for a dynamic effect. Add dimmers or voice controls for convenience. For a more dramatic look, combine backlighting with other architectural features like coves or niches. Seasonal color schemes can keep the ambiance fresh.
Backlit walls bring a modern, high-end feel that elevates your bedroom instantly. It’s a straightforward project that yields a significant visual upgrade. Seeing your room glow in different moods will inspire you to explore more lighting and decor ideas. Your space will feel both stylish and personally tailored.
8. Custom Carved Wood or MDF Murals for Artistic Flair
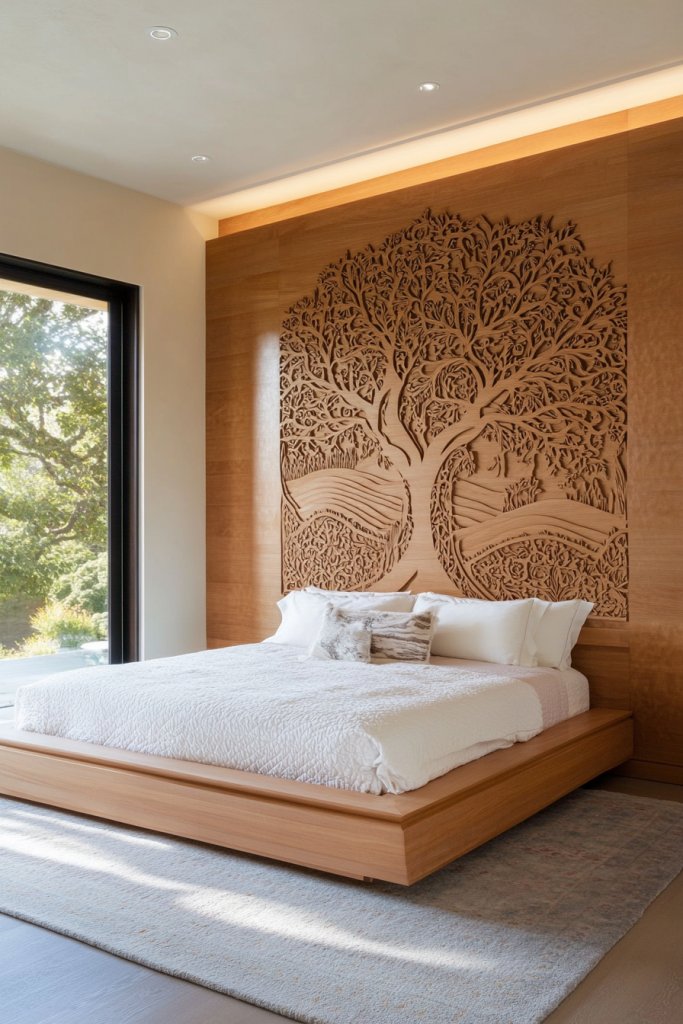
Looking for a truly unique, handcrafted focal point? Custom carved wood or MDF murals offer an artistic statement that’s entirely personalized. They turn a plain wall into a work of art, showcasing craftsmanship and creativity. This is your chance to have a bespoke piece that reflects your style and personality.
Recommended Products to replicate this idea
| # | Preview | Product | |
|---|---|---|---|
| 1 |

|
Musanpou Unique Hand Carved Wooden Wall Panels with Hanging Floral Decorations - Rustic Farmhouse... | Check Latest Price |
| # | Preview | Product | |
|---|---|---|---|
| 1 |

|
birdeco MDF Wall Paneling Kit Paintable Wall Panels MDF Unprimed 12 of The Pack/W 10cm, L 120cm,... | Check Latest Price |
Visualize an intricately carved floral motif or geometric pattern spanning your back wall, with detailed relief and layered depth. The craftsmanship adds texture and visual interest, casting subtle shadows that change with the light. The design can be painted or stained to match your decor, creating a harmonious or contrasting effect. It becomes a centerpiece that commands attention and admiration.
Opt for traditional motifs like floral, tribal, or art deco, or go for modern abstract designs. Customize the size and complexity to suit your space, from a full wall mural to a decorative panel. Integrate lighting to highlight the carvings or leave them matte for a more understated look. Painting or staining can be tailored to complement your decor palette.
Work with a skilled artisan or order a custom design from a reputable manufacturer. Choose the material—solid wood, MDF, or plywood—based on your budget and desired finish. Prepare your wall by cleaning and priming. Mount the mural securely with heavy-duty adhesive or brackets, ensuring it’s level. Finish with protective sealant or paint for longevity. Regular dusting and occasional touch-ups keep it pristine.
Personalize by adding color accents or metallic leaf to certain areas for extra flair. Incorporate your favorite motifs or symbols to make it truly yours. You can also add integrated lighting for dramatic effects. Periodically update the surrounding decor to keep the mural feeling fresh and integrated with your evolving style.
A carved mural elevates your bedroom into a personalized sanctuary with an artistic edge. It’s a durable, timeless investment that showcases your taste and craftsmanship appreciation. Seeing a unique, handcrafted piece in your space boosts confidence in exploring other creative decor ideas. Your bedroom becomes a true reflection of your artistic personality.
9. Monochromatic Color Blocking for Visual Boldness
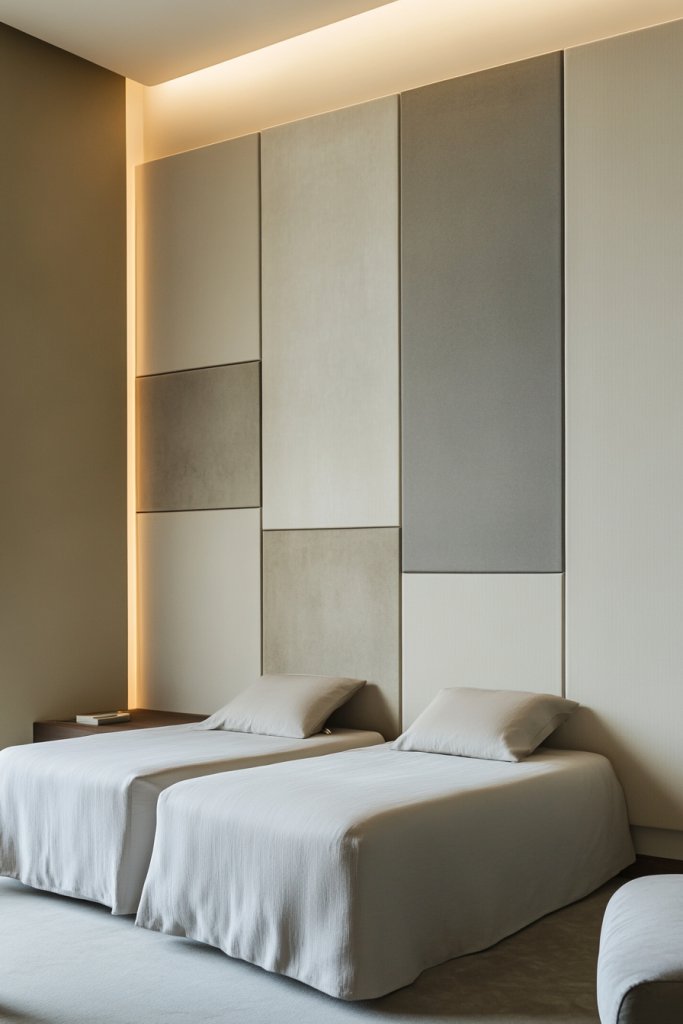
Ever want your bedroom to feel like a bold, modern sanctuary but struggle with making it look cohesive? Monochromatic color blocking offers a simple yet striking way to create visual impact without overwhelming the space. It’s perfect for those who crave a chic, unified aesthetic that feels intentional and sophisticated. If your current walls feel flat or uninspired, this idea might be just what you need.
Imagine a wall painted in a deep navy, with adjacent sections in matte charcoal and soft slate. The large blocks of color create a dynamic, layered look that plays with your perception of space. The matte finishes absorb light, giving the wall a velvety texture that invites touch. Sharp lines and clean transitions make the room feel crisp, organized, and intentionally designed. It’s like a high-end fashion look but on your bedroom wall.
You can experiment with different shades of the same color for a subtler effect or go for contrasting shades for maximum drama. Seasonal changes are easy—swap out darker tones for lighter pastels or warm hues during summer. This approach works well in both small and large rooms, making them feel more expansive or cozy depending on your color choices. For a softer vibe, pair this with textured textiles and minimal decor.
Start by choosing a single color family that resonates with your style. Use painter’s tape to create large geometric shapes or irregular blocks, then fill each section with high-quality matte paint. Use a level and measuring tape for precision, especially if you want sharp, straight lines. Apply at least two coats for even coverage, allowing drying time between layers. For crisp edges, remove tape carefully while paint is still slightly damp. Consider using painter’s caulk for perfect junctions if you want seamless transitions.
Add subtle variations by incorporating different textures within each color block—like a soft velvet or linen finish. You could also add metallic or gloss accents to some sections for extra depth. Personalize further with custom stenciled patterns or initials subtly integrated into the blocks. Remember, the key is balance—don’t overdo it; let the color blocks speak for themselves.
This bold approach transforms a plain wall into a statement piece that screams style and confidence. It’s a versatile technique that fits modern, minimalist, or even eclectic decor schemes. With a little patience and the right tools, you’ll find yourself proud of a project that looks professionally done. Ready to make your bedroom pop with color and design? Go monochromatic and own the look!
10. Metallic Accents with Copper, Gold, or Silver Finishes
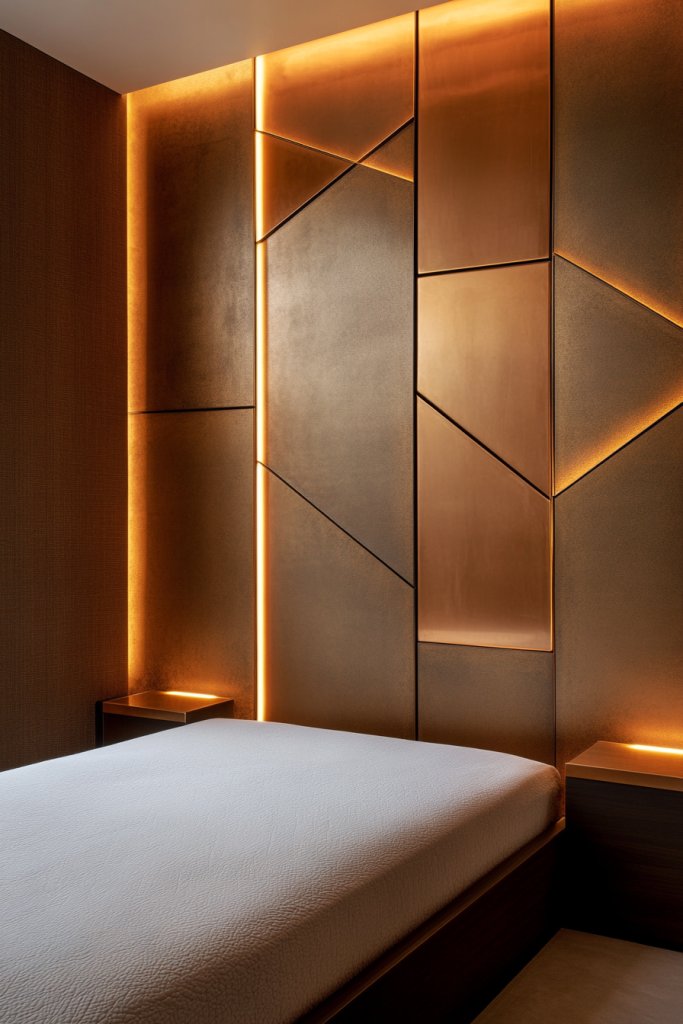
Looking to add a touch of glamour and luxury to your bedroom without going overboard? Metallic accents are the easiest way to elevate your back wall instantly. Whether it’s subtle hints of gold or bold copper, metallic finishes catch the light and create a dynamic focal point. If your decor feels flat or uninspired, adding metallic elements can dramatically change the vibe.
Think of a textured wall with copper leafing peeking through a neutral plaster base, or gold-painted geometric panels that shimmer with movement. Light bounces off these metallic surfaces, creating a luminous glow. The reflective qualities add depth and dimension, making even a simple design feel high-end. Imagine catching a glimpse of your reflection in a shiny panel or a carefully placed metallic sculpture, adding visual intrigue and richness.
Use metallic finishes sparingly as accents in combination with matte or satin paints for balance. Gold and brass work well in warm-toned rooms, while silver and chrome suit cooler palettes. Incorporate metallic details into molding, paneling, or decorative strips that run vertically or horizontally. Seasonal variations could include swapping out metallic accessories or accent panels for different finishes to refresh the look. This method suits both contemporary and vintage-inspired styles.
Start by selecting high-quality metallic paints, leafing, or foil that match your desired finish. For a textured look, consider applying metallic leafing or foils over drywall or plaster, sealing them with a clear adhesive or varnish. Use stencils to create geometric patterns or borders, then fill in with metallic paint or foil. For a more sculptural effect, attach metallic panels or decorative strips using adhesive or screws. Ensure proper lighting to maximize the reflective properties—consider wall sconces or concealed lighting for optimal glow.
Add variety by mixing different metallic tones—combine gold with silver or copper with bronze for a layered effect. Incorporate sculptural elements like metallic wall art or textured panels with embossed patterns. You can also add small metallic fixtures or decorative hardware that ties into the overall aesthetic. Keep the look balanced; avoid overwhelming the space with too many shiny surfaces. Instead, let one or two key elements shine.
Metallic accents turn your bedroom into a luxe retreat that feels curated and polished. They work beautifully with both minimalist and maximalist decor, adding a layer of sophistication. When done right, metallics reflect your personality—bold, confident, and stylish. Ready to introduce some shimmer? Embrace metallic accents and watch your space transform effortlessly.
11. Textured Plaster or Lime Wash Finish for Subtle Sophistication
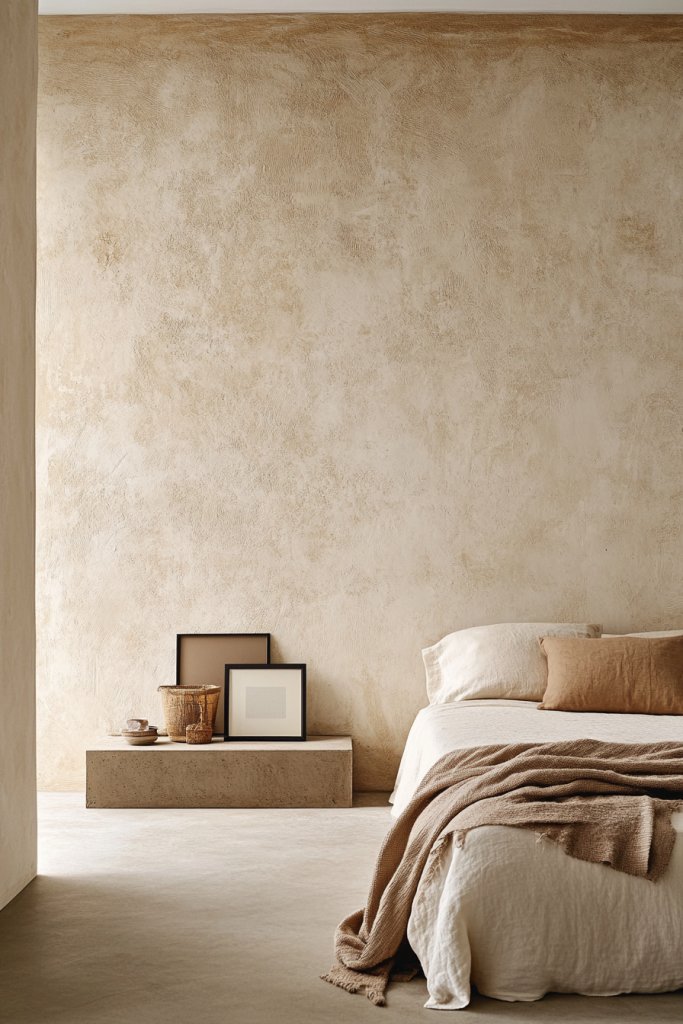
Tired of flat, boring walls that do nothing for your bedroom’s vibe? Textured plaster or lime wash finishes add depth and character, giving your wall an organic, timeless appeal. This look offers understated elegance without needing elaborate decor or artwork. If your space feels too sterile, this technique can warm things up while keeping things sophisticated.
Recommended Products to replicate this idea
| # | Preview | Product | |
|---|---|---|---|
| 1 |

|
Meoded Paint & Plaster | Golmex Concrete Look Plaster | Lime/Cement Based Plaster for Interior... | Check Latest Price |
| # | Preview | Product | |
|---|---|---|---|
| 1 |

|
Meoded Paint & Plaster | Lime Wash | Lime Paint | Natural Matte Finish | Interior & Exterior | Check Latest Price |
Picture a wall with a soft, matte surface—subtle ridges and variations in tone that catch the light differently throughout the day. Lime wash creates a gentle, mottled effect, reminiscent of old Mediterranean villas. The textured surface invites you to touch, adding sensory richness and visual depth. Its natural, imperfect finish complements rustic, bohemian, or modern decor, bringing a sense of history and authenticity into your space.
Choose between smooth lime wash for a more uniform look or more pronounced plaster textures for a dramatic effect. Color options are often earthy tones—creams, warm greys, or muted pastels—matching various decor styles. Seasonal updates can be achieved by changing the underlying color or applying a new layer of lime wash for a fresh appearance. This finish pairs well with organic textiles, wooden furniture, and vintage accents.
Begin by preparing the wall surface—clean, smooth, and repair any cracks. Mix lime wash or textured plaster according to product instructions. Apply with a trowel, sponge, or brush, creating varied textures and thicknesses. Layer the material to build depth, working quickly to blend edges. Use a sponge or cloth to soften or distress sections for a more natural look. Seal the finish with a breathable sealant if necessary, especially in humid environments. This technique requires patience but offers a unique, handcrafted appearance.
Play with color by layering different shades or adding subtle pigments to the plaster mix. Incorporate metallic or mica powders for a hint of shimmer within the texture. Complement with raw wood, linen fabrics, or antique fixtures that blend seamlessly with the organic aesthetic. Keep the surface matte or add a slight sheen for different effects. Personal touches like engraved patterns or stenciled borders can also add customized detail.
A textured plaster or lime wash wall gives your bedroom a peaceful, gallery-like quality—rich in texture but understated. It’s ideal for creating a cozy, welcoming retreat that feels both timeless and current. When you master this finish, it’s a true testament to your craftsmanship and eye for detail. Ready to bring warmth and depth? Embrace the textured finish and enjoy a wall that tells a story.
12. Creative Use of Faux Headboard as a Back Wall Feature
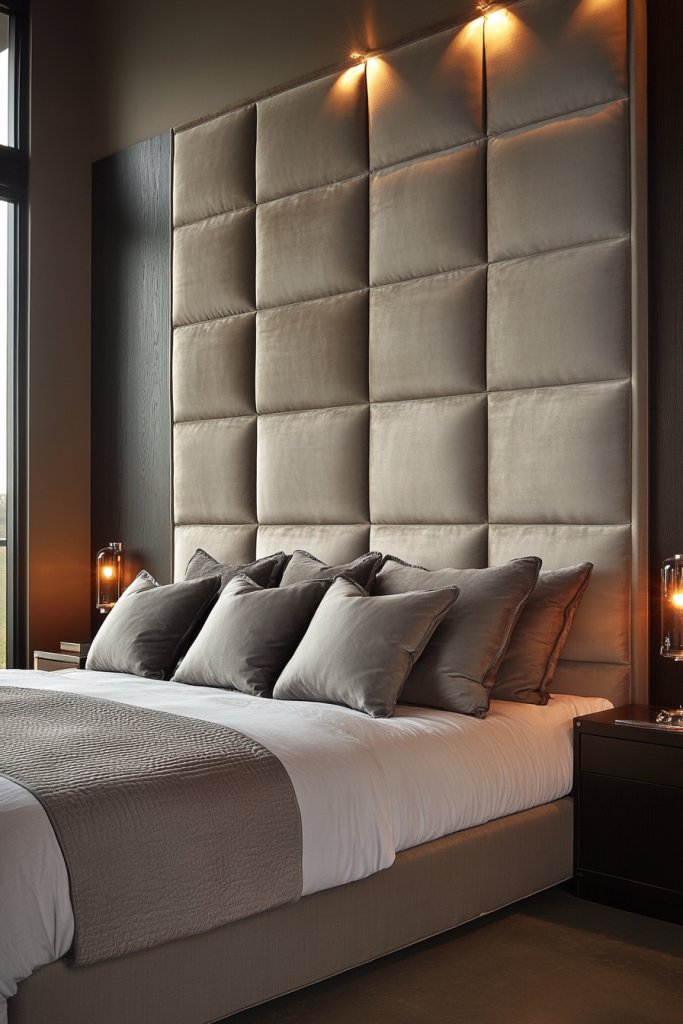
Ever wondered how to make your bedroom wall stand out without breaking the bank or risking a DIY disaster? Enter the faux headboard idea—a clever way to add personality and style directly to the back wall, transforming it from a plain surface into a statement piece. It’s perfect if you’re craving that cozy, bed-anchoring vibe but want to keep things flexible and non-permanent. Plus, it’s a fantastic way to hide any imperfections behind your bed or add a splash of texture and color—without the commitment of a full wall makeover.
Recommended Products to replicate this idea
| # | Preview | Product | |
|---|---|---|---|
| 1 |

|
Art3d Slat Wall Panels, WPC Soundproof 3D Wall Paneling for Interior Wall Decor, TV Background,... | Check Latest Price |
| # | Preview | Product | |
|---|---|---|---|
| 1 |
|
Art3d Smoothing Tool Kit for Applying Peel and Stick Wallpaper, Vinyl Backsplash Tile | Check Latest Price |
Imagine a wall covered in soft, upholstered panels that stretch across the entire width of your bed, giving the illusion of a giant headboard. Or picture decorative molding with layered paint or textured finishes that create depth and visual interest. The best part? You can customize the shape, size, and material to match your style, whether that’s modern minimal, vintage chic, or boho eclectic. It’s like giving your bedroom a little personality upgrade that feels intentional but isn’t a long-term commitment.
Styling this faux headboard offers loads of room for experimentation. Think about using plush textiles like velvet or boucle for a luxe look, or textured fabrics such as woven linen or faux fur for a cozy, inviting feel. You could also add decorative trims or contrasting piping to elevate the design further. And don’t shy away from playing with color—deep navy, rich emerald, or even a sleek matte black can completely change the mood of your space. The options are endless, so really, it’s all about matching your vibe.
When it comes to implementation, start by measuring your bed and sketching out your design. You can use easy-to-install materials like foam-backed fabric panels, decorative MDF, or even peel-and-stick wall tiles for quick results. The key is to keep it simple—use adhesive or light nails, depending on your wall type—and avoid overcomplicating the process. If you’re not super handy, there are plenty of tutorials online that walk you through step-by-step. Remember, the goal is a seamless, polished look, so take your time aligning panels and trimming edges.
Personalizing your faux headboard allows you to really put your stamp on the space. Add LED strip lighting behind the panels for a subtle glow, or incorporate decorative elements like metallic accents, embroidery, or even a few well-placed hooks for hanging lightweight accessories. You can also swap out covers seasonally or whenever your style evolves, making it a highly adaptable feature. It’s a clever way to keep your bedroom fresh without repainting or remodeling—saving you time, effort, and money.
Looking for some inspiration? Think of the dramatic effect a large padded panel in a jewel tone can create, or the charming appeal of a vintage-inspired molding design painted in a soft pastel. This approach is all about creating a focal point that’s both functional and artistic, giving your bedroom a cozy yet sophisticated vibe. The best part? With just a little effort and some creativity, you can craft a focal wall that feels uniquely yours—no furniture or artwork required. Ready to give your wall a personality boost? You’ve got this!
Conclusion
Designing the back wall of your bedroom isn’t just about decoration—it’s about shaping the visual heart of your space. A well-thought-out focal wall can add dimension, character, and mood, turning an ordinary room into a personal retreat that reflects your style. Whether you choose bold paint, textured panels, or an artistic display, the key is to ensure it harmonizes with the rest of your decor for a cohesive look.
The beauty of a statement back wall is its versatility—it can be as subtle or as daring as you wish, adapting easily to evolving tastes and trends. By taking inspiration from these twelve ideas, you can experiment confidently, knowing your bedroom’s backdrop will always set the perfect tone for rest, relaxation, and a touch of drama.
Last update on 2025-09-21 / Affiliate links / Images from Amazon Product Advertising API
Leave a Reply